Online Survey
The Goals for this Example
We wish to create an online survey. In addition, we want to require authentication. In this case, we
insist that the user supply a valid password in order to access the survey. We also want to see how to
insert the submitted data in a table in SQL Server. We examine how to use secure communications so
that the user's data is encrypted and the user can see a certificate that verifies the web server
is who it says it is. Finally, we wish to logout the user once the data is submitted.
The Overall Design
- Since this is a longer application than we have created before, it would be wise to create the
overall design first, before looking at the details of the implementation. Follow the links to
the screen shots to see how each page should look.
- Login page
- Here the user must supply a valid username and password.
- We will use required field validators to be sure that both a username and password are supplied.
- In addition, regular expression validators will be used to be certain that both the
username and password are the type of data we expect and are not longer than we expect.
- This is one way in which we defend against SQL injection attacks and other attacks in which
the user supplies bad data to try to get the application to do something that we did not
intend it to do.
- A custom validator will be used. Its ServerValidate procedure will look up the username
in a table in our SQL Server database, returning that user's password.
- A stored procedure will be used for this lookup, in part to add another defense against
SQL injection attacks.
- If the returned password matches that which the user submitted, so-called
forms authentication
will be used to grant access to the survey and the user will be redirected to the survey page.
- Any attempt to bypass the login page and go directly to the survey page will send the user
to the login page.
- The method of forms authentication will be explained further below.
- Survey page
- The survey page will ask the user to submit his/her job title and salary.
- Regular expression validators will again be used to be sure that the data is reasonable
before submitting it to the database.
- If the data is fine, then a stored procedure (for security again) will be used to insert
this data into the desired database table.
- If the data is inserted, the user is redirected to the success page.
- If the data is not inserted, perhaps because this user already submitted the survey data,
then the user is redirected to the failure page.
- We don't want a user to be able to submit survey data more than once. To enforce this
we will make the username field to be the primary key for the table that holds the user
data. Since a primary key field has to contain unique data and the data being submitted
will consist of the username, job title, and salary, the database will refuse to
insert more than one row of data for a given user.
- Success page
- This page tells the user that the data was recorded.
- This page also automatically logs the user out.
- Any further attempt to submit data sends the user back to the login page.
- Failure page
- This page tells the user that the data was not recorded.
- This could be due to a database problem or to a user who is trying to submit survey
data more than once.
- As with the success page, the user is automatically logged out.
|
Making the Web App
Make a New Web App
- As usual, make a new project of type Visual Basic Project and having template
ASP.NET Web Application. In the location box put in a reasonable location such as
one of the following:
- https://cis3.stvincent.edu/studentc/Survey
- http://cis2.stvincent.edu/studentc/Survey
- We assume from here on that the folder name is Survey.
- Change the name of the web form, WebForm1.aspx, to home.aspx. (Recall that you do
this in Solution Explorer. Right click on WebForm1.aspx, select Rename, and then fill
in the desired name. This will also automatically rename the accompanying code file.
- Save your work so far by using File, Save All.
|
Database Preparations in SQL Server
- We assume that you still have a logon for SQL Server and have access to the database
you used in the previous examples.
In our example here the name used for the database is Summer2003.
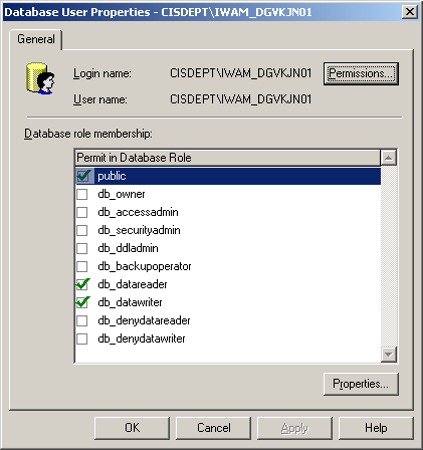
- Start SQL Server Enterprise Manager and find your particular database within it.
- Click on the User's icon.
- Right click the SQL or IWAM user (as needed for your server configuration) and select Properties.
If the needed user is not shown, right click on the User's icon and select New Database User.
Then use the drop down list to add the desired user (such as CISDEPT\SQL).
- After right clicking on the desired user and selecting Properties, check the db_datawriter role
so as to allow this user to write to your database.
This is what allows your web app to write to the database.
- Also check that the public and db_datareader roles are checked for this user.
- See this picture of the roles for the IWAM user
for how this should look.
- With some servers you may need to give the ASPNET user the same roles.
- As mentioned before, check with your database administrator to learn what roles and permissions
you need for which database users.
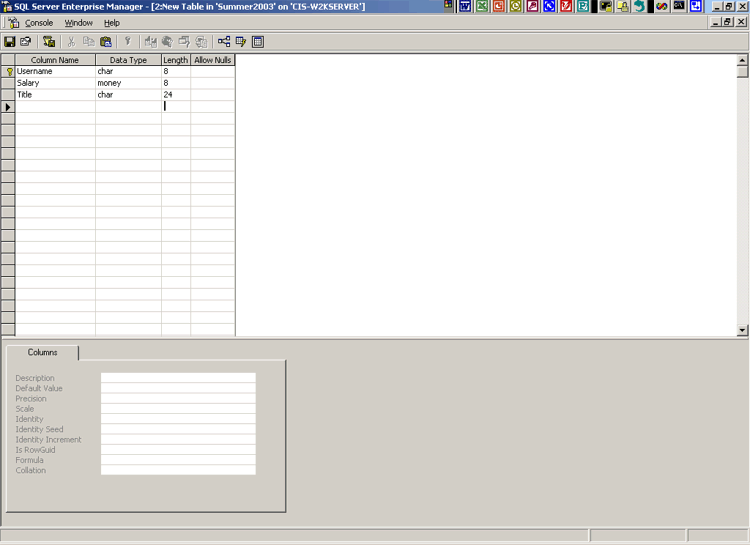
- Next, right click on the Tables icon and select New Table.
- Fill in the 3 fields as shown in this picture.
Use the types, lengths, etc. as shown. This data is also listed here for convenience:
|
| Column Name |
Data Type |
Length |
Allow Nulls |
| Username |
char |
8 |
no |
| Salary |
money |
8 |
no |
| Title |
char |
24 |
no |
- Right click at the front of the Username field and then click on the key button
in order to set this to be the primary key field.
- Close this window (the inner window, not the outer one for Enterprise
Manager). You will be asked to supply a name for this table. Call it SurveyData.
- We will not add data to this table now since that is what your web app will do.
- Instead, we make another new table. This one will hold the username and password for each user.
- Fill in the 2 fields shown below.
|
| Column Name |
Data Type |
Length |
Allow Nulls |
| Username |
char |
8 |
no |
| Password |
char |
8 |
no |
- Set the Username field to be the primary key field.
- Close the inner window. When asked for a name for the table, call it SurveyUsers.
- We do need to add data to this table.
- Right click on your SurveyUsers table and select Open Table, Return all rows.
- In the resulting window you can fill in data for this table.
Fill in several rows, where each username consists of alphabetic characters and is up
to 8 characters in length. The passwords for these should be exactly 8 characters in length,
with alphabetic characters, digits, underscore, +, and = as the list of valid characters.
(You can, of course, adjust this to suit your needs.)
- You might, for example, enter the following set of data. After doing so, just close
the inner window in SQL Server's Enterprise Manager.
|
| Username |
Password |
| smithc |
ATd83+ea |
| reyesj |
4mda_uT2 |
| robisonm |
Y=7tniw3 |
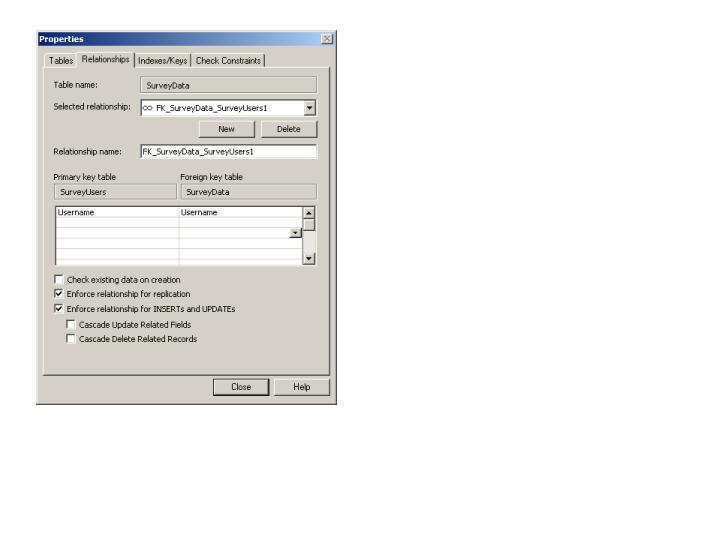
- While we are in SQL Server Enterprise Manager
we should set up a relationship between the
two tables to make sure that a user whose data is entered into the SurveyData table cannot
have his entry deleted from the SurveyUsers table. This is called referential integrity. It
is not particularly important in this case, but it can be very helpful in other cases in keeping
the data from being put into an inconsistent state.
- Right click on the SurveyData table and select Design Table.
- Click on the Relationships button at the top of the design window. (It is probably the third
button from the right.)
- Note that you get a Properties window and are placed under the Relationships tab.
- Click on the New button.
- The Foreign Key box will contain the table name SurveyData.
Click on the first white line beneath this to get the pull-down and then select Username.
- In the box labelled "Primary key table" select SurveyUsers.
- In the first white line below this, click to get the pull-down and then select Username.
- Here is a picture of the completed relationship.
- Click on the Close button.
- Then close the design window. You will be asked whether to save your changes. Say yes.
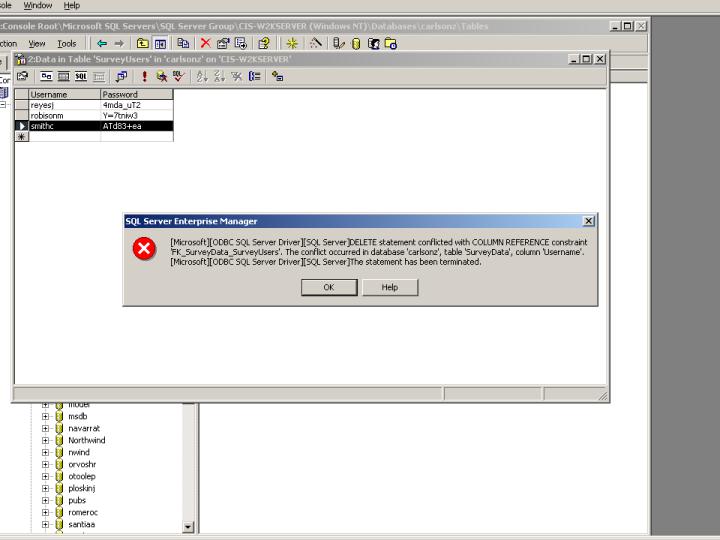
- To see what this relationship does for your database, manually add an entry for smithc to your
SurveyData table. Then right click on the SurveyUsers table and select Open Table, Return all rows.
Click on the grey border in front of smithc and press the Delete key to try to delete this entry.
Of course, you should not be allowed to do this, since smithc has related data in the other table.
See this picture of what you get when SQL Server refuses to do the deletion.
|
Creating home.aspx
- The basic idea is to make your home.aspx form look like this picture of
the completed web form.
- The 4 blue labels and the Login button are pretty obvious.
- Change the ID of the text box next to the label "Login name:" to NameBox.
- Change the ID of the text box next to the label "Password:" to PasswordBox.
- Also change the TextMode property for this PasswordBox to Password. This causes
this box to display asterisks when a user enters something into the box.
- The items that look like red labels are all validators except for the one that says
"Error in accessing database". That is an ordinary label. So, add that label and change
its ID to ErrorLabel. Also change the Visible field to false. Our code will make this
label visible if there is a database error.
- To the right of NameBox add a required field validator. Change its ID to
"NameRequiredFieldValidator" and fill in NameBox as the control to validate. Then fill in
"Must supply a login name" in the ErrorMessage field under Properties. This validator will
display its error message if the user fails to fill in a login name.
- Similarly, to the right of PasswordBox add a required field validator. Change its ID to
"PasswordRequiredFieldValidator" and fill in PasswordBox as the control to validate. Then fill in
"Must supply a password" in the ErrorMessage field.
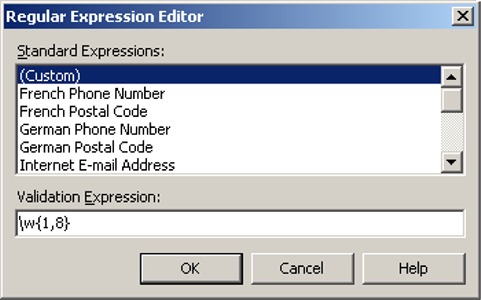
- To the right of NameRequiredFieldValidator add a regular expression validator. Change its ID to
something more meaningful if you wish and set NameBox as the control to validate. Fill in
"Invalid login name" in the ErrorMessage fields. We want this validator to display its message
if the login name supplied by the user is too long or contains a character that we want to disallow.
- To do this, click on the Validation Expression field and then click on the little button labeled
with 3 dots. This brings up the regular expression editor.
Put [a-zA-Z]{1,8} into the bottom field, the one labeled "Validation Expression" and click OK.
- This regular expression allows any letters of the alphabet, upper or lower case.
No other characters are allowed. In addition, the {1,8} specifies that
there must be anywhere from 1 to 8 of these
characters. Thus the login name cannot exceed 8 characters in length. This should
keep malicious users from causing problems by sending data of very long length to your application.
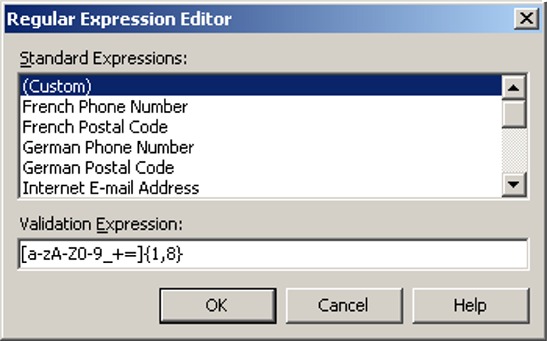
- To the right of PasswordRequiredFieldValidator add another regular expression validator. Change its
ID if you wish and set PasswordBox as the control to validate. Fill in
"Invalid password" in the ErrorMessage fields. We want this validator to display its message
if the password supplied by the user is too long or contains a prohibited character.
- To do this, click on the Validation Expression field and then click on the button
with 3 the dots. Put [a-zA-Z0-9_+=]{1,8} into the bottom field
of the regular expression editor, the field labeled "Validation Expression" and click OK.
- This regular expression allows lower case letters (a through z), upper case letters (A through Z),
digits (0 through 9), plus the underscore, plus sign, and equals sign. No other characters are
allowed. In addition, the {1,8} specifies that there must be anywhere from 1 to 8 of these
characters. Thus the password cannot exceed 8 characters in length.
- Security tip 1: It is important to check at the server end for invalid data or data that is too long.
Remember that an attacker has complete control of the client. VB .NET's validation controls do
run at the server end (even if the EnableClientScript property of each validator is True so as
to allow validation at the client end). The default seems to be that EnableClientScript is True,
so that the validation runs at both ends. In most cases this seems to be reasonable. However,
as you will see below,
on the server end you must be careful that the validation is done before
any critical code is run that processes the user's input.
- Security tip 2: If security is of high
importance, you would not want to report all of these helpful messages such as "Invalid login name"
and "Invalid password". Instead, you would want to use one generic message so as not to make it
any easier than necessary for an attacker to guess a correct username and password.
- Finally add a custom validator below the 2 text boxes.
- Change the ID of this validator to LoginCustomValidator and fill in PasswordBox as the control
to validate. Use "Login failed" in the ErrorMessage field. Our plan is to have this message
displayed if an incorrect password is submitted by the user. We will see how this is done later
when we write the code-behind file for this page.
- In Visual Studio do File, Save All.
|
The DataAdapter and Stored Procedure
- Add an SQLDataAdapter to the home.aspx web form.
- We will use this data adapter and its stored procedure to look up the correct password
for the login name supplied in NameBox.
- For this data adapter use the same connection as before, the one that allows
you to connect to your particular database.
- In the data adapter's wizard, make the selection to use a new stored procedure.
- Turn off Insert, Update, and Delete under Advanced Options since we do not need these.
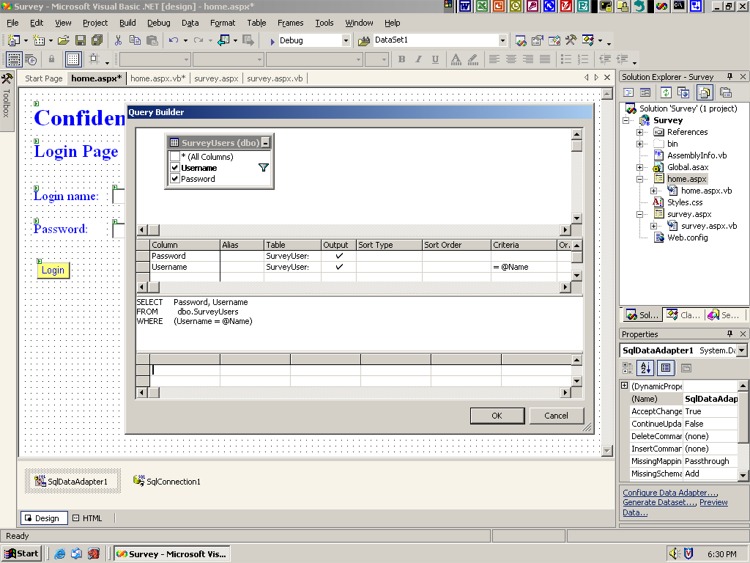
- Add the SurveyUsers table to the QueryBuilder grid.
- Select the check boxes for the Username and Password fields.
- In the Criteria column of the Username row, place
=@Name. This is to select
the row of data that has the username matching what is sent in via the @Name parameter.
- Note that the SQL in this QueryBuilder picture
(the section that begins with "SELECT Password, Username") says that it is selecting
first the Password field and then the Username. If yours is backwards, that is alright,
but you will need to remember this when we write the code-behind file.
- Name the stored procedure GetPassword.
- In SQL Server Enterprise Manager give the SQL or IWAM account Exec access to this stored procedure.
(Use whatever fits your server configuration.)
Right click on the stored procedure and then select Properties, Permissions.
- In the Properties window for your new data adapter, expand the SelectCommand field.
Replace what is in the CommandText field with yourid.GetPassword.
(Of course, fill in your user ID in place of yourid.) Say Yes and Yes to the questions asked.
Visual Studio with add square brackets to give as the entry in this CommandText field
yourid.[GetPassword].
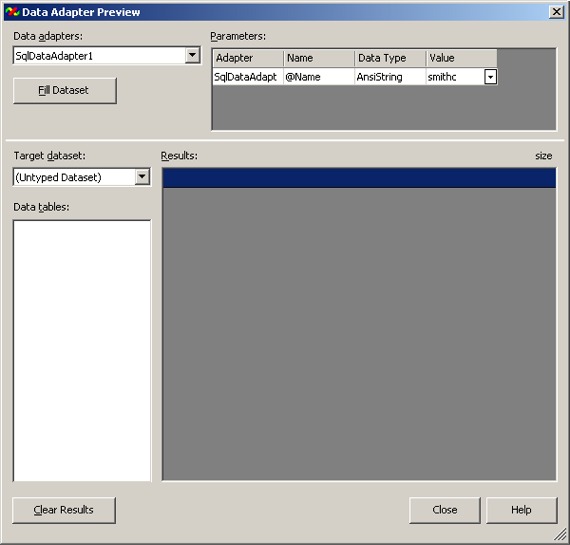
- In the Properties window for the data adapter, click on the Preview Data link.
In the Data Adapter Preview,
fill in one of the valid login names (such as smithc) found in your SurveyUsers table.
Then click on the Fill Dataset button and verify that
the preview returns the username and password as expected.
- In Visual Studio do File, Save All.
|
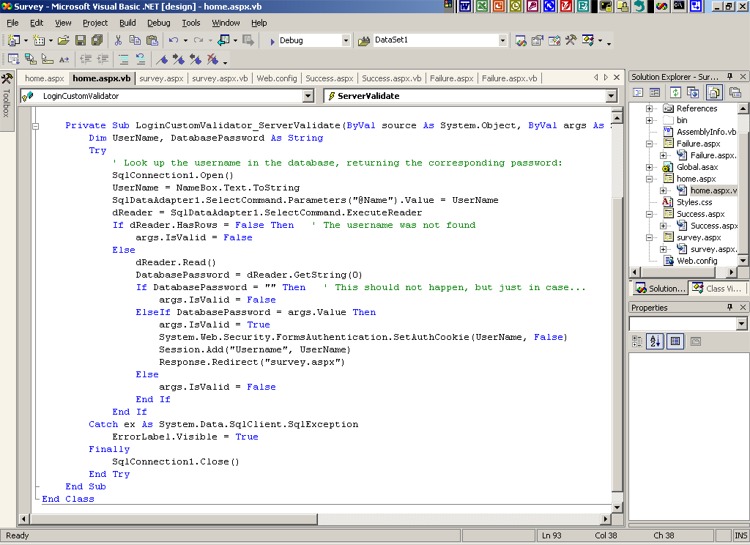
The home.aspx.vb Code-Behind File
- On the home.aspx web form, double click on LoginCustomValidator, the one whose message
reads "Login failed".
- This will take you to the code-behind file, to an outline of a procedure to handle the validation.
- The name of this procedure should be automatically set as LoginCustomValidator_ServerValidate.
- Click on the + to show the code inside of the "Web Form Designer Generated Code" region.
- Find the section of code that sets up your labels and other items as protected fields.
- Add the following line so that we have a data reader available:
Protected dReader As System.Data.SqlClient.SqlDataReader
- We do not need to write any code for the Page_Load procedure.
- However, we do need code for the LoginCustomValidator_ServerValidate procedure.
This procedure will be executed when the user clicks on the Login button, thus causing a postback.
- Insert the needed code so that it looks as follows:
|
Private Sub LoginCustomValidator_ServerValidate(ByVal source As System.Object, _
    ByVal args As System.Web.UI.WebControls.ServerValidateEventArgs) _
    Handles LoginCustomValidator.ServerValidate

    Dim UserName, DatabasePassword As String
    Try
        ' Look up the username in the database, returning the corresponding password:
        SqlConnection1.Open()
        UserName = NameBox.Text.ToString
        SqlDataAdapter1.SelectCommand.Parameters("@Name").Value = UserName
        dReader = SqlDataAdapter1.SelectCommand.ExecuteReader
        If dReader.HasRows = False Then   ' The username was not found
            args.IsValid = False
        Else
            dReader.Read()
            DatabasePassword = dReader.GetString(0)
            If DatabasePassword = "" Then   ' This should not happen, but just in case...
                args.IsValid = False
            ElseIf DatabasePassword = args.Value Then
                args.IsValid = True
                System.Web.Security.FormsAuthentication.SetAuthCookie(UserName, False)
                Session.Add("Username", UserName)
                Response.Redirect("survey.aspx")
            Else
                args.IsValid = False
            End If
        End If
    Catch ex As System.Data.SqlClient.SqlException
        ErrorLabel.Visible = True
    Finally
        SqlConnection1.Close()
    End Try
End Sub
|
- You can also look at this picture of the code in the editor
- The main idea is to look up the correct password for the given username and see if it matches
the password submitted by the user.
- The code begins by setting up a couple of String variables.
- Then we open our connection to the database in the usual way.
- Next, we get the username from the appropriate text box, the one with ID NameBox.
- This username is then filled in as the value of the @Name parameter to our stored procedure,
the one used by our data adapter.
- We then use a data reader, much like in the datareader example,
to hold the results from the select command performed by the stored procedure.
- Unlike the previous example, we expect only one row of data, not many. We should get
just the row for the specified username.
- Of course, if the user mistyped the login name, there might be no rows of data returned
by the stored procedure. We check for this by looking at the HasRows property of the data reader.
- If there was no data returned we set the result of this validation attempt to be false.
This is done by placing False into args.IsValid.
- On the other hand, if there is data, we read the line of data and then use GetString(0) to
extract the first item from this row of data. (If your stored procedure returns the Username
followed by the password, change this to GetString(1). The code above assumes that the password
comes before the username.)
- Although it should not occur, a check was made to see if the password returned is the empty
string. If so, False is the answer to the validation attempt.
- Otherwise, we check to see if the returned password matches the password submitted,
here passed in via the args parameter (in args.Value) since PasswordBox was the control to
validate.
- If these match, the user should be logged in. With FormsAuthentication this is done with a cookie
as seen in the line of code:
System.Web.Security.FormsAuthentication.SetAuthCookie(UserName, False)
- Note that the second parameter of false indicates that this cookie should not be stored
on the user's drive; it will exist only in main memory. This is exactly what we want for
granting temporary access to the other web pages of this application.
- More will be explained about FormsAuthentication below,
but for the moment, let's finish the code.
- If the passwords matched, we go on to store the string "Username" and the actual login name
as a pair in an HttpSessionState object, much like we have done before in the
Maintaining Session State example.
This is so that we won't have to ask the user again for the login name when we get to the survey page.
Instead, we will be able to easily look up the login name.
- Next, we redirect the user to the survey page.
- Of course, if the passwords do not match, we put False into args.IsValid to indicate that the
validation has failed. The custom validator on the web form will then display its error message.
- You might want to change the type of exception checked for in the Catch handler to plain
Exception, the base class for all exceptions, instead of using SqlException. That way any
exception will cause the error label to become visible. You might then also modify the message
shown on the error label to be a very generic error message.
- If you wish to read more about the use of a custom validator, use Help, Search in Visual Studio
to look for the topic "CustomValidator Class". Be sure to pick the item for the .NET Framework
Class Library.
- Save all of your files before going on.
|
FormsAuthentication
- We already discussed how SetAuthCookie is used to grant access
to the other pages of the application.
- The method of forms authentication requires some modifications to this Web.config file
in Visual Studio.
- Use Solution Explorer to open this file. If you know XML, you will recognize that this
is an XML file.
- Modify this file so as to use the changes shown below:
|
<authentication mode="Forms">
   <forms name="SurveyCookie"
      loginUrl="home.aspx" protection="Encryption" />
</authentication>

<authorization>
    <deny users="?" /> <!-- Deny all unauthenticated users -->
</authorization>
|
- Note that the comment sections that went with these settings are not shown here in order
to make things simpler to read.
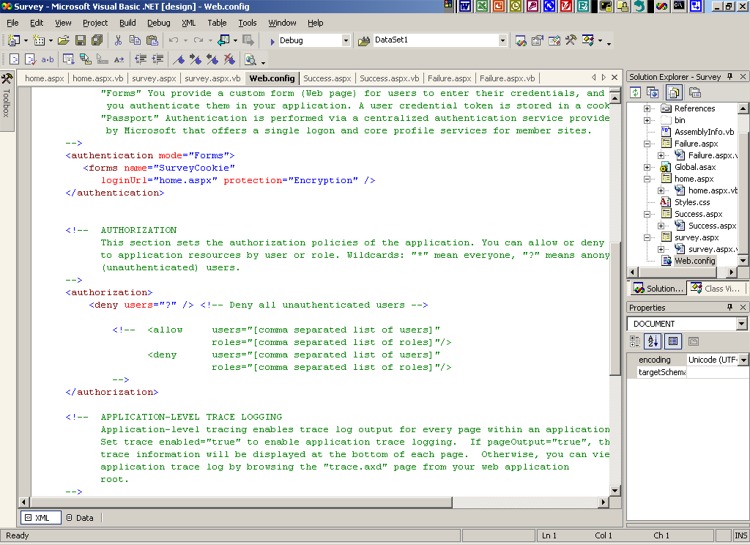
- Examine this picture of web.config to see how the
modified file looks in Visual Studio itself.
- Other sections of Web.config should remain as they were.
- Note that the authentication mode is set to "Forms". This is how we specify that
forms authentication is to be used.
- In addition, we specify the name of the cookie to be used for forms authentication.
- The loginUrl is the page to direct the user to if an attempt is made to go directly to
any other page of this application other than the login page. Of course, we make this
to be home.aspx, which is the login page! This is how we force the user to log in to get access.
- We set the protection item to "Encryption" to indicate that the cookie is to be encrypted and
thus resistant to tampering by a malicious user.
- The authorization section is set up to deny all users matching the ? wildcard. This means
all unauthenticated users, all users who have not logged in. These users will not be able
to reach any page in the application except for the login page, home.aspx.
- The authorization page can also be set to indicate who is allowed access. For example,
the following would allow everyone access (by using the * wildcard for all users).
This is the default setting.
<allow users="*" />
|
Creating the survey.aspx Web Form
- Add a new web form to your project. Recall that you can do this by right clicking on
your project in Solution Explorer and then selecting Add, Add Web Form.
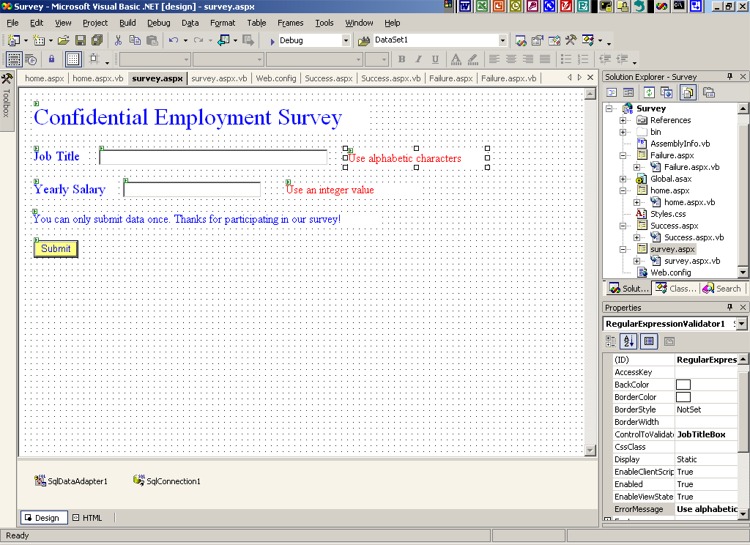
- The final result for this web form should look like this
picture of survey.aspx.
- The "Confidential Employment Survey" label can be copied from home.aspx.
- Add the other 3 blue labels and the 2 text boxes.
- Change the ID of the text box next to the label "Job Title" to JobTitleBox.
- Change the ID of the text box next to the label "Salary" to SalaryBox.
- Add the Submit button.
- The items that look like red labels are both regular expression validators.
- We use these to be sure that the data entered into the text boxes is reasonable.
- This is important both to assist the user and as a security measure to reduce the
possibility of attacks that work by sending bad data to the web application and/or database.
- To the right of JobTitleBox add the first regular expression validator. Change its ID if you wish.
Fill in JobTitleBox as the control to validate. Then fill in
"Use alphabetic characters" in the ErrorMessage field. We want this validator to display its message
if the job title supplied by the user is too long or contains a character that we want to disallow.
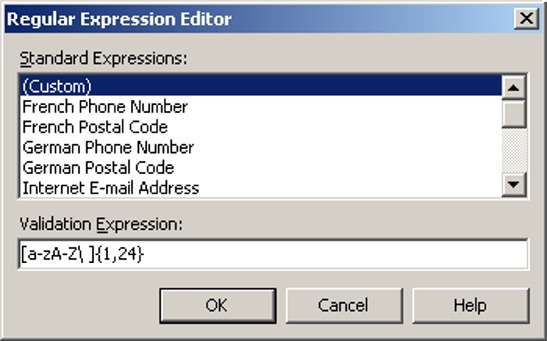
- To do this, click on the Validation Expression field and then click on the button labeled
with 3 dots. This brings up the regular expression editor.
Put [a-zA-Z\ ]{1,24} into the field labeled "Validation Expression" and click OK.
- This regular expression allows lower and upper case letters and spaces. (The \ followed by a
space indicates the space character.) The total length of the string must be anywhere from 1 to
24 characters. This means that an empty box will not be accepted. A string that is too long
will also be rejected. You can allow additional characters if you wish, though it is best not
to allow a lot of special symbols as they are sometimes the basis for certain kinds of attacks.
- To the right of SalaryBox add another regular expression validator. Change its
ID if you wish and set SalaryBox as the control to validate. Fill in
"Use an integer value" in the ErrorMessage field. We want this validator to display its message
if the salary supplied by the user is too long or contains a prohibited character.
- To do this, click on the Validation Expression field and then click on the button
with 3 the dots. Put [0-9,]{1,12} into the "Validation Expression" field of the
regular expression editor and click OK.
- By now you should be able to interpret this regular expression.
It allows digits (0 through 9), plus the comma (which might be used
between groups of 3 digits). No other characters are
allowed. In addition, the {1,12} specifies that there must be anywhere from 1 to 12 of these
characters. Thus the salary number cannot exceed 12 characters in length. Note that we did not
allow a decimal point, since whole numbers should be sufficient, nor did we allow a dollar sign.
- Save all of your files before proceeding further.
|
Another DataAdapter
- Add an SQLDataAdapter to the survey.aspx web form.
- We will use this data adapter and an associated stored procedure to insert the user's
job title and salary data into the SurveyData table.
- For this data adapter use the same connection as before.
- In the data adapter's wizard, make the selection to use a new stored procedure.
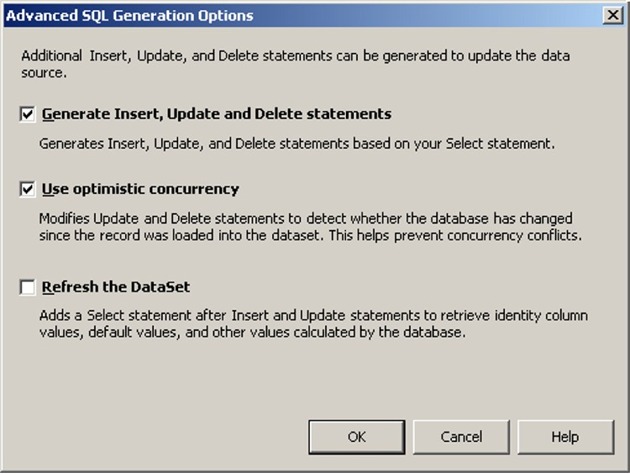
- This time, do not turn off Insert, Update, and Delete under Advanced Options
since we need to do an insertion.
- However, you can turn off the "Refresh the Dataset" option as shown in
this picture of the Advanced SQL Generation Options dialog box.
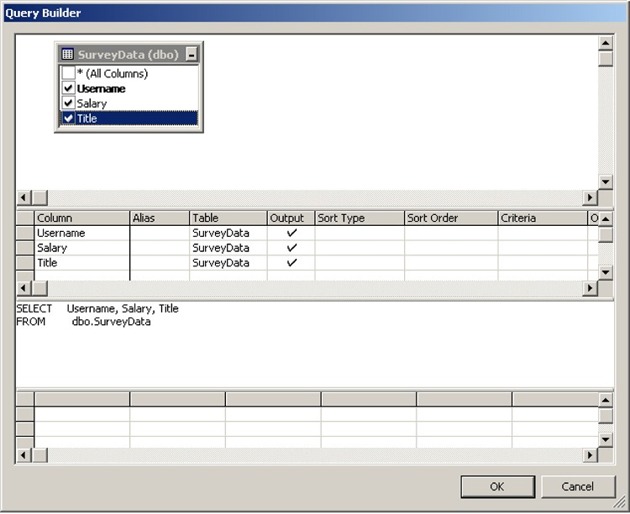
- Click on the QueryBuilder button and add the SurveyData table to the QueryBuilder grid.
- Select the check boxes for the Username, Salary, and Title fields.
- The SQL, as shown in this QueryBuilder picture,
looks like an ordinary SELECT statement to return the 3 fields for all rows of the SurveyData table.
- Yet, we will not use the select command in our code; instead we will use the insert command which
is automatically generated along with this select command.
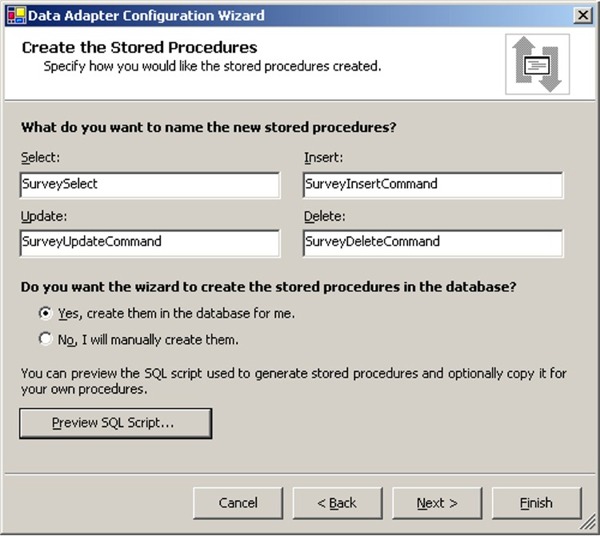
- This time we will be asked to give names to 4 stored procedures.
As in this picture of the naming dialog box, fill in
the names SurveySelect, SurveyInsertCommand, SurveyDeleteCommand, and SurveyUpdateCommand.
(You can actually use any reasonable names as long as you remember the name of your insert
command when you get to the code-behind file.)
- In SQL Server Enterprise Manager give the SQL or IWAM account Exec access to these stored procedures.
(Use whatever fits your situation.)
Right click on each stored procedure and then select Properties, Permissions.
- In the Properties window for your new data adapter, expand the SelectCommand field.
Replace what is in the CommandText field with yourid.SelectCommand.
(Of course, fill in your user ID in place of yourid.) Say Yes and Yes to the questions asked.
Visual Studio with add square brackets to give yourid.[SelectCommand] in this CommandText field.
- In a similar way, adjust the CommandText field for InsertCommand, DeleteCommand, and UpdateCommand.
(We could probably get away with just doing the InsertCommand as this is the only one that
we intend to use.)
- If you want to test your data adapter, you could go to SQL Server Enterprise Manager and add a
couple of lines of data to the SurveyData table. Close the window where you add the data.
Then in Visual Studio, go to the
Properties window for the data adapter and click on the Preview Data link.
Click on the Fill Dataset button and verify that the returned data shows all of the rows from
the SurveyData table. In other words, the preview ran the select command for you. Thus it does
not actually test the insert command, but it checks the regular select command and so can give you
some confidence that the related insert command will work when used later in your code.
Then in Enterprise Manager delete the rows of data that you temporarily put in the SurveyData table.
- In Visual Studio save all of your files.
|
The survey.aspx.vb Code-Behind File
- Use Solution Explorer to open the survey.aspx.vb file.
- Add the following code to the Page_Load procedure:
|
Private Sub Page_Load(ByVal sender As System.Object, ByVal e As System.EventArgs) _
    Handles MyBase.Load

    'Put user code to initialize the page here
    Dim UserName As String

    If IsPostBack Then
        Page.Validate() ' Call all of the validators on this page.
        If Page.IsValid Then
            Try
                UserName = Session("Username")
                ' Could add a test to be sure that UserName has a value.
                ' Insert new row of data into the SurveyData table.
                SqlConnection1.Open()
                SqlDataAdapter1.InsertCommand.Parameters("@Username").Value = UserName
                SqlDataAdapter1.InsertCommand.Parameters("@Salary").Value =
				CInt(SalaryBox.Text.ToString)
                SqlDataAdapter1.InsertCommand.Parameters("@Title").Value = JobTitleBox.Text
                SqlDataAdapter1.InsertCommand.ExecuteNonQuery()
            Catch ex As System.Data.SqlClient.SqlException
                Response.Redirect("Failure.aspx")
            Catch ex As Exception   ' catch any other exception
                Response.Redirect("Failure.aspx")
            Finally
                SqlConnection1.Close()
            End Try
            Response.Redirect("Success.aspx")
        End If
    End If
|
- The main goal here is to insert the user's data into the SurveyData table.
- We do this when there is a postback (due to the user clicking the Submit button on the
survey.aspx web form).
- However, we first need to be sure that we have reasonable data. To do this, we call Page.Validate()
as it causes all of this page's validators to run (at the server end). Then we can check the
page's IsValid property to see if everything is OK. If so, we go ahead and process the user's data.
If not, we do nothing. The validator(s) on the page that detected a problem with the user data
will display their text on the current page.
- Note that the validators normally run at the server after the Page_Load is done, but before any
click handlers execute. Thus an alternative design would be to put our If IsValid
code into a click handler for the submit button and have no code inside Page_Load. The explicit
call to Page.Validate() should then not be needed. Experiment with this if you like.
- From here on let's assume that the user data validated as being reasonable.
- First the value associated with the "Username" string is looked up in the HttpSessionState
object. This is how we avoid making the user enter the username a second time.
- Note that this UserName is put into the Value field for the @Username parameter to
the stored procedure that carries out the insert command.
- Then we get the data from SalaryBox. However, since we get it in string form, we have to
convert it to a number. One way to do this is with the CInt function as shown. This function
takes its parameter, a string, and returns the corresponding integer.
- This integer salary is used as the value for the @Salary parameter to the same stored procedure.
- Then the @Title parameter to the stored procedure is given the value taken from the text box
for the job title.
- The ExecuteNonQuery routine is used in order to execute the insert command stored procedure.
- If things work alright, we redirect the user to the success page. Otherwise, we redirect
the user to the failure page. (Of course, we have not yet created these 2 pages.)
- The most likely reasons that we would redirect to the failure page are that the application
could not open the connection to the database or that the insertion failed (perhaps because there
already is data in the SurveyData table for this user).
- Notice that if an SqlException is not detected we go on to check to see if there is any
exception whatsoever (as type Exception matches with any exception). This is just in case
anything else might go wrong in the code in our Try block.
- Since both Catch handlers execute the same code and the second one matches with all exceptions,
the first Catch handler is redundant and could be removed. It is left in the code only in
case we might want to modify things later so that different code is run for these 2 Catch handlers.
- Save all of your files again.
|
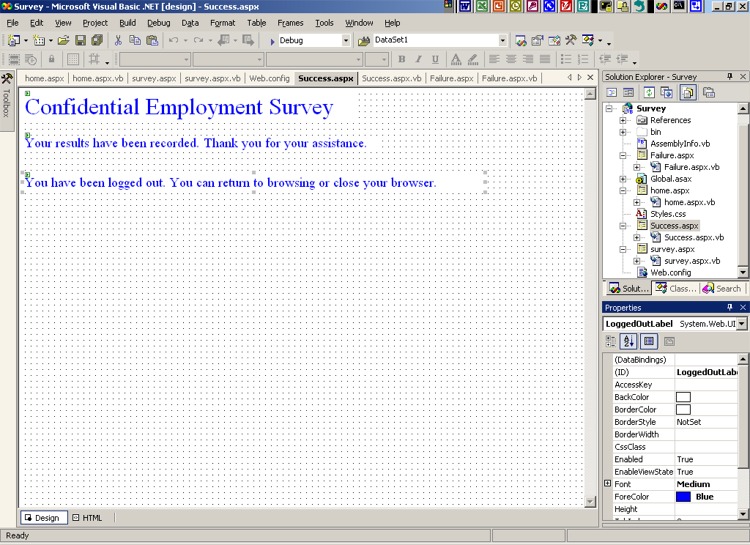
The success.aspx Web Form and Code-Behind File
- Much like before, add a new web form to your project. Name it success.aspx.
- The purpose of this page is to tell the user that the data was recorded and to log the user out.
- Use this picture of success.aspx as a guide.
- As you can see, it simply contains 3 labels.
- The first label can be copied from one of the previous 2 web forms.
- Add the other labels as well.
- Add the following code to the success.aspx.vb code-behind file:
|
Private Sub Page_Load(ByVal sender As System.Object, ByVal e As System.EventArgs) _
    Handles MyBase.Load

    'Put user code to initialize the page here
    If Not IsPostBack Then
        System.Web.Security.FormsAuthentication.SignOut()   ' log the user out
    End If
End Sub
|
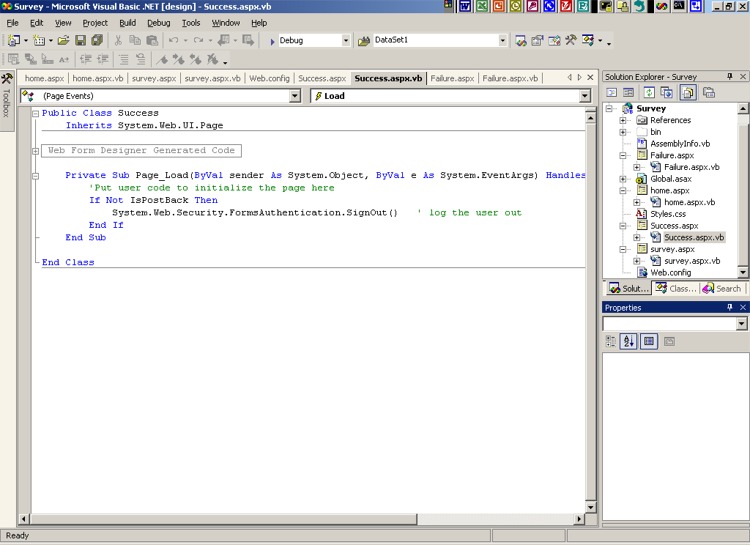
- You can also refer to this picture of the code in the editor.
- Note that all the code does is to call the SignOut function when this page is first reached
(that is, when a postback has not occurred).
- There is no sense in trying to log out again if a postback happens.
- Save all of your files.
|
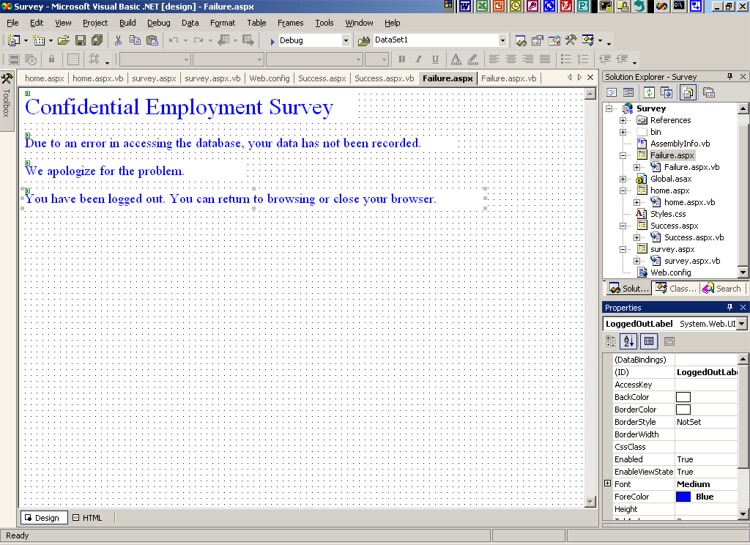
The failure.aspx Web Form and Code-Behind File
- Add another web form to your project. Name it failure.aspx.
- This page tells the user that there was some error which prevented the recording of
the survey data. It also logs the user out.
- You can use this picture of failure.aspx as a guide.
- Add the 4 labels. These are the only items on the form.
- Add the following code to the failure.aspx.vb code-behind file:
|
Private Sub Page_Load(ByVal sender As System.Object, ByVal e As System.EventArgs) _
    Handles MyBase.Load

    'Put user code to initialize the page here
    If Not IsPostBack Then
        System.Web.Security.FormsAuthentication.SignOut()   ' log the user out
    End If
End Sub
|
- The code is identical to that used in the success.aspx.vb code-behind file.
- The SignOut function is used in order to log out the user.
- Save all of your files in Visual Studio.
|
Testing Your Web Application
- Build your project in the usual manner.
- Fix any errors that are noted and then do build again.
- View your new web app in a browser. The URL would be similar to one of the following:
- http://cis3.stvincent.edu/studentc/Survey/home.aspx
- http://cis2.stvincent.edu/studentc/Survey/home.aspx
- Test your application with normal data. That is, try to login with a username and
password from your SurveyUsers table. Assuming that this works, fill in a job title
and salary and see if submitting this data results in the data being correctly inserted
into the SurveyData table. (Remember that in SQL Server Enterprise Manager you can
see a table's data by right clicking on it and then selecting Open Table, Return all rows.)
- We assume that the SurveyData table will be viewed in Enterprise Manager or by writing another
application to view or process the data.
- Next, try to log in again as the same user that just successfully submitted some data.
You should be able to log in, but the application should give you the failure page when
you try to submit data. (This is because the database refuses to allow 2 entries with
the same username, as the username field is the primary key for the SurveyData table.)
- Then after successfully logging in and submitting some survey data, use the back button
to go back to the survey page and click Submit again. The application should send you to
the login page as you were automatically logged out after successfully submitting your data.
Thus you cannot submit the same data more than once.
- Try various combinations of invalid usernames and passwords at the login page to be sure that
the validators are working correctly.
- Also try invalid data on the survey page, such as a job title with numbers in it or a salary
value that is too long. This will check out that page's validators.
- Note that you might get somewhat different behaviors depending on the user's browser, the browser's
security setting (such as whether it will run client-side script), and whether you have the
EnableClientScript property set to True for the validators (which it seems to be by default).
If client-side script is not used, then you might see a delay before an error message appears
due to the round-trip to the server to process the user's bad input.
|
Using the Secure Web Server
- Additional security can be provided by using the secure web server.
- This will require the assistance of your web server administrator.
- Ask this person to require secure access to the web pages in this application:
home.aspx, survey.aspx, success.aspx, and failure.aspx.
- Although this must be done by the web server administrator, for completeness, here are the
steps needed:
- In Internet Services Manager, navigate to the appropriate web server.
- Expand the folder for the particular user.
- Then expand the folder for the Survey project.
- Right click on one of the web files, such as home.aspx.
- Select Properties and click on the File Security tab.
- In the Secure communications section, click on the Edit button.
- Check the box labeled "Require secure communications (SSL)" and then click OK and OK.
- Do the same for the other 3 web pages.
- This requires the use of SSL to encrypt any data flowing between the user's browser and the
web server. In addition, it allows the user to view and accept the server's certificate.
- This certificate's purpose is to verify that this server is the web server it purports to be.
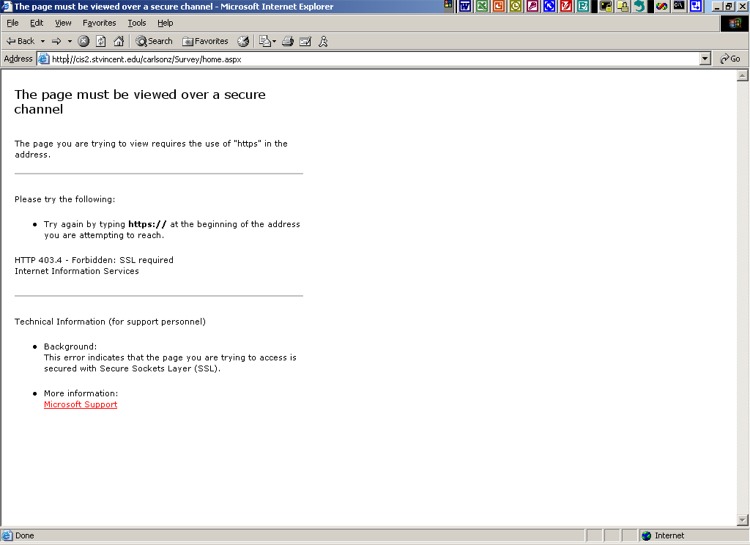
- Now if you try to view your web app using the usual URL, such as:
http://cis3.stvincent.edu/studentc/Survey/home.aspx
you get an error message saying that you must use SSL. Here is a picture of the
error message produced by Internet Explorer.
- To access your web app you must now use https instead of http at the start of the URL, like this:
https://cis3.stvincent.edu/studentc/Survey/home.aspx
- The use of https gives you both encryption of data and access to the web server's certificate.
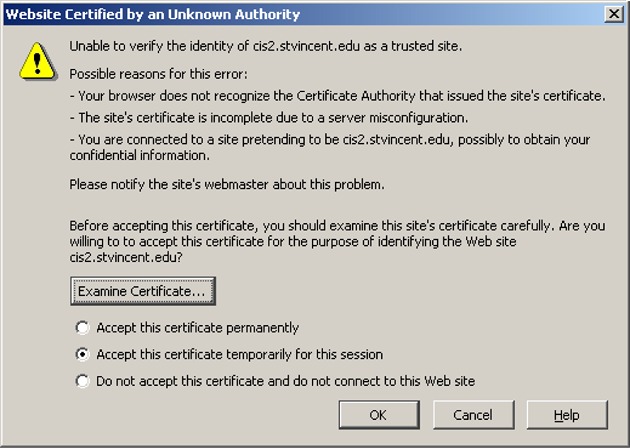
- Normally this certificate would be signed by a recognized certificate authority. If not, or if the
certificate has expired, your browser should warn you. When using our own certificate (not one
signed by a certificate authority), we got this
warning when using Mozilla, for example.
A properly signed certificate indicates to the user that this web server is the web server it
says that it is. Otherwise, the user has no guarantee about the identity of this server.
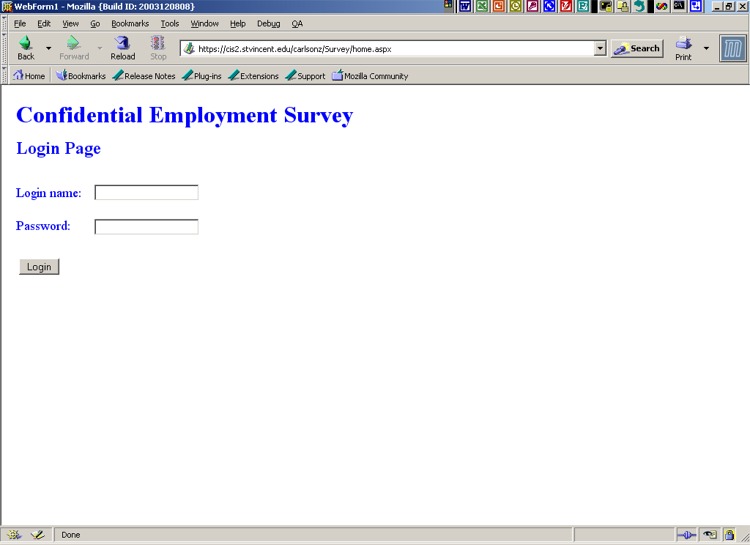
- If we accept this certificate, the browser then displays the
login page for our application.
Note that the URL begins with https and that there is a padlock icon in the lower right corner
of the browser. The user can click on this padlock in order to examine the server's certificate.
|
Summary
- This web application does a lot more than our previous examples.
- It illustrates many useful features, such as how to password-protect a web application using
a login/logout process and how to insert data into a table from within a web app. We also
examined the use of secure communications (encryption of data and the web server certificate).
- Note that we only learned to use one particular method of authenticating users. There are
a number of other methods available.
- Although real-world web apps are often much more complex, this example begins to show
some of the functionality needed in these larger applications, such as e-commerce applications.
- Suggestion: Now that you know how a web app can both get data from a database and write data
to one, develop a guestbook web application that allows users to submit data and view previous
submissions. Be careful to validate the user data for the sake of security. (Otherwise your
web application is likely to be vulnerable to cross-site scripting attacks in which a user
submits a malicious script instead of the expected type of guestbook data. That script can
then run on a victim user's computer when the victim views the guestbook entries.)
|
|

 Search CIS Site
Tutorials
Search CIS Site
Tutorials