A DataReader Example
The Goals for this Example
The main goal for this example is to learn how to use a DataReader. It gives us a simple way
to read through data from a database but does not allow us to write to the database. The values read
in this way are placed in a drop-down list from which the user can select. We also learn how
to add an "all items" entry to this list.
Making the Modified Web App
What the App Should Do
- We take the web app that used HttpSessionState,
and rewrite it so that it allows the user to select auto parts based on the type (category)
in addition to the price range as used before.
- The various types of parts are read from the SQL Server database by using a DataReader.
- These types are then displayed in a drop-down list from which the user can choose.
- In addition, this example shows how to add an item to the list for "All Types"
in case the user does not wish to narrow the search to a particular type.
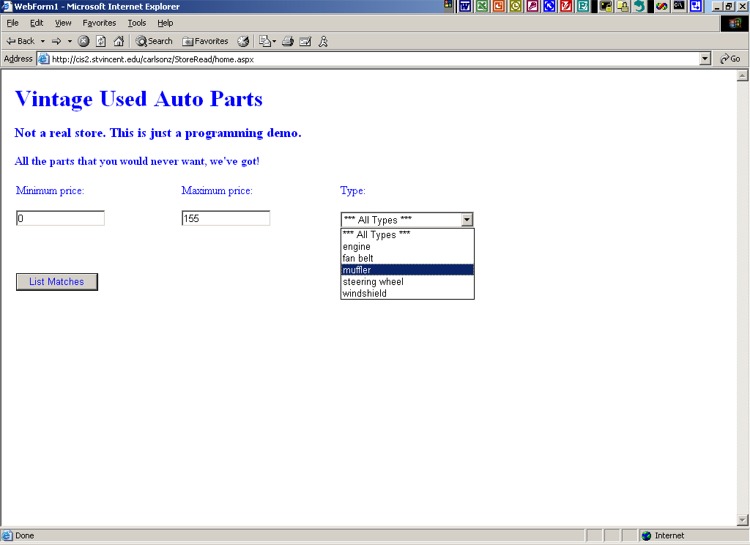
- The user selects the desired price range and type of product as shown in this
picture of the home page.
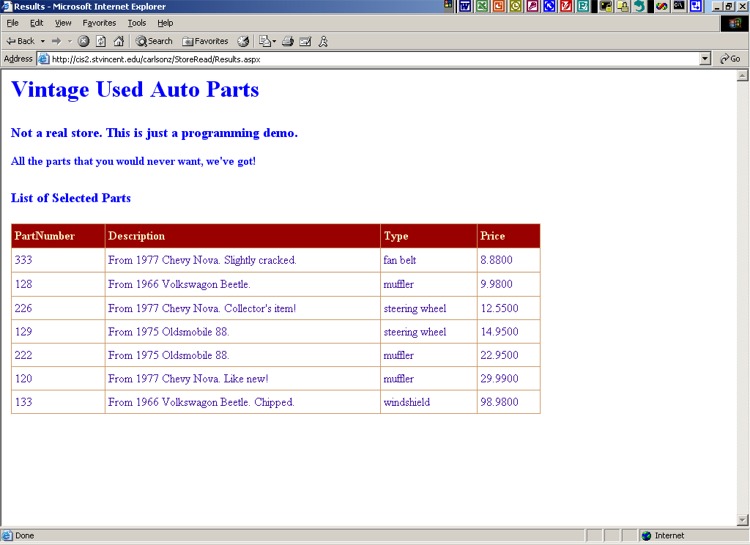
- When the completed web app is used to select the price range 0 to 155 and all types,
this is the resulting page of results.
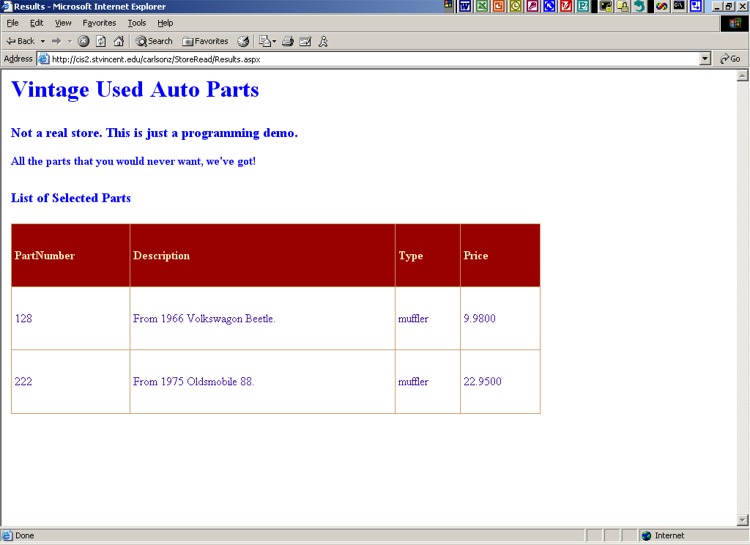
- Similarly, this picture of the results page
shows the matching data when the user selects a price range of 0 to 29 and a type of muffler.
|
Copying the Old Web App
- Have Visual Studio produce a copy of the web app that used HttpSessionState.
- Recall that you do this by opening this old project and then using Project, Copy Project.
- Be sure to check the box to copy all files for this project.
- Use an appropriate URL as the place for this new project. For example, use something like
one of the following examples:
- https://cis3.stvincent.edu/studentc/StoreRead
- http://cis2.stvincent.edu/studentc/StoreRead
- Then close the old project and open the new one by using File, Open, Project From Web.
- Once you have the new project open in Visual Studio, go to the Solution Explorer and change
the name of the project to StoreRead.
- Save your work so far by using File, Save All.
|
Making the First Round of Changes
- Move the "List Matches" button so that it is below the other items on the home.aspx web form.
- Drag a drop-down list onto this form from the Web Forms section of the Toolbox. Place it
to the right of the boxes for the minimum price and maximum price.
- Change the ID of this drop-down list to TypeList.
- Place a label above this drop-down list and set its Text field to "Type:".
- Change the ID of the error label for displaying "Error in accessing the database" to
ErrorTypeLabel.
- Click on the web form itself, not on anything that has been placed onto the form, and then go to
the Properties window.
- Set the enableViewState field to true (if it is not true already).
- This way, after the postback happens when the user clicks the button,
the data will still be available.
- Note that setting enableViewState to true for the form
also sets enableViewState to true for all of the controls on the form.
- This allows data in our controls (the text boxes and drop-down list, including the item
selected by the user) to remain after the postback happens.
- As you will see below in the code that goes with this
web form, we need this data to still be present so that we can save it in a session state
object that will be available for use in the Results.aspx web form.
- If you do not need data to persist like this, you can set enableViewState to false and avoid
the extra overhead associated with maintaining view state.
- Do File, Save All to save what you have thus far.
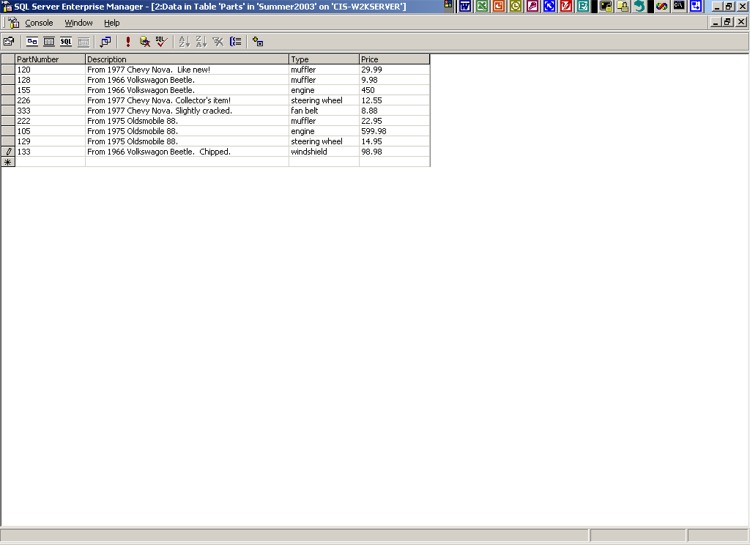
- In SQL Server Enterprise Manager add some new data to the same Parts database that we have
used in the previous examples. We do this so that we can have more interesting
queries of the database. It is suggested that you add data so that the table's contents
looks like this picture of the Parts table.
- For convenience, here is the same data in case you want to copy it from this web page:
|
| PartNumber |
Description |
Type |
Price |
| 105 |
From 1975 Oldsmobile 88. |
engine |
599.98 |
| 120 |
From 1977 Chevy Nova. Like new! |
muffler |
29.99 |
| 128 |
From 1966 Volkswagon Beetle. |
muffler |
9.98 |
| 129 |
From 1975 Oldsmobile 88. |
steering wheel |
14.95 |
| 133 |
From 1966 Volkswagon Beetle. Chipped. |
windshield |
98.98 |
| 155 |
From 1966 Volkswagon Beetle. |
engine |
450 |
| 222 |
From 1975 Oldsmobile 88. |
muffler |
22.95 |
| 226 |
From 1977 Chevy Nova. Collector's item! |
steering wheel |
12.55 |
| 333 |
From 1977 Chevy Nova. Slightly cracked. |
fan belt |
8.88 |
- Recall that you add new data in Enterprise Manager by right clicking on the Parts table and then
selecting Open Table, Return all rows. Then just type new rows of data.
- Simply close the window showing the rows of data when you are finished entering data.
|
Adding a New DataAdapter
- In Visual Studio, add an SQLDataAdapter to the home.aspx web form.
- This is in addition to the data adapter already on the results.aspx page.
We will use this new data adapter to populate the drop-down list with the names of the types
of parts that the user can select. The old data adapter is used to display the results
of the search.
- For the new data adapter use the same connection as before, the one that allows
you to connect to your particular database.
- In the data adapter's wizard, make the selection to use a new stored procedure.
- Turn off Insert, Update, and Delete under Advanced Options.
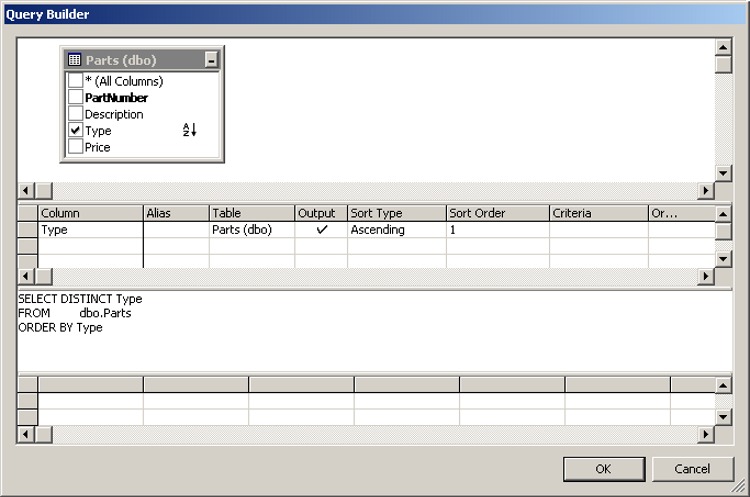
- Add the Parts table to the QueryBuilder grid.
- Select the check box for the Type field. This indicates that we want the values for the Type
field returned by our stored procedure.
- Click in this row under Sort Type and choose Ascending. We might as well have our
list of types in alphabetical order!
- Refer to this picture of QueryBuilder to see what
you should have at this point.
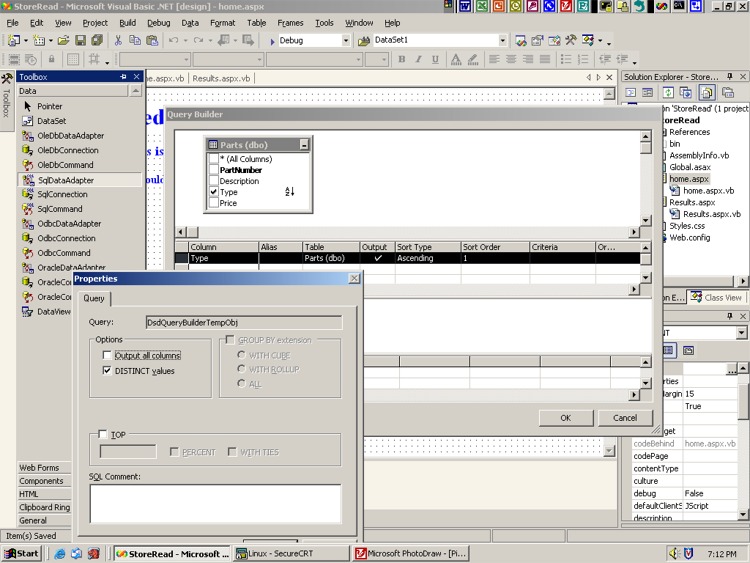
- Right click at the front of this field, select Properties, and choose Distinct values.
See this picture showing the Properties window.
- Click Close and OK.
- Name the stored procedure SelectByType.
- In SQL Server Enterprise Manager give the SQL or IWAM account Exec access to this stored procedure,
as needed. (Recall that this is one place where server configurations can differ.)
Right click on the stored procedure and then select Properties, Permissions.
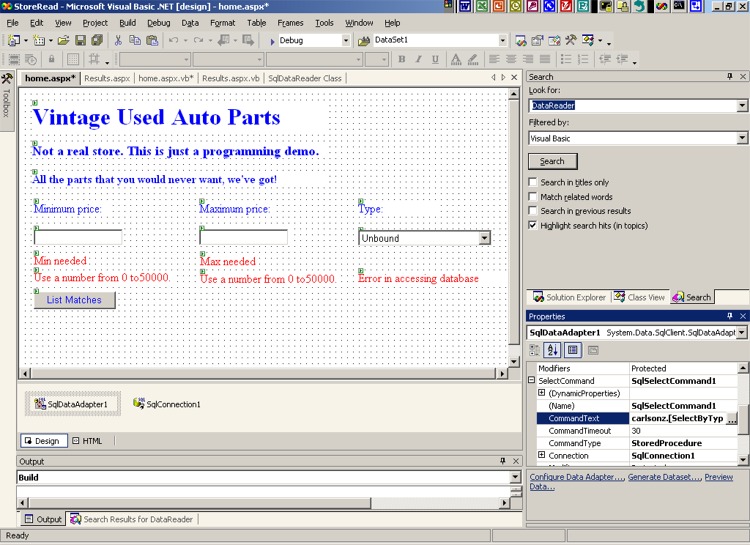
- Go back to Visual Studio. In the Properties window for your new data adapter,
expand the SelectCommand field.
Replace what is in the CommandText field with yourid.SelectByType.
(Of course, fill in your user ID in place of yourid.) Say Yes and Yes.
Visual Studio with add square brackets to give yourid.[SelectByType] in this CommandText field.
- Refer to this picture of the situation to see how this appears.
- In the Properties window for the new data adapter, click on the Preview Data link.
Click on the "Fill Dataset" button and verify that the preview returns the expected data.
Then close this window.
- In Visual Studio do File, Save All.
|
Adjusting the Code in home.aspx.vb
- In the home.aspx.vb code-behind file, click on the + to show the code inside of the
"Web Form Designer Generated Code" region.
- Find the section of code that sets up your labels and other items as protected fields.
- Add the following line so that we have a data reader available:
Protected dReader As System.Data.SqlClient.SqlDataReader
- Rewrite the Page_Load procedure so that it looks as follows:
|
Private Sub Page_Load(ByVal sender As System.Object, ByVal e As System.EventArgs) _
    Handles MyBase.Load

    'Put user code to initialize the page here
    Dim Min, Max As String

    If Not IsPostBack Then
        Try
            TypeList.Items.Add("*** All Types ***")
            SqlConnection1.Open()
            dReader = SqlDataAdapter1.SelectCommand.ExecuteReader
            While (dReader.Read())
                TypeList.Items.Add(dReader.GetString(0))
            End While
        Catch exception As System.Data.SqlClient.SqlException
            ErrorTypeLabel.Visible = True
        Catch exception As Exception
            ErrorTypeLabel.Visible = True
        Finally
            SqlConnection1.Close()
        End Try
    Else   ' Postback case:
        Page.Validate()
        If Page.IsValid Then
            Min = MinTextBox.Text.ToString()
            Max = MaxTextBox.Text.ToString()
            Session.Add("MinKey", Min)
            Session.Add("MaxKey", Max)
            Session.Add("TypeSelected", TypeList.SelectedItem.Text)
            Response.Redirect("Results.aspx")
        End If
    End If
End Sub
|
- In the code, note that if this is the first time this page is being loaded (that is, there is
no postback), we first add "*** All Types ***" as an item in the drop-down list.
You will see later how we handle the case when the user selects this item.
- Then we open our connection to the database and execute our stored procedure (via the SelectCommand).
- The while loop shows how to read through the data returned by the stored procedure and add
each string to the drop-down list of types.
- Note that GetString(0) gives us the first field from the row of data returned by our stored procedure.
In our case there was only 1 column, 1 field, the type field in the returned row of data, but in
other situations your stored procedure may return several fields. Choose the one(s) you want
by using an index of 0, 1, 2, etc.
- The rest of the code in the case where there is no postback
is as we have used before.
- In the else section we handle the case when we do have a postback.
A postback happens if the user clicks the button on the form.
- It is here that we would not have any data in our text boxes and drop-down list if we had
failed above to set enableViewState to true for the home.aspx web form.
The data would have been gone after the postback happened.
- The code here is much like we have used before. After validation, we extract the values that the user
placed in the text boxes, store these values (really as key/value pairs) in an HttpSessionState object,
and then redirect to the results page.
- Save all of your files before going on.
|
Adjusting Results.aspx
- Go to the Results.aspx form and click the data adapter.
- Then click the link labeled Configure Data Adapter. This is because we need to change the
details of the query that is run to retrieve our results.
- Select the option Create New Stored Procedure.
- Turn off the Insert, Update, Delete option under Advanced Options.
- As before, use Query Builder.
- Add the Parts table to the query builder screen.
- Put a check next to each of the 4 fields so that all 4 will be returned.
- Click on the field in the Sort Type column and the Price row. Use the pulldown to select Ascending.
This specifies that the results will be sorted in ascending order by price.
- Next we need to select the data that fits the correct range. Go to the field in the Criteria column,
Price row and enter
<=@Max.
(Recall that @Max indicates a parameter to the stored procedure. Our
condition selects items in the table with price less than or equal to this parameter's value.)
- Click in the column labelled Column, one row beneath that Price row. Use the pulldown to select Price.
Go to the field in the Criteria column, the same row and enter
>=@Min.
(This ANDs in a second condition to select items from the table with price greater or
equal to the parameter's value.)
- Check that all the rows except the last Price row have a check in the Output column.
This specifies what fields of the table will be returned as output from the stored procedure.
- Type in
=@PartType as the condition for the Type field.
That is, place this condition in the box for the Type row, Criteria column.
- See this picture of QueryBuilder to see what you should
have at this point.
- Click OK.
- Name your stored procedure SelectByTypeAndRange.
- In SQL Server Enterprise Manager give the SQL or IWAM account Exec access to this stored procedure.
(Use the settings needed for your particular server configuration.)
As before, right click on the stored procedure and then select Properties, Permissions.
- In the Properties window for your new data adapter, expand the SelectCommand field.
Replace what is in the CommandText field with yourid.SelectByTypeAndRange.
(Of course, fill in your user ID in place of yourid.) Say Yes and Yes.
Visual Studio with add square brackets to give yourid.[SelectByTypeAndRange] in this CommandText field.
- In the Properties window for the data adapter, click on the Preview Data link.
Fill in an appropriate type and price range for the parameters and verify that
the preview returns data as expected.
- Add a second data adapter to results.aspx. We need this because we
need a different query of the database table for the case when the user selected
"*** All Types *** in the drop-down list.
- Just have this data adapter use the existing SelectByRange stored procedure, the one that we
used in the StoreInput project.
- In the Properties window for the new data adapter, expand SelectCommand. Replace what is in the
CommandText field with yourid.SelectByRange. (As usual fill in your actual user ID.)
Respond Yes and Yes to the questions.
- Save all of your files before continuing with the next section.
|
Adjusting the Code in Results.aspx.vb
- In the Results.aspx.vb code-behind file, click on the + to show the code inside of the
"Web Form Designer Generated Code" region and verify that you still have the following
line present to give you a data table:
Protected dTable As New DataTable
- Rewrite the Page_Load procedure so that it looks as follows:
|
Private Sub Page_Load(ByVal sender As System.Object, ByVal e As System.EventArgs) _
    Handles MyBase.Load

    'Put user code to initialize the page here
    Dim Min, Max, Type As String

    NoDataLabel.Visible = False
    DataGrid1.Visible = True

    If Not IsPostBack Then
        If Session.Count = 0 Then   ' No session items were supplied.
            NoDataLabel.Visible = True
            DataGrid1.Visible = False
        Else
            Min = Session("MinKey")
            Max = Session("MaxKey")
            Type = Session("TypeSelected")
            Try
                SqlConnection1.Open()
                If (Type.Equals("*** All Types ***")) Then
                    SqlDataAdapter2.SelectCommand.Parameters("@Min").Value = Min
                    SqlDataAdapter2.SelectCommand.Parameters("@Max").Value = Max
                    SqlDataAdapter2.Fill(dTable)
                Else
                    SqlDataAdapter1.SelectCommand.Parameters("@Min").Value = Min
                    SqlDataAdapter1.SelectCommand.Parameters("@Max").Value = Max
                    SqlDataAdapter1.SelectCommand.Parameters("@PartType").Value = Type
                    SqlDataAdapter1.Fill(dTable)
                End If
                If dTable.Rows.Count = 0 Then
                    NoDataLabel.Visible = True
                    DataGrid1.Visible = False
                Else
                    DataView1 = New DataView(dTable)
                    DataGrid1.DataBind()
                End If
            Catch exception As System.Data.SqlClient.SqlException
                ErrorLabel.Visible = True
            Catch exception As Exception
                ErrorLabel.Visible = True
            Finally
                SqlConnection1.Close()
            End Try
        End If
    End If
End Sub
|
- Note that the above code only displays data when there is no postback. If a postback happens
there is no need to change what is on the page.
- If there is no session data (which is where we placed the price range and parts type information)
then we cannot possibly do a lookup. We just display an error message.
- Otherwise, we look up the session data and open the connection to the database table.
- Then we check to see if the parts type that was selected was "*** All Types ***" or not.
- In the first case, we use the second data adapter, the one that calls upon the
SelectByRange stored procedure. We simply fill in the values for the 2 parameters
and then fill our data table with the results that the stored procedure returns.
- Similarly, in the second case, we use the first data adapter, the one that calls upon the
SelectByTypeAndRange stored procedure. We fill in the values for the 3 parameters to the
stored procedure and place the results returned by the stored procedure into our data table.
- If the count of the number of rows of data returned (in either of the 2 cases) is zero,
then we simply display an error message.
- Otherwise, we display our data in the data grid as we have done in several of the previous web apps.
- Checking for exceptions and closing the database connection are also done as before.
|
Testing Your Web Application
- Save all of your files and build the project, as usual.
- View your new web app in a browser. The URL would be similar to one of these examples:
- http://cis3.stvincent.edu/studentc/StoreRead/home.aspx
- http://cis2.stvincent.edu/studentc/StoreRead/home.aspx
- Test the various ways in which the user can select data to be sure that the application
works in all cases. In particular, try both selecting a particular type of parts and selecting
all parts, as those cases use different stored procedures.
|
|

 Search CIS Site
Tutorials
Search CIS Site
Tutorials