A Web App with Text Boxes and Buttons
The Goals for this Example
One goal is to see how to use buttons and text boxes in a web app. Another is to construct a web
app that does some easy calculations.
Creating the Example
Since this example builds upon our previous simple web app for
Pizza Paradise, you can copy the previous project, just add on to the previous project, or
create the old project all over again. Here are the directions for copying the project.
Note that we again use the same 2 examples of where to store the project
that we used in the previous example. Exactly what to use for this depends on how your server is
configured. If in doubt contact your web server administrator or instructor.
Copying a Web Project
- To open the old Pizza Paradise project in Visual Studio, start by using File, Open, Project from Web.
- Enter the URL where your project(s) reside. Here are our usual 2 examples:
- https://cis3.stvincent.edu/studentc
- http://cis2.stvincent.edu/studentc
- In the resulting Open Project dialog, select the folder containing your project. It will be
named Pizza if you used the names suggested in the previous example.
- In the next window open the project file for this project. If you used the suggested names
it will be called Pizza.vbproj.
- Enter your password if prompted for it.
- Once the old project has been opened, make a copy of it by using Project, Copy Project.
- Adjust the destination folder as desired, perhaps to something like that shown in these examples:
- https://cis3.stvincent.edu/studentc/Calculate
- http://cis2.stvincent.edu/studentc/Calculate
- We assume throughout that the web access method is FrontPage extensions.
- You can choose how much to copy. The safest method is "All files in the source project folder".
This would include your image files, for example.
- Use File, Close solution to close the original Pizza project.
- Then use File, Open, Project From Web to open the new Calculate project. (Use a URL similar
to those above. Then select the Calculate folder and double click the appropriate .vbproj
project file.)
- If the previous step fails to show you the newly-created project folder, try exiting totally from
Visual Studio and then restarting it. Then do File, Open, Project From Web, etc.
- Now you should have the new copy of the project open in Visual Studio.
|
Minor Adjustments
- If necessary, use View, Properties Window and then View, Solution Explorer so that these 2 items
are available.
- In Solution Explorer make sure that all files are shown. (Click on the "Show All Files" button
until you get this.)
- If the web form isn't on the screen, open it by double clicking Pizza.aspx (or whatever you
named your web form file) in Solution Explorer.
- Be sure that this web form is open in Design View, not HTML view. (See the tabs at the bottom
of the screen.)
- Move the pizza image to the upper right corner of the form.
- Resize it if need be so that it fits reasonably.
This is done by clicking on the image and then grabbing with the mouse one of the 4 resizing handles
(found at the corners of the image) and then moving it.
- We wish to remove the hyperlink. Just click on the hyperlink on the web form and press the delete key.
- If need be, use View, Toolbox so that you can use the Toolbox. (If your Toolbox is minimized to a
tab docked on the side, you can probably just mouse over the tab to get the Toolbox to display.
Note that you can click on the pushpin in the corner of the Toolbox to toggle it between minimized
view and "always open" view.)
- Drag a label from the Web Forms section of the Toolbox and place the label below the items
already on the form.
- Use Properties to adjust the text of this label to "Calculate the total cost of your order:", change
the color to blue, and use a large font.
|
Adding Labels, Text Boxes, and Buttons
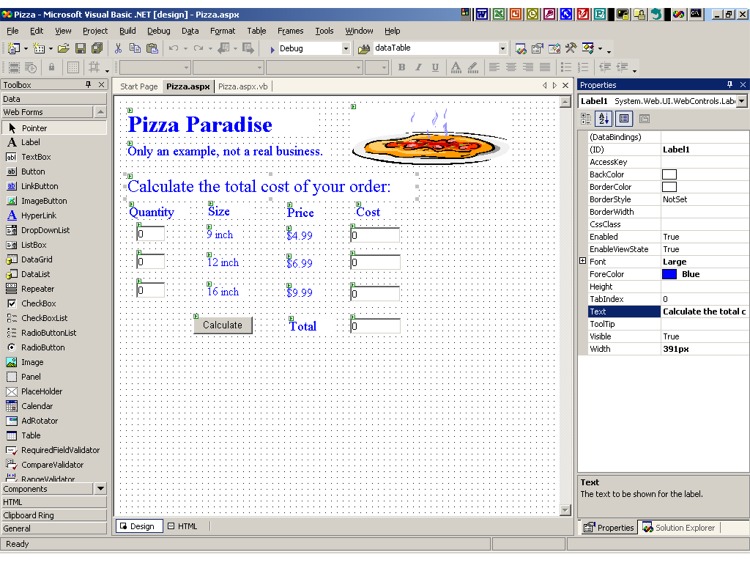
- Start by viewing an image of what we intend to create, showing
the labels, text boxes, and a button that we wish to add to the form.
- Then add the labels, with the text and blue color as shown. Note that those in the first new
row have medium font size, while those in-between have small font size.
- Hint: once you have created one label. You can right click on it, select copy, right click on the
form, and select paste in order to make a copy of the label. You can then adjust the properties,
position, etc. for the new label. This is especially useful if a number of properties (such as color)
are to remain the same.
- For each text box needed, drag a text box from the Web Forms section of the Toolbox to your web form.
- Resize the text boxes as desired.
- Remember that you can align a group of labels, text boxes, etc. by "rubber banding" them with
the mouse and then using Format, Align. Then choose the type of alignment that you want.
- Under Properties, change the IDs of the three text boxes below the Quantity label to
Quantity9TextBox, Quantity12TextBox, and Quantity16TextBox. This makes it easier to tell
what text box refers to what data, especially when we write some code later to calculate
the cost of a pizza order based on the quantities that the user places in these boxes.
- Similarly, change the IDs of the text boxes under the Cost label to
Cost9TextBox, Cost12TextBox, Cost16TextBox, and TotalTextBox.
- Since it makes no sense to have the user change a value in any of these last 4 text boxes,
change the ReadOnly property of each to true.
- Make the text field for each text box to be 0 since 0 makes sense as the default value.
- Drag a button from the Web Forms section of the Toolbox to your form, change its ID to
CalculateButton, and its text to "Calculate".
- Save your work so far by using File, Save All. (If you are prompted to save a .sln Solution File,
do so. Save it in a convenient location where you will remember not to delete it.)
|
Adding Click Handler Code
- Double click the Calculate button on your form. This will take you to an editor where
you can add the code that should be executed when a user clicks on the Calculate button.
- Note that the name of the sub procedure for your code will be CalculateButton_Click
and that this will be located in a file named Pizza.aspx.vb. (A sub procedure is essentially
a function that returns nothing in the function name.)
- Add your code so that the procedure looks exactly like the following:
|
Private Sub CalculateButton_Click(ByVal sender As System.Object, _
    ByVal e As System.EventArgs) Handles CalculateButton.Click

    Dim Cost9, Cost12, Cost16, TotalCost As Decimal
    Cost9 = Convert.ToDecimal(Quantity9TextBox.Text) * 4.99
    Cost9TextBox.Text = Cost9.ToString
    Cost12 = Convert.ToDecimal(Quantity12TextBox.Text) * 6.99
    Cost12TextBox.Text = Cost12.ToString
    Cost16 = Convert.ToDecimal(Quantity16TextBox.Text) * 9.99
    Cost16TextBox.Text = Cost16.ToString
    TotalCost = Cost9 + Cost12 + Cost16
    TotalTextBox.Text = TotalCost.ToString
End Sub
|
- Look at the picture of the editor to see this code in
the Visual Studio editor.
- Note that the
Dim line declares some variables that are local to this procedure.
Quantity9TextBox.Text is the notation for looking up the value that the user
placed in this particular text box.- The
Convert.ToDecimal function is used to change this string value into a decimal.
- The
* 4.99, of course, multiplies by the unit price of 4.99.
- It would, of course, be better to set up constants for the unit price values, but we do not
go into those details here. (If you are interested, look up how to use const to declare a constant.)
- The
ToString function is used to convert the decimal cost value into a string.
- The
Cost9TextBox.Text = statement is used to place the resulting string into the
indicated text box.
|
Build Your App
- Click on the Save All button in Visual Studio or use File, Save All.
- Then use Build, Build Pizza (or whatever you named your application).
- If the build succeeded, the Output window will give you a message to that effect.
- If not, take a look to see if you can tell what went wrong.
- You can close the Output window to get it out of your way.
|
Testing and Debugging The App
- Look at your web app by going to the appropriate URL in your browser. For example, the URL might be
something like one of the following:
- http://cis3.stvincent.edu/studentc/Calculate/Pizza.aspx
- http://cis2.stvincent.edu/studentc/Calculate/Pizza.aspx
As always, make the obvious adaptations for your server, etc. Note, too, that https is not
needed for viewing the completed app.
- Put some numbers in the text boxes and click that Calculate button to see if your app
produces the desired costs and total cost for a pizza order.
- If the app does not produce the desired results, check your code and IDs for the text boxes
carefully to see that they match what was given above.
- If the app does not run, even though the build succeeded above, it will probably give you a
very general (and not very helpful) error message. You can probably get a more detailed error
message by doing the following:
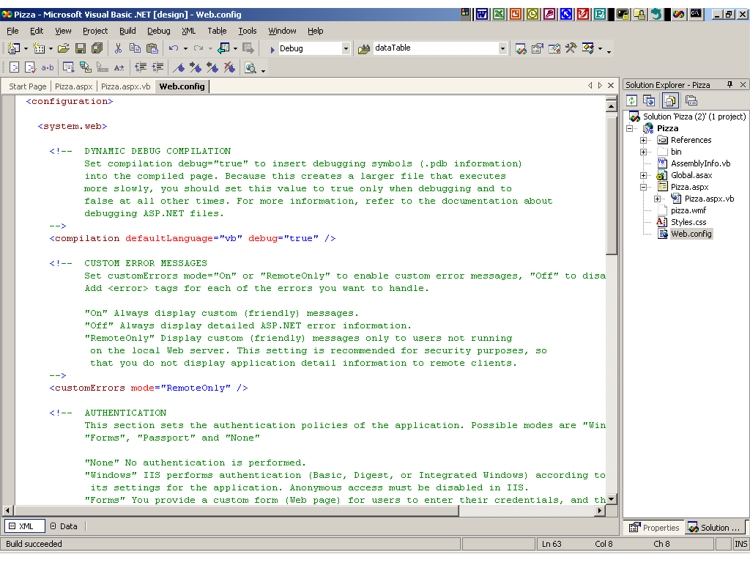
- In Solution Explorer double click on the Web.config file.
- Here is a picture of Web.config in Visual Studio.
- Find the section that says
customErrors mode="RemoteOnly""
and replace RemoteOnly by Off.
Save all and rebuild your app. In your browser you should
then get a more detailed error message for your run-time application error.
- You can also get trace output by finding the line that begins with
trace enabled="false" requestLimit="10"
            pageOutput="false"
and changing those 2 false entries to true.
Save all and rebuild your app. Then refresh your app in your browser to see
what you get.
- When finished with debugging, undo all of your changes to Web.config, save everything,
and rebuild your app. This will leave your app in a more secure state. If a runtime
error crops up later, you don't want everyone on the Internet to be able to read the
error messages and trace the output.
|
|

 Search CIS Site
Tutorials
Search CIS Site
Tutorials