Ecommerce App: Software 1
The Goals for this Example
This example outlines the creation of a simple ecommerce app for selling software online via download.
Master pages and content pages are used as are many of our previous items such as Entity Framework, LINQ, and validators.
Getting Started
Preliminaries
- Thus we wish to create a website for selling software that uses a master page
to give the name of the business and navigation controls at the top, content in the middle, and name, address, and
copyright at the bottom.
- You can best see what it looks like and how it works by trying the
actual web app.
Note that the web app uses a somewhat improved look compared to that in the picture in the previous bullet.
- Begin by making a new web site named Software1 in Visual Studio.
- In Server Explorer, open your web.config file and add your webapp connection string, as created in
this prior example.
This is the connection string that allows you to connect to the database using SQL Server authentication. That is,
it passes the username and password to log into SQL Server over the network so as to make the connection.
If need be, copy in that connection string. Also copy, if not already present,
the connection string for logging into SQL Server using Windows authentication with your Windows account.
You would need that if you want to use Server Explorer in Visual Studio to access your database.
- Add an App_Code folder as you will need it later.
- After reading the beginning of chapter 16 in our text, Professional ASP.NET 4.5 in C# and VB, add a master page
to the web site. Check the box for placing the code in a separate file, but do not check the other box below it.
- Also, use Add, Add New Item, Web Form to add to your web site ordinary web forms named Default.aspx, Contact.aspx,
Privacy.aspx, Search.aspx, Products.aspx, and Results.aspx. For each of these pages, be sure to check the box that says
"Select master page". After you click on the Add button, you will then be able to select the master page that you
started above. You will add to these pages later.
- Save the following images in your website folder. You may wish to substitute other images or add additional ones.
|
The Master Page
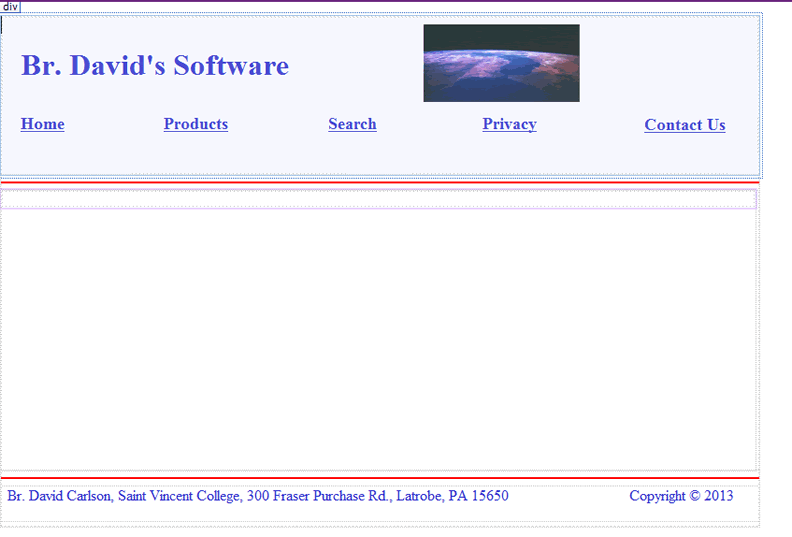
- Adjust your master page to contain the items shown in this image of the running app
in the top section and in the bottom section. The middle (or content) section will be filled in with a separate content page.
- You can also look at this image of the completed Master page as shown in Design view.
- Note that the top section goes down to and includes the horizontal rule, which you can get from the HTML section of the
Toolbox.
- Similarly, the bottom section goes from the very bottom up to and including the lower horizontal rule.
- It can be difficult to get these items arranged reasonably. Try a mixture of Design view and Source view. Perhaps putting the
top and bottom sections in separate div's might help.
- It is suggested that you change the name of the company to something of your choosing. Make sure it appears in the title of the
head section and as an extra large label at the top of the master page.
- You may want to use 5 buttons for navigation instead of the 5 hyperlinks.
- Note that you encode the apostrophe as ' and the copyright symbol as ©.
- You can also see in the box below how I set up my particular master page. Only the head and body sections are shown.
|
<head runat="server">
<title>Br. David's Software</title>
<asp:ContentPlaceHolder id="head" runat="server">
</asp:ContentPlaceHolder>
</head>
<body style="height: 540px; width: 811px;">
<form id="form1" runat="server">
<div style="height: 170px; top: 5px">
<asp:Label ID="Label1" runat="server" Text="Br. David&apos;s Software" Font-Bold="True"
Font-Size="X-Large" ForeColor="#3333CC"
style="z-index: 1; left: 31px; top: 49px; position: absolute"></asp:Label>
<asp:Image ID="Image1" runat="server" Height="80px" ImageUrl="~/earth3.gif"
style="z-index: 1; left: 291px; top: 24px; position: absolute" Width="167px" />
<asp:HyperLink ID="HyperLink1" runat="server"
style="z-index: 1; left: 31px; top: 120px; position: absolute; height: 19px;"
ForeColor="#3333CC">Home</asp:HyperLink>
<asp:HyperLink ID="HyperLink2" runat="server"
style="z-index: 1; left: 184px; top: 120px; position: absolute"
ForeColor="#3333CC">Products</asp:HyperLink>
<asp:HyperLink ID="HyperLink3" runat="server"
style="z-index: 1; left: 360px; top: 120px; position: absolute; right: 581px;"
ForeColor="#3333CC">Search</asp:HyperLink>
<asp:HyperLink ID="HyperLink4" runat="server"
style="z-index: 1; left: 698px; top: 121px; position: absolute"
ForeColor="#3333CC">Contact Us</asp:HyperLink>
<asp:HyperLink ID="HyperLink5" runat="server"
style="z-index: 1; top: 120px; position: absolute; left: 525px"
ForeColor="#3333CC">Privacy</asp:HyperLink>
</div>
<div>
<hr />
</div>
<div style="height: 300px; width: 807px;">
<asp:ContentPlaceHolder id="ContentPlaceHolder1" runat="server">
</asp:ContentPlaceHolder>
</div>
<div style="height: 60px">
<hr />
<asp:Label ID="Label2" runat="server"
Text="Br. David Carlson, Saint Vincent College, 300 Fraser Purchase Rd., Latrobe, PA 15650"
style="z-index: 1; left: 17px; top: 518px; position: absolute" ForeColor="#3333CC"></asp:Label>
<asp:Label ID="Label3" runat="server" Text="Copyright © 2013"
style="z-index: 1; left: 682px; top: 518px; position: absolute" ForeColor="#3333CC"></asp:Label>
</div>
</form>
</body>
|
- You might prefer the following version of the master page. Once again, only the head and body sections are shown.
- The horizontal rules were set to a red color, the font size was increased, and some of the positioning was modified.
- Note that the NavigateUrl property of each hyperlink has been filled in so that clicking on the link will take the
user to the appropriate page.
|
<head runat="server">
<title>Br. David's Software</title>
<asp:ContentPlaceHolder id="head" runat="server">
</asp:ContentPlaceHolder>
</head>
<body style="height: 540px; width: 811px;">
<form id="form1" runat="server">
<div style="height: 170px; top: 5px">
<asp:Label ID="Label1" runat="server" Text="Br. David&apos;s Software"
Font-Bold="True" Font-Size="XX-Large" ForeColor="#3333CC"
style="z-index: 1; left: 31px; top: 49px; position: absolute; width: 295px;"></asp:Label>
<asp:Image ID="Image1" runat="server" ImageUrl="~/earth3.gif"
style="z-index: 1; left: 462px; top: 24px; position: absolute; height: 83px;" Width="167px" />
<asp:HyperLink ID="HyperLink1" runat="server"
style="z-index: 1; left: 31px; top: 120px; position: absolute; height: 19px;" ForeColor="#3333CC"
Font-Bold="True" Font-Size="Large" NavigateUrl="~/Default.aspx">Home</asp:HyperLink>
<asp:HyperLink ID="HyperLink2" runat="server"
style="z-index: 1; left: 184px; top: 120px; position: absolute" ForeColor="#3333CC"
Font-Bold="True" Font-Size="Large" NavigateUrl="~/Products.aspx">Products</asp:HyperLink>
<asp:HyperLink ID="HyperLink3" runat="server"
style="z-index: 1; left: 360px; top: 120px; position: absolute; right: 571px; height: 20px; width: 52px;"
ForeColor="#3333CC" Font-Bold="True" Font-Size="Large"
NavigateUrl="~/Search.aspx">Search</asp:HyperLink>
<asp:HyperLink ID="HyperLink4" runat="server"
style="z-index: 1; left: 698px; top: 121px; position: absolute" ForeColor="#3333CC" Font-Bold="True"
Font-Size="Large" NavigateUrl="~/Contact.aspx">Contact Us</asp:HyperLink>
<asp:HyperLink ID="HyperLink5" runat="server"
style="z-index: 1; top: 120px; position: absolute; left: 525px" ForeColor="#3333CC" Font-Bold="True"
Font-Size="Large" NavigateUrl="~/Privacy.aspx">Privacy</asp:HyperLink>
</div>
<div>
<hr style="color: red" />
</div>
<div style="height: 300px; width: 807px;">
<asp:ContentPlaceHolder id="ContentPlaceHolder1" runat="server">
</asp:ContentPlaceHolder>
</div>
<div style="height: 60px">
<hr style="color: red" />
<asp:Label ID="Label2" runat="server"
Text="Br. David Carlson, Saint Vincent College, 300 Fraser Purchase Rd., Latrobe, PA 15650"
style="z-index: 1; left: 17px; top: 518px; position: absolute" ForeColor="#3333CC"></asp:Label>
<asp:Label ID="Label3" runat="server" Text="Copyright © 2013"
style="z-index: 1; left: 682px; top: 518px; position: absolute" ForeColor="#3333CC"></asp:Label>
</div>
</form>
</body>
|
Content Pages
Default.aspx
- Change the title on your content page Default.aspx to "Home, Br. David's Software" or similar.
- Add 3 labels.
- Here is the text for the 3 labels, but you can adjust this to suit your interests. In particular, you may want to use your
own name, etc. It would be best to mark up that apostrophe, too.
- Welcome to Br. David's Software
- We provide a number of interesting software items for Linux and for Windows. Begin by clicking on the Products link.
- Br. David Carlson, Associate Professor of Computing at Saint Vincent College, creates this software as a hobby and so as to provide tools that assist in learning certain areas of computing.
|
Privacy.aspx
- Change the title to "Privacy, Br. David's Software" or similar.
- Place 2 labels on this form. The first should contain the text "Privacy Policy" in large, bold.
- The other label should be placed below the first and contain the text:
"Our policy is never to sell or give to others data that you provide."
Feel free to adjust this policy statement as you wish.
|
Contact.aspx
- Change the title to "Contact, Br. David's Software" or similar.
- Place 4 labels on this form. The first should contain the text "For further information, contact:"
in extra large, bold.
- The next label should contain "Br. David Carlson" in large, bold or use your own name.
- The third label should contain "Phone: 724-805-2416" in bold. Feel free to fill in some other, perhaps
fictitious, phone number.
- The last label should contain the text:
"Email: <a href="mailto:carlsond@stvincent.edu">carlsond@stvincent.edu</a>" in bold.
Again, feel free to use some other email address, perhaps imaginary. Note that the double quotes should be marked
up as ", the less thans as <, and the greater thans as > so that they display correctly.
The outer double quotes are not part of the string, as they are here just to indicate the start and end of the text.
|
Search.aspx
- Change the title to "Search, Br. David's Software" or similar.
- Place a label on this form. Use the text "Sorry! The search feature has not yet been implemented."
- You will implement the search feature in the next project.
|
Products.aspx
- Change the title to "Products, Br. David's Software" or similar.
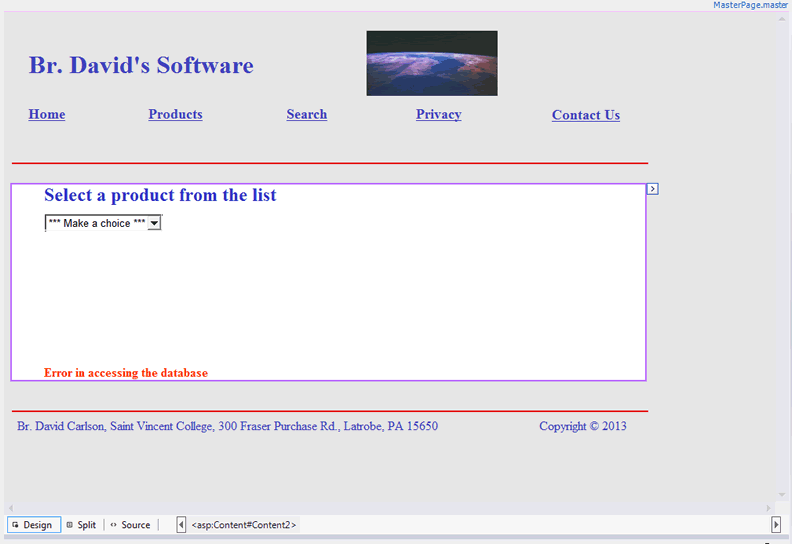
- Refer to this image of the Products.aspx page, shown in Design view.
- Note that there is a large label at the top that says "Select a product from the list" followed by a drop-down
list, and then a label in red for displaying the message "Error in accessing the database".
- Of course, the error label has to initially be invisible.
- Note, too, that the drop-down list contains 1 item already, the string "*** Make a choice ***". You learned
how to add an entry like this in this earlier example.
- You will add VB code to go with this page below.
|
Results.aspx
- Change the title to "Selected Product, Br. David's Software" or similar.
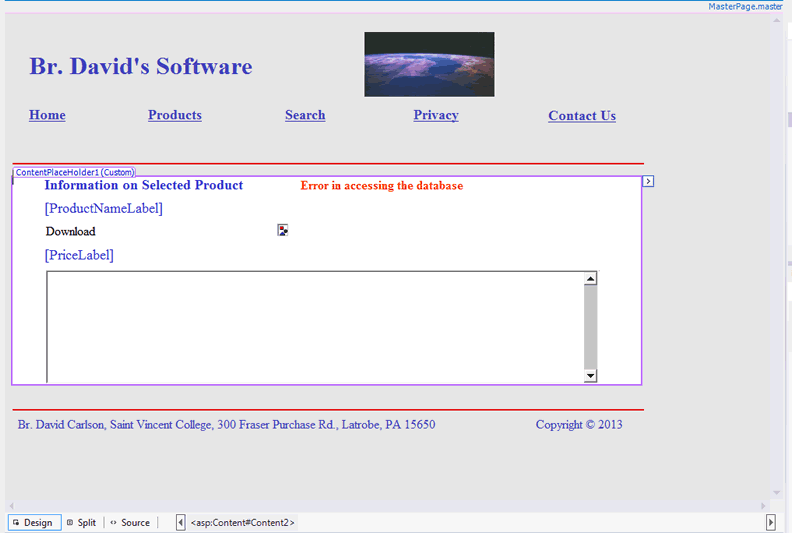
- Refer to this image of the Results.aspx page, shown in Design view.
- Note that there are 2 labels at the top. One says "Information on Selected Product" and to the right of it
is our usual error label in red for displaying the message "Error in accessing the database". Of course,
the error label has to initially be invisible.
- Below the first label is a label with no text and having ID ProductNameLabel. It's visibility is set to False.
- Below the last label is a hyperlink control with ID DownloadHyperLink and text simply "Download".
It, too, is not visible.
- Below that one is a label with ID PriceLabel and no text. It is not visible.
- Below that label is a textbox with ID ProductDescriptionBox. It's visible property is set to False, the ReadOnly
property is set to true, and the TextMode property is set to MultiLine so that we can see more than one line of the description
at a time.
- To the right of DownloadHyperLink is an image control with ID ProductImage. The visible property is set to False.
- You will add VB code to go with this page below. That code will display the data for a selected software product by
placing that data into the appropriate labels and other controls, and then making those controls visible.
|
A New Database Table
Design the Software Table
- You can create the Software table, used to hold data about the software products available for download, by using SQL Server
Management Studio or Visual Studio's Server Explorer. The description here is for SQL Server Management Studio.
- Connect using Windows authentication from a PC where you are already logged in.
- Find your particular database and expand the + in front of it.
- Expand the Tables node in the same way.
- Right click on that same Tables node and select New Table.
- You will then be allowed to fill in one column (field) name at a time, along with its type, and whether or not to allow
a NULL entry.
- Supply the following information:
|
| Column Name |
Data Type |
Allow Nulls |
| ID |
int |
not checked |
| Name |
varchar(50) |
not checked |
| Description |
varchar(960) |
not checked |
| ImageURL |
varchar(80) |
checked |
| Price |
money |
not checked |
| DownloadURL |
varchar(80) |
not checked |
- Right click at the front of the ID field and make the selection to designate this field
to be the primary key.
- Right click again at the front of the ID field and look at Column Properties at the bottom of the screen.
Expand the Identity Specification property and make the obvious choices to have ID be
an identity field which starts at 1 and goes up by 1 each time.
- Fill in your other five column (field) names.
- The reason that we allow a NULL entry for ImageURL is that we may not have images for some of our software items.
- Right click on the tab for your new table in design view. Select the save option. You will be given a chance to name
the new table. Name it Software. You should now have a new, but empty table.
- You can now close the window where you set up the fields for this table.
|
Add the Data
- Next we add data to the Software table. Begin by right clicking on this table in SQL Server Management Studio and selecting
Edit Top 200 Rows.
- In the resulting window you can fill in data for this table, one row (one software item) at a time.
The ID is an identity field, so its values
will automatically be filled in. For the other fields, enter this data or supply similar
data of your own devising.
- For the ImageURL you may use the URLs that are in the above txt file, all of which point at our other web server,
cis.stvincent.edu, or
you may supply a URL that points to the images you placed in your web site folder. This later folder is on your W
drive, which maps to a location on the cis2.stvincent.edu web server. For example, a URL to an image on this latter
server might look like http://cis2.stvincent.edu/studentj/Software1/mic1.gif.
- Each row of data gets saved when you click on the next row (of initially empty data).
- You may now close the window where you entered the data.
- You can right click on your table and select Edit Top 200 Rows at any time that you want to adjust the data.
|
The VB Code-Behind Files
Create a Model for the Software Table
- Before creating the VB code, you need to create a model for your new table, Software.
- This will allow you to use the Entity Framework and LINQ in writing your VB code, instead of having to write SQL
or stored procedures to get at the data in this Software table.
- In creating a model, you have to keep track of the name for you entities collection as you will need to use it your
VB code. It is the second of three items that you have to name when generating a model from the database.
- Since you have created models in several of the previous examples, you should be able to handle this without
further directions.
|
Products.aspx.vb
- Before creating the VB code to handle the user's choice of a software item in the drop-down list on the Products.aspx
form, set the AutoPostBack property of this drop-down list to True. When the user makes a choice of an item by clicking
on it, this will cause a postback, allowing our VB code to process the selection.
- We will need to save the name of the selected item in Session state so that it will be available to our VB code on
the Results page. Therefore, make the following additions:
- Put <sessionState mode="InProc" /> in the system.web section of your Web.config file.
- Place EnableSessionState="True" inside the directive on the first line of your Products.aspx form
when in source view.
- Similarly, put EnableSessionState="ReadOnly" inside the directive on the first line of your Results.aspx
form when in source view. This page only needs to read the data sent to it by the postback on the Products page.
- Everything should now be ready to use Session state.
- In your Products.aspx form, while in Design view, double click on some spot below the content placeholder, but before the
end of the Master page stuff. This should give you the outline of a Page_Load event handler for Products.aspx.
- Use the following outline as a guide in writing your VB code for this event handler.
- Note that you have done something very similar before.
|
Protected Sub Page_Load(sender As Object, e As EventArgs) Handles Me.Load
    If Not IsPostBack Then
        ' Make sure the error label is not visible.
        Try
            ' Inside the usual Using statement, use LINQ to get the names of
            ' all the products in the software table, in ascending order.
            ' Then write the VB code to display these names in the drop-down list.
        Catch exception As Exception
            ' Make the error label visible.
        End Try
    Else
        Page.Validate()
        If Page.IsValid Then
            ' Put the selected item from the drop-down list into Session state.
            ' Then redirect to the Results.aspx form.
        End If
    End If
End Sub
|
Results.aspx.vb
- In your Results.aspx form, while in Design view, double click on some spot below the content placeholder, but before the
end of the Master page stuff. This should give you the outline of a Page_Load event handler for Results.aspx.
- Use the following outline as a guide in writing your VB code for this event handler.
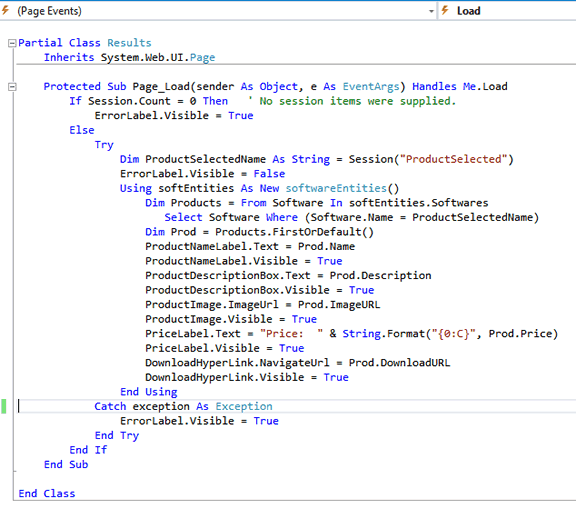
- Try to create your code from the outline, but if you get stuck, look at
this picture of my Page_Load event handler.
|
Protected Sub Page_Load(sender As Object, e As EventArgs) Handles Me.Load
    If Session.Count = 0 Then   ' No session items were supplied.
        ' Make the error label visible.
    Else
        Try
            Dim ProductSelectedName As String = Session("ProductSelected") ' Use name it was saved under.
            ' Make sure the error label is not visible.
            Using softEntities As New softwareEntities()
                Dim Products = From Software In softEntities.Softwares
                   Select Software Where (Software.Name = ProductSelectedName)
                Dim Prod = Products.FirstOrDefault()   ' Get the first (and only) item from the collection.
                ' Copy Prod.Name into ProductNameLabel.Text
                ' Make ProductNameLabel visible.
                ' Similarly put Prod.Description into ProductDescriptionBox and make it visible.
                ' Copy Prod.ImageURL into the ImageUrl property of the ProductImage control.
                ' Set ProductImage to be visible.
                ' Here is the complete code for the next one:
                PriceLabel.Text = "Price:  " & String.Format("{0:C}", Prod.Price)
                ' Make PriceLabel visible.
                ' Place Prod.DownloadURL into the NavigateUrl property of DownloadHyberLink.
                ' Make DownloadHyperLink visible.
            End Using
        Catch exception As Exception
            ' Make the error label visible.
        End Try
    End If
End Sub
|
|

 Search CIS Site
Tutorials
Search CIS Site
Tutorials