Maintaining Session State
The Goals for this Example
The overall goal is to ask for user input on one page
and then show the matching data on a second page.
Session state has to be maintained so that the second page has the user input available in order to query the database
for the matching data. Session state will be maintained using InProc Session state.
This application, like the UserInput application will again use the Entity Framework, LINQ,
and validation controls. It will also show how to populate a drop-down list with data taken from a database and how to show exactly
two decimal places for monetary values displayed in a grid view.
Getting Started
Adjusting the Parts Table
- You should already have a Parts table in SQL Server from the UserInput application.
- Log into SQL Server Management Studio using Windows authentication.
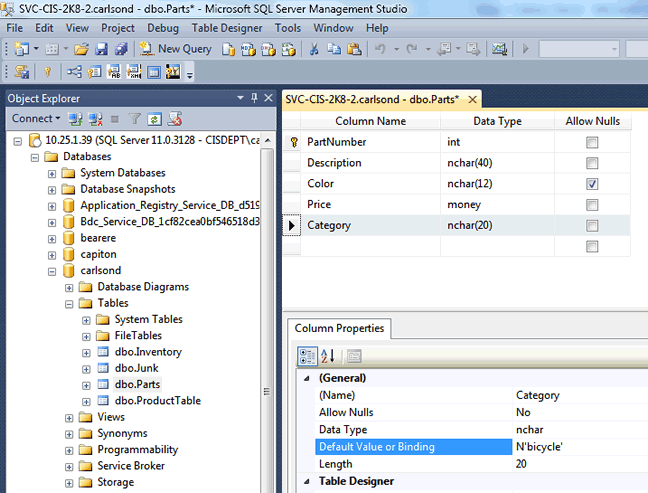
- Right click the Parts table within your particular database and select Design.
- After the existing 4 fields (PartNumber, Description, Color, and Price),
add a fifth field named Category.
The type should be nchar(20) and the Allow Nulls should not be checked.
- Right click the new Category field and select Properties. In the Properties section,
type bicycle as the value for "Default value or binding". SQL Server Management Studio will add single
quotes around the word bicycle (and later will add an N and perhaps parentheses as well). This is fine.
- Right click on the Design View tab that contains the name of the table, namely Parts. Select Save Parts to save your
modifications.
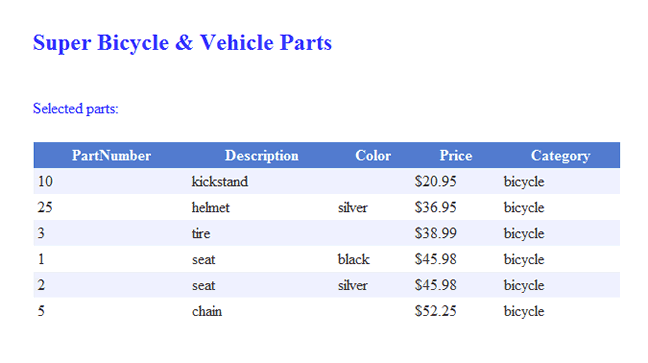
- Right click your Parts table in the list underneath your database and select Edit Top 100 Rows.
- Add data to the Parts table so as to make it contain the data shown in this picture.
- If you want your previous web app to still work, you will also need to add data to your Inventory table so that each of the
new parts has a quantity (even if it is just zero).
- You can now close SQL Management Studio.
|
Setting up a New Website
- Create a new web site named Parts in Visual Studio and locate it on your W drive, the drive that maps to a share on
our live web server.
- Add the App_Code folder to your web site by right clicking the site in Solution Explorer as we have done before.
- Open the Web.config file for this new web site, and copy into it your carlsondwebapp connection string, or whatever
your web app connection string is named. This is the one that contains a username and password for SQL Server.
You can copy this string from your code for this previous example.
Note that this connection string goes inside of opening and closing connectionStrings tags
and that the whole connectionStrings piece goes inside the opening and closing configuration tags.
- Add a new web form. Use the standard name Default.aspx for this one.
- With this form in Source View, copy into the div section all of the contents of the div section of
the form in your UserInput example.
- Similarly, add a new web form named Response.aspx and copy into it the same stuff! We will then adjust both forms
to have just the items we want to keep.
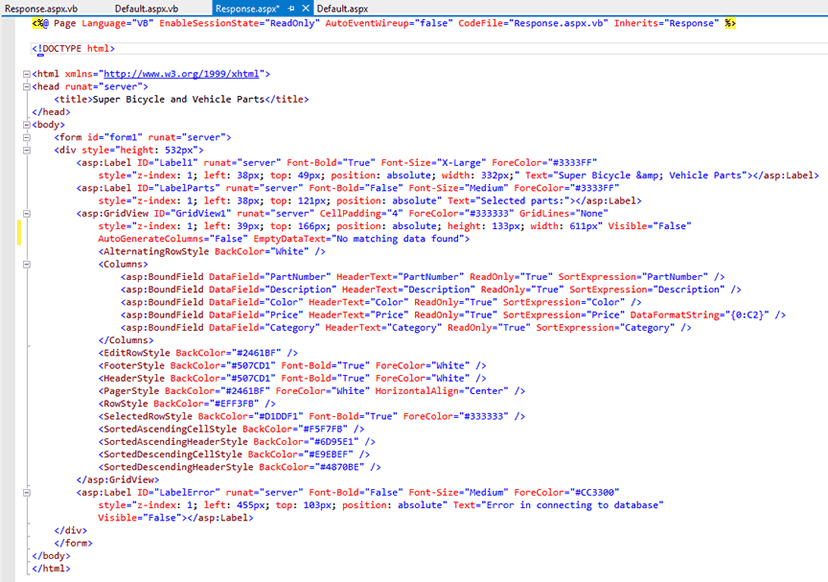
- On both forms, change the title and the label with extra large text to say "Super Bicycle and Vehicle Parts".
- On the Default.aspx form remove the grid view and the label that says "Selected parts:".
- On the Response.aspx form remove everything except the first label with the extra large font size,
the "Selected parts:" label, the "Error in connecting to database" label, and the grid view.
- Also set the Visible property to True for the "Selected parts:" label on Response.aspx.
- Now that so many items have been removed from Response.aspx, rearrange the remaining items so that they are
reasonably spaced (without large gaps between them).
- Note that both forms should still contain that "Error in connecting to database" label.
- In Design View for the Response.aspx form, select the grid view. Under its Properties, find the EmptyDataText
property and give it the value "No matching data found". This message will display should the user's
data lookup return no matches.
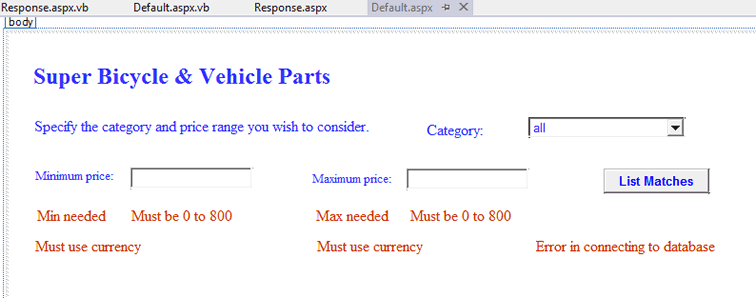
- Adjust your Default.aspx form so that the label just underneath the label with extra large text now says "Specify
the category and price range you wish to consider."
- Adjust your Default.aspx so that it has a new label whose text is simply "Category:" and then add a drop down
list just to the right of this label. Set the ForeColor for the DropDownList and the new label to #3333FF
(or whatever color you used for all of the other labels).
- In properties for your drop down list, set the AppendDataBoundItems property to True. This is so that the
category names you retrieve from your Parts table will be appended after the one static name that we will add next.
- We wish to add the word "all" to the drop down list. The other entries will be added by retrieving the
categories from your database. The easiest way to add this one entry is with "all" enclosed by ListItem tags as shown
in the box below.
- Compare your forms to my Default.aspx as well as
my Response.aspx forms, where the latter is shown in source view.
|
<asp:DropDownList ID="DropDownList1" runat="server"
    style="z-index: 1; left: 558px; top: 105px; position: absolute; width: 164px;"
    AppendDataBoundItems="True" ForeColor="#3333FF">
    <asp:ListItem Value="all">all</asp:ListItem>
</asp:DropDownList>
|
Accessing the Database
Creating the Model
- As you have done before,
generate a database model by right clicking your App_Code folder and making the usual choices.
- Only select the Parts table from among the tables available in your database.
- I named the model to be PartsModel, named my entity connection settings as carlsondwebappEntities (the name under which
the settings are stored in the Web.config file), and named my namespace to be PartsNameSpaceModel,
but you can name these as you like.
- Just be sure to keep track of that middle one, the entity connection settings name, as this is the one you will need to use
in your VB code.
|
VB Code
- Create a Page_Load event handler and a button click handler for your Default.aspx page. If you do not remember how
to do this, go back to our earlier examples.
- See if you can write the Page_Load code yourself. This should be LINQ code that uses your webappEntities (or whatever
you called your entity collection) so as to obtain from the database the names of the various categories in the Parts table.
Note that you do not want to repeat category names; you want distinct categories. Also get the category names back in
ascending (alphabetical) order. Place these names into your drop down list, of course.
- If you can't get this to work or want to check your work, look at my code for Page_Load.
Of course, you probably used different names for some things, so your code cannot be an exact duplicate of mine.
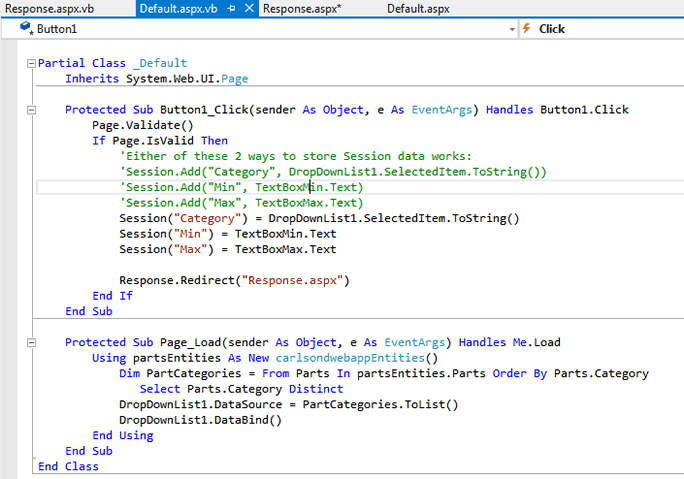
- The click handler code for the button needs to run all the validators to see if the page is valid. If it is, it should store
the user data (from the text boxes and drop down list) in Session state and then take the user to the
Response.aspx page where the search results will be shown.
- The code to do this is given in the box below, as much of this is likely to be new to you.
Note that there are two ways shown to place data into Session state. The first method is commented off.
- The Response.Redirect is one way to go to another page, Response.aspx in this case.
Another way is to replace the button by a hyperlink control and set its NavigateUrl property to Response.aspx,
but let's not do that in this project.
(You might think that the button's PostBackUrl property could be used in the same way, but this sends the user to the new
page immediately, without running any of the click handler code.)
|
Protected Sub Button1_Click(sender As Object, e As EventArgs) Handles Button1.Click
    Page.Validate()
    If Page.IsValid Then
        'Either of these 2 ways to store Session data works:
        'Session.Add("Category", DropDownList1.SelectedItem.ToString())
        'Session.Add("Min", TextBoxMin.Text)
        'Session.Add("Max", TextBoxMax.Text)
        Session("Category") = DropDownList1.SelectedItem.ToString()
        Session("Min") = TextBoxMin.Text
        Session("Max") = TextBoxMax.Text

        Response.Redirect("Response.aspx")
    End If
End Sub
|
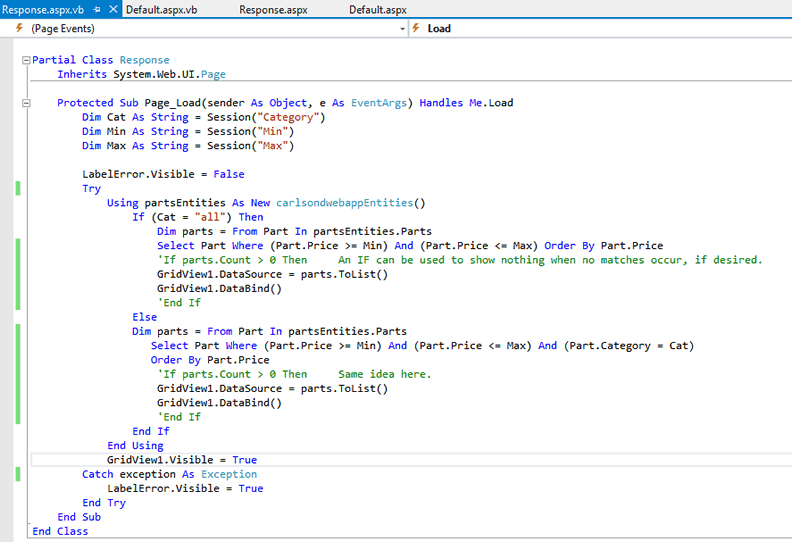
- Create a Page_Load event handler for your Response.aspx page. If you do not remember how
to do this, go back to our earlier examples.
- An outline for the VB code for Page_Load is shown in the box below. Notice how the values that Default.aspx stored
in Session state are retrieved from Session state for use by Response.aspx.
- See if you can write the rest of the Page_Load code yourself. This should be LINQ code that uses your webappEntities (or whatever
you called your entity collection) so as to obtain from the database the data on the parts that match the user-supplied values
of Min, Max, and category Cat. Of course, if Cat has value all, then you want all parts in the range from Min to Max no matter
what category they come from. If, on the other hand, Cat is bicycle, then only the bicycle parts that fit the desired price
range should be retrieved by your LINQ. In both cases, get the parts data in ascending order by price.
- Display the retrieved parts data in your grid view as usual.
- If you can't get this to work or want to check your work, look at my code for Page_Load.
Of course, you probably used different names for some things.
- One thing that you can learn from my code for Page_Load is that
you can look at the Count of the returned data to decide whether to display a message that there were no matches
and similar. However, don't do this for the current project as we deliberately put a message in the EmptyDataText
property of our grid view as our way to handle the case when there is no matching data. The grid view will simply
show that message instead of the usual grid of data if there is no matching data.
|
Dim Cat As String = Session("Category")
Dim Min As String = Session("Min")
Dim Max As String = Session("Max")

LabelError.Visible = False  ' to be sure this is off in case it had been on previously
Try


Catch exception As Exception
    LabelError.Visible = True
End Try
|
Odds and Ends
- In your Web.config file, turn off unobtrusive validation, as we have done before.
- Also in Web.config, add the following between the opening and closing system.web tags to indicate that we want
to use the InProc form of Session state management:
<sessionState mode="InProc"/>
- See my Web.config file to see how this looks.
- At the top of your two aspx forms, inside the directive on the very first line, place the following among the property/value
pairs:
EnableSessionState="True"
- Even better, use ReadOnly instead of True on the Response.aspx page, as it only needs to read data from Session state.
However, the Default.aspx page has to be able to write date to Session state, so the True is needed to do this.
There is less overhead if you can limit the access to ReadOnly.
- You can see one of these additions for EnableSessionState in my Response.aspx file.
- It would also be nice to get the price values to show exactly 2 decimal places, like we should have for currency values.
Here is a way to do that:
- The overall idea is to configure the data source for the grid view just so that we can set up the 5 columns (including
formatting). Then we will remove this data source but keep the 5 DataFields, as they are called.
- We will try to configure this data source to use your webappEntities, but that may give an error that
says "The provider did not return a providermanifest instance". If that happens, try one of
the two following strategies:
- You could simply configure the data source using SQL and select all 5 fields of the Parts table.
Then do the other steps below but using regular SQL instead of using the Entity Framework.
- You could also use this fix: Entity Framework: The provider did not return a providermanifest instance.
Esssentially, you right click in Visual Studio on your PartsModel.edmx file, select the XML editor, and then
find 2012 and change it to 2008. It is not clear how this fix would work for those using
a later version of Visual Studio.
- On your Response.aspx page, click on the smart tag at the upper right corner of your grid view and select Choose
Data Source, New Data Source.
- Click on Entity and OK.
- Under Named Connection select your webappEntities (or whatever yours is called). Click Next.
- For EntitySetName, the suggested name of Parts should be fine.
- Uncheck Select All. Instead check each of the 5 fields individually. Then click Finish.
- Click on the smart tag for your grid view again.
- This time select Edit Columns.
- In the box in the lower left corner, the one showing the 5 selected fields, click on Price.
- You should then see on the right side the properties for this field.
- For the DataFormatString, fill in {0:C2} for its value. This indicates to format item number 0, the one and
only item in this field, as currency, with 2 decimal places.
- Click OK.
- In source view for Response.aspx, find your grid view and remove the property/value pair
DataSourceID="EntityDataSource1" (or whatever you called the data source).
- While in source view, also remove that DataSource control, DataSource1 (or whatever it was named).
- This way the grid view will continue to get its data from your LINQ code in the code-behind file and not use
the new data source we temporarily added here. The whole point was to specify the 5 DataFields for the grid view
along with the format string for the Price.
- Of course, if you know how to type in the DataFields, you could just add the 5 needed DataFields to your grid
view while in source view. They should look like those shown in the box below. Of course, this code needs to go
between the opening and closing tags for the grid view. You also probably need to use the smart tag on the grid view
(while in design view), click "edit columns", and uncheck the box labeled "Auto-generate columns".
If columns are auto-generated in addition to having the columns coded as below, the set of columns will be seen twice.
|
<Columns>
    <asp:BoundField DataField="PartNumber" HeaderText="PartNumber" ReadOnly="True" SortExpression="PartNumber" />
    <asp:BoundField DataField="Description" HeaderText="Description" ReadOnly="True" SortExpression="Description" />
    <asp:BoundField DataField="Color" HeaderText="Color" ReadOnly="True" SortExpression="Color" />
    <asp:BoundField DataField="Price" HeaderText="Price" ReadOnly="True" SortExpression="Price"
        DataFormatString="{0:C2}" />
    <asp:BoundField DataField="Category" HeaderText="Category" ReadOnly="True" SortExpression="Category" />
</Columns>
|
Building and Running Your App
- Build this website as we always do.
- Then test that it runs correctly locally.
- Finally, get it to work on our live web server. Of course, your folder for the website will have to be
converted to an official IIS web app by the server administrator.
- If you turned on debugging in your Web.config file, turn it off now.
- If you were putting this web app into production, you would also want to turn off the display
on detailed error messages. For course work, it is best to keep the display of those error messages.
However, if we did want to turn off the display of detailed error messages and to turn off debugging,
you would return your Web.config file to normal
by editing the file so that the customErrors and compilation
sections look like the following. Note that either On or RemoteOnly for customErrors
will shield users from the technical details of errors and protect your website from hackers
who would like to see those detailed error messages!
|
      <compilation debug="false" strict="false" explicit="true" targetFramework="4.5"/>
      <customErrors mode="On"/>
|
|

 Search CIS Site
Tutorials
Search CIS Site
Tutorials