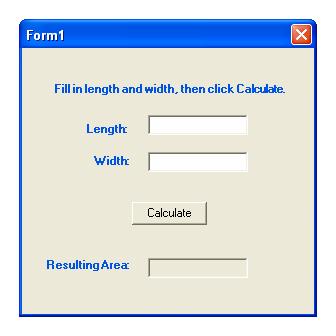
Software Design Using C++First Intermediate Windows Forms ExampleWarning: This webpage uses old materials that might well not work today.Setting Up a Windows Forms AppThis is the first Windows Forms example where you have to write some code. Our example will calculate an area. However, before we write any code, we must set up some things. We begin by repeating the directions given in our first introductory example on how to set up a Windows Forms App. If you are using a newer version of Visual Studio that does not have Windows Forms App capabilities for C++, you can use C# instead, as it is fairly similar to C++. Most of the directions here still work, but with some small changes in the coding. Both the C++ and C# coding are shown below. The very first thing to do is to tell Visual Studio to create a Windows Forms Application. The directions are similar for Visual Studio 2008 and 2012, though the menu systems are customizable so that what you see in certain situations may be different from what is listed here. Hopefully you can adapt these directions to your situation easily. You can choose to group several of your application projects in what Visual Studio calls a solution, or you can simply create individual projects (each of which is in its own "solution"). Let's assume that you have already created a solution and have that solution open in Visual Studio. Use File, New Project. Under Templates, select Visual C++, CLR, and then Windows Forms Application. (In C# with Visual Studio 2015, it appears that you choose C# and then simply Windows Forms Appplicaton.) Fill in a reasonable name for your project (perhaps Area1) and choose a location for the project. You can also specify that you want this project added to an existing solution (or have it make a new solution for this project). Adding ControlsVisual Studio should then produce a blank form in design view for you. The goal is to add "controls" to it so that it looks like this completed form, perhaps better seen in this close-up of the form in the completed, running application. The items seen on the form are called controls and are dragged onto the form from the Toolbox. The Toolbox contents can be seen just by placing the mouse over the tab for the Toolbox. If this tab is not visible, just use View, Toolbox. Once you have the Toolbox open, you can click on the pushpin at the top to make it stay open or click again to allow it to retract when the mouse is not over it. Try that out! Also note that the controls in the Toolbox are grouped into categories labeled Data, Components, Windows Forms, etc. Clicking on one of the categories causes the Toolbox to display the controls in that category. If the list is long, there will be up and down triangles that you can click on to scroll through the list. We will mostly be using controls from the Windows Forms category. Let's begin by dragging a label control from the Toolbox to your empty form. Place it toward the top of the form and drag its edge so as to make the label almost as wide as the form itself. We want to use this form to display the directions for using this software. To do this, go to the Properties Window. (This window has a pushpin just like the Toolbox and so works in much the same way. If it is nowhere to be seen, just use View, Properties Window.) Find the Text property and use "Fill in length and width, then click Calculate." (without the quotes) as its value. Note that if you click on something other than this label, then the Properties Window will show the properties of something else. While our label is selected, look for the property named ForeColor and change it to whatever color you want to use. Clicking on this property will display a downward triangle which you can click on to get a list of colors, categorized as Custom, Web, and System. In the images for this example, the ActiveCaption color found under System was used. Next find the Font property. If it has a + sign in front, click on the + in order to see all of the items within. Find the Bold property under Font and change its value to True. Move and resize this label as necessary so that it looks good. As long as we have a label on the form, let's make copies of it and then change the text so as to give the other three labels that we want. Click on the existing label and use Edit, Copy and then Edit, Paste to produce a new label with the same properties. Then change the Text property to "Length:" and place this label under the previous one. You will probably need to drag the right edge of this label to shorten it, as we will place something else to the right of it. Refer again to our picture of the finished application to see what we are trying to get. In a similar way, create the label that says "Width:" and the one that says "Resulting Area:". These get placed one after the other as we move vertically down the form.
Next we try a different control. Drag a text box control to the form. Place it to the right of the
"Length:" label. In the Properties Window, change the name of this text box to
Since we need two more text boxes, we just copy the existing one like we did above with the labels. Change
the name of the one new text box to Note that you can select one or more controls by clicking on a single control, using CTRL click on each of several controls, or rubber-banding a bunch of controls with the mouse. Once you have selected one or more items, you can use the commands under the Format menu to make things look nice. For example, you can make all of the text boxes the same size, you can align their left edges, etc. Practice with this formatting by trying to make things look great on your form.
The last control needed on this form is a button. Drag a button control from the Toolbox to your form
and place it between the text boxes for width and area. The idea is that the user will click on this
button in order to have the area calculated and displayed in that last text box. Change the
name property of this button to
Now that all of the controls are on the form, we might think of the order in which they should be
reached if the user presses the Tab key repeatedly. Probably this should take us from
Overall Form PropertiesWe also need to customize some properties of the overall form. To do this, click somewhere on the form but not on any of the controls. In the Properties Window you can change various properties. Adjust the ForeColor, for example, if you desire. Change MaximizeBox and MinimizeBox to False. Notice that this removes the little maximize and minimize buttons in the upper right corner of the form. We drop these because it makes little sense to maximize to full screen such a simple application. Also change FormBorderStyle to FixedDialog. This will prevent the user from dragging an edge of the form and resizing it while it is running. Before going any further, be sure to save all of your files. It is wise to do this periodically so that you don't lose much if something goes wrong with your computer, etc. You can click on the Save All icon at the top of Visual Studio or use File, Save All. So, Where's the Code?We haven't written any code yet to tell our application to do anything. However, if you have the Solution Explorer open in Visual Studio you may have noticed some code files sitting in it. Like the ToolBox and Properties Window this has a pushpin and can be opened and retracted as desired. If you don't see it on the screen, just use View, Solution Explorer. The Solution Explorer shows all of the files associated with your project (and, in fact, with your complete solution, which may contain several projects). We could use the Solution Explorer to manually bring up the right file and then add our code, but there is an easier way in this case. The only code we need to add is that which needs to run when the user clicks the Calculate button. If you double click on this button in design view in Visual Studio, an outline of the "click handler" function will be automatically placed in the correct file, Form1.h, and shown to you in a code editor. The outline of the function should look like this:
If you are using C#, the outline of the click handler would look like the following. Note that it assumes you have renamed the button as CalculateButton.
We will not worry about those strange function parameters here. All we need is some code to
get the numbers that the user types into Before we fill in the needed code, notice that the editor now shows two views of Form1.h, one is the design view of the form while the other shows the actual code. You can use the tabs at the top to select the one you wish to work on. You can instead use the Solution Explorer and double click on the file you want to see. For one like Form1.h that has two radically different views, you can right click on the file and select View Code or View Designer. Now edit things so that your function looks like the following. Include the comment before the function, too, as that will help you to keep track of what your function supposedly does.
If you are using C#, here is the complete code to use. We again assume that the button has been renamed as CalculateButton.
You can see that we declare three floating point variables.
The
If you have already studied pointers, you will realize that the Compiling and Running the AppSave all of your files again. Then use Build, Build Area1 to compile. (Area1 is the project name. If you used a different name for your project, that name should show in the menu.) If you get compiler error messages, you can probably double click on each error and be shown the line of code where the error was detected. (Remember that the actual location of the error could be before the line that is indicated. The line shown is probably the line where the compiler was when it realized the error.) Fix your syntax errors and use build again. You can run your program by using Debug, Start Without Debugging. Assuming that there is no problem at runtime, try out your application to see that it does what it is supposed to, that is, that it correctly calculates areas. Then try some bad data. What happens if you type abc for the length? Right, you get an unhandled exception. We never considered this possibility when we wrote our code. We will look into how to handle exceptions like this later. You have now created your first Windows Forms Application that includes some hand-written code! Back to the main page for Software Design Using C++ |
Computing & Information Systems |
|

 Search CIS Site
Tutorials
Search CIS Site
Tutorials
|