Software Design Using C++
Basics of Data Streams
Introduction
Often we want a program to process a long sequence of data. In this Web
page we will only consider the processing of a sequence of numbers.
These numbers can be read from the keyboard (that is, interactively
from the user) or from a text file. We will also consider how to write
this type of data to a text file. Other types of data and other types
of file handling are discussed in the intermediate section of these
Web pages under the heading of Files (Streams).
The basic idea when reading number data is that we will read in numbers until we cannot read any more.
If we are reading the data from a file, we could say that we are reading
data until we reach the end of the file (EOF, for short). In reading
data interactively from the keyboard, we instruct a Windows user to press
CTRL z to signal the end of the data. (This means to hold down the CTRL
key and touch the z.) CTRL z is essentially the EOF signal for interactive input.
In Linux this would have to be changed to CTRL d, as that is the correct
EOF signal there. In general, input and output operations tend to be a bit
system-dependent. That is, when switching from one operating system to
another, or one C++ compiler to another, you may find small differences
that cause a program that works in one setting not to work in the other.
Just be aware of this possibility and be prepared to deal with it if necessary.
Reading from the Keyboard
Look at the program readkeyb.cpp to see how to
read a stream of numbers from the keyboard. This program reads in a stream
of floating point numbers and then prints out their average. Part of the
code is shown below. The initialization of the variables and the printing
of the average have been left out here in order to save space.
cout << "Enter a floating point number (or CTRL z to end): ";
cin >> Num;
while (! cin.fail())
{
Total = Total + Num;
Count++;
cout << "Enter a floating point number (or CTRL z to end): ";
cin >> Num;
}
|
The only thing really new here is the use of cin.fail() to
control the WHILE loop. The stream cin refers to input from
the keyboard. The fail function, when applied to
cin, tells us if the last operation on cin failed.
This could happen if the user entered something that is not a number, such
as the letter A. It would also happen if the user pressed CTRL z to signal
the end of the data stream. The latter would be the normal way for this
loop to end. Try both of these when you compile and run this program.
Remember that the ! symbol is the boolean NOT operation.
(See the discussion on Compound Conditions,
under the "Decisions, Decisions" topic, for more information on boolean operations.)
The overall idea in the above code is that we go through the loop
body as long as the preceding input operation did not fail.
There is also an eof function that can tell us if we are at the end of
a stream of data. (In this example that would mean that we have received
a CTRL z). However, this function only checks for end of file; it does not
check for non-number data like the letter A. Thus it is better to use the
fail function as it stops the loop reasonably in both cases.
Note, too, that with some compilers the eof function appears
not to work reliably. So for both reasons it seems best to use the fail function.
Notice that cin is really an object and that we are using
the usual object-oriented syntax in calling a class function on an object.
(See Using Objects for more information on objects.)
Compare the specific function call with the general syntax:
cin.fail()
object.function(parameter_list)
|
Reading from a Text File
See the program readfile.cpp for a simple example
of how to read numbers from a text file until the end of file has been reached.
The program reads floating point numbers and prints the average once end of
file has been reached, much like the above example.
The main difference is that this program reads the numbers from a text file.
A text file is the type of file consisting of lines of characters.
(See Files (Streams) for more information on
types of files.) A text file can be created by NotePad in Windows, Edit in
DOS, etc. There is even an icon for creating a new text file in Visual C++
Developer Studio. In fact, our program files are text files themselves,
although their names end with the .cpp extension instead of the usual .txt
extension used by most text files on a PC.
According to the comments at the top of the program, the numbers in the
text file must be placed on separate lines or separated by blank space.
That is how the different numbers are distinguished. For an example of such a file
click see this version of readfile.txt.
Near the top of the program you will see the inclusion of a new header. The
fstream header is the one we will use whenever we work with files.
The inclusion of a certain header file is often needed when you want to use some
specialized function, data type, etc. that is supplied by the compiler. See your
compiler's on-line help or a good reference book to
learn more about this.
Below we have pasted in the entire main function, the only function in this
program. Note that it creates a variable called InFile of
type fstream. This fstream type is the one we will
use for all of our files throughout all of these Web pages.
int main(void)
{
fstream InFile;
float Num, Total;
int Count;
InFile.open("readfile.txt", ios::in);
if (InFile.fail())
{
cout << "Could not open readfile.txt" << endl;
exit(1);
}
Count = 0;
Total = 0.0;
InFile >> Num;
while (! InFile.fail())
{
Total = Total + Num;
Count++;
InFile >> Num;
}
if (Count > 0)
cout << "Average is " << Total / Count << endl;
else
cout << "No data given" << endl;
InFile.close();
return 0;
}
|
The open function applied to the InFile variable
(object) is an important one. This is how one indicates what file is to
be accessed and what type of access is desired. The file in this case is
one named readfile.txt. The ios::in indicates
that we are opening the file for input (that is, in order to read data from it).
The variable InFile is used from here on in the program whenever
we need to refer to this file.
InFile.open("readfile.txt", ios::in);
if (InFile.fail())
{
cout << "Could not open readfile.txt" << endl;
exit(1);
}
|
Right after we try to open the file, there is a test of
InFile.fail(). Much like in the previous program, the
fail function is used to tell us if the last operation on
the data stream failed. Here this is the open command itself.
You should always check to see if an open failed
and if so, print an error message. In this program, we even exit from
the program if the open failed. There is no sense in trying
to go on with our program if we cannot access the data file.
Why would open ever fail? This would happen if the file
is not present in the expected directory (normally the same directory where
the executable program is, if running from Windows, or the project directory, if
running from Visual Studio). In Linux, open could fail if the
permissions on the data file are such that you are not allowed to read the file.
The heart of the program is the same as in the previous example, except that
the data is read from InFile instead of cin.
Thus you see the use of InFile >> Num to read a number from
InFile. You also get the same overall WHILE loop as in
the previous program. The only difference is that the fail
function is being used to see if the last input operation on
InFile worked, instead of the last input operation on
cin. We read data until reading fails.
InFile >> Num;
while (! InFile.fail())
{
Total = Total + Num;
Count++;
InFile >> Num;
}
|
After computing and printing the average, the program ends by closing
the data file. Get into the habit of always closing your data files
as soon as you are done with them. With some languages and compilers
this is not necessary, but with others it is, so it is best to always close
your files. Besides, it consumes some computer resources to keep a file
open, so it is best to close it as soon as possible.
The command for closing InFile is:
There are other ways to set up files instead of using fstream.
The type ifstream can be used for input files, for example.
But then we need a different type for output files. Plus, in some
programs we will want to have a file open for reading and writing both!
All in all, it will be easier to use fstream consistently for all of our files.
Writing to a Text File
Writing numbers to a text file is rather similar. The makefile.cpp
example shows how to produce the type of text file that was used as input for the above example.
One key difference is to use ios::out to open the file in output mode. Then you use the <<
operator to write each number to the output file stream. Be sure to close the file at the end as
failure to do so often means that some data does not really get written out to the file. (This is
because output to a file is often "buffered", which means that it is saved up and only flushed out
to the file on occasion. The close will force all saved data to be flushed to the file. Here
is the essential code for writing to our readfile.txt file:
float Num;
fstream OutFile;
OutFile.open("readfile.txt", ios::out);
if (OutFile.fail())
{
cout << "Open of readfile.txt failed" << endl;
exit(1);
}
cout << "Enter a floating point number (or CTRL z to end): " << endl;
cin >> Num;
while (! cin.fail())
{
// Process the data:
OutFile << Num << endl;
cout << "Enter a floating point number (or CTRL z to end): " << endl;
cin >> Num;
}
OutFile.close();
|
Passing File Streams as Parameters
A file stream can be passed as a parameter to a function, but it must be a reference parameter.
The readfile2.cpp example is a reworked version of our
readfile.cpp program. However, the new version does most of the
file processing in a function. Note that the file stream is opened for input in the main function
and is then passed as a reference parameter to the helping function ProcessFile.
Formatted Output to a File Stream
It is also possible to nicely format the numbers that are written to a text file.
See the makegradefile.cpp example, the essentials of which are
shown below. Note how the setf function is used to set some formatting flags for the output stream.
In particular, it is used to say that we want fixed point numbers. (The other option is
ios::scientific for scientific notation, which uses an exponent.) The setpoint flag is
used to say that we want to see the decimal point and trailing zeros in a number like
3.00, rather than a 3 with no decimal point. We also use the precision function to
specify that we want our numbers rounded to 2 decimal places when they are written to the file.
Note the use of the setw "manipulator" function in the output command that writes data to the file.
This is used to set the width of the field holding the number. In our case, a width of
12 is used. In order to use the setw function you have to include the iomanip header.
Also be aware that the setw command only affects the very next item that is output to
the file stream. Thus you may need to use setw several times to get the effect that you want.
To see its effect on a file, see the following example version of gradefile.txt
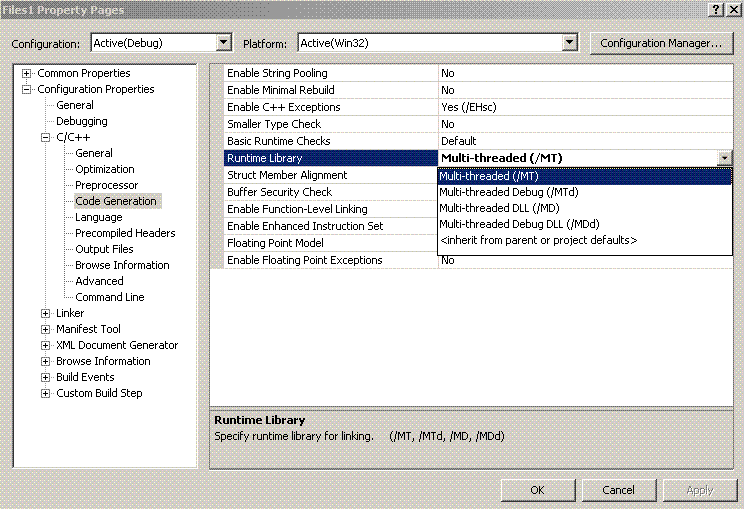
float Num;
fstream OutFile;
OutFile.open("gradefile.txt", ios::out);
if (OutFile.fail())
{
cout << "Open of gradefile.txt failed" << endl;
exit(1);
}
// Set up output file formatting:
OutFile.setf(ios::fixed);
OutFile.setf(ios::showpoint);
OutFile.precision(2);
cout << "Enter a GPA number (or CTRL z to end): " << endl;
cin >> Num;
while (! cin.fail())
{
// Process the data:
OutFile << setw(12) << Num << endl;
cout << "Enter a GPA number (or CTRL z to end): " << endl;
cin >> Num;
}
OutFile.close();
|
A Dark GDK Example
Let's now consider the application of files to using Dark GDK. Before doing using our example
code, you will need to make the following change to the project set up for the Dark GDK App
discussed below. In Visual Studio, go to Project -> Properties and in that configuration window
go to Configuration Properties -> C/C++ / Code Generation and
set Runtime Library to Multi-threaded (/Mt).
As was stated before, this will need to be done in the Dark GDK project below but first, let us quickly
review a helper program which has been written for this.
We would like to create a Dark GDK Program which reads an input file and draws some circles and rectangles.
To write the input files for this by hand could become rather confusing, particularly if we are frequently
alternating the type of shape that we want to draw. What we can do to help is write a program which will prompt
the user for the configuration of their drawing and use that to create the file. (What this also allows us to
see is how two programs can interact through the intermediary of a file. A far more sophisticated example of this
would be the Warcraft III Map Editor
which allows users to design maps and save them for use in
Warcraft III. Of course, we could come up with a
whole variety of such examples in the world of Business, Games, Utilities, etc. Our helper application is
CreateShapeFile.cpp. There
is little new in it from what we have discussed earlier regarding file creation. For reference, you can see
fileformat.txt and a simple output
file, drawing.txt.
Now we need to consider the program which reads this file and displays it,
ShapeLoader.cpp. On the whole, the main body is rather simple
and revolves around a simple switch statement which branches the code based on the first number on each
line (the "shape type" indicator for either rectangle or circle).
switch(type)
{
case RECTANGLE_TYPE:
InFile >> filled >> ulx >> uly >> lrx >> lry;
if(filled)
{
dbBox(ulx,uly,lrx,lry);
} else
{
DrawEmptyBox(ulx,uly,lrx,lry);
}
break;
case CIRCLE_TYPE:
InFile >> filled >> cx >> cy >> r;
if(filled)
{
DrawBall(cx,cy,r);
} else
{
dbCircle(cx,cy,r);
}
break;
}
|
The logic within each case handles the expected data. The error handling is not
overly robust, but we must accept that at this point in our lectures. The drawing functions
should look familiar, though one has taken a slightly different twist, namely "DrawBall."
In a previous example, a ball was drawn very simply, by drawing multiple concentric circles which
ultimately give the appearance of a full "ball." Ultimately, this is going to involve quite a bit of
processing as each circle is created. On the whole, the operation is relatively simple thanks to the
symmetry of the circle about its center. In order to render an entire circle, we could consider several possible
algorithms, each of which becomes less and less computationally involved. The following material is optional
and provided for your own edification, though it may be a bit intense for a new algorithmist.
Therefore, it is optional, though recommended for eventual review. In the examples which follow,
we will assume the following definitions: {r => radius; cx => center x coordinate; cy => center y coordinate; these
last two apply also for any other point arbirarily named (e.g. p = (px,py), r = (rx,ry), etc.}
| Algorithm "Name" | Algorithm Description |
| Full Distance Formula Fill |
A filled circle could be defined as all those points which are of distance d such that 0 <= d <= r.
In ordinary English, this means that these are all points which are no furter from the center of the circle than the length of
the radius. (When drawing an empty circle, the points which have d = r define the outer rim of that circle. Considering all
of distance 0 to r merely includes those "inside of the rim.") According to the
distance formula which is derived from the
Pythagorean Theorem, we know that the distance d from the center to
any point p can be defined as: sqrt(pow(px - cx,2) + pow(px - cx,2)), the square root of the sum of the squares of the differences
of each component.
Also, we know that the upper left corner of the bounding box of a circle is (cx - r, cy - r).
(The bounding box is defined as the smallest rectangle which contains the circle. For a circle, this would be the square with
sides of length 2r [the diameter of the circle], with an upper left corner defined with x as the lowest x on the circle and y as
the lowest y value.) From this, we could start in the upper left corner and proceed across and down the bounding box
until we reach the lower right corner. For each point, we could calculate the distance of that point from the center
and draw the point for all those which meet the criteria defined above.
|
| Partial Distance Formula Fill |
To do the "Full Distance Formula Fill," we would spend quite a bit of time. Because of the symmetry of the circle, we know that for any
point ul on the left side of circle, there exists on the right half a point r which is the same distance (in both the x and y directions)
from the center, only differing in that it is in the positive x direction. We can simply explain this in the following way. For any point on the left side of a circle, we know that there
exists a corresponding point on the right side of that circle. On the left, the point is a given -x from the center. The cooresponding point
on the right side of the circle has the same y component but has x instead of -x for its x component.
In specific notation, for each point ul = (ulx,uly) which lies upon the outside of the circle, there exists
a point r such that urx = 2 * cx - ulx and ury = uly. (This is determined algebraically by solving placing the equation (urx = cx + x) in
terms of cx by solving (ulx = cx - x) for x, getting (x = cx - ulx) and replacing (cx - ulx) for x in the equation for urx.)
Now that we have the start and end points of a given line on the circle, we can merely
iterate in a loop without calculating, creating all points p defined as {p | (ulx <= px <= urx,uly)}. We merely iterate this for each
line of the bounding box.
However, we could even further simplify this since the circle is also symmetric across its horizontal center. (In fact, it is symmetric
across its center point.) For point ul, we also know that there is a corresponding bottom left point bl which is equally far from the center in
the y direction. This means that bly = 2 * cy - uly. Furthermore, according to our former principle, there must exist a point which is a
reflection across the vertical center line of the circle such that this bottom right point br = (urx,bly). Therefore, we need only investigate
those points which lie in the upper left quadrant of the circle. We only have to execute our algorithm for all those points p
such that cx - r <= px <= cx and cy - r <= px <= cy.
Both of these versions yield the added advantage that when scanning a given line, we need not proceed any further in the x direction
once we have found the left-side x value for the circle. We use the latter in this example program.
|
| Exact Point Detection Method |
In the final portion of the last example, we considered using the upper-left arc of the circle and from that extrapolating the rest
of the data. When doing this, we still had to pass through a number of points which were not valid before reaching the first
point which lies on the outside of the circle. Wouldn't it be nice if we could ascertain for each line x in the upper left
quadrant of the circle what y? Well, there are two methods which you could use, though we will only lay out the beginnings of those here:
- You could use the distance formula and solve for x for each value y in the upper left quadrant.
{pow(x-cx,2) + pow(y-cy,2) = pow(r,2) => x = ±sqrt(pow(r,2) - pow(y-cy,2)) + cx
- You also could use the parametric defintion of a circle {x(t) = r*cos(t) + cx; y(t) = r*cos(t) + cy} and
iterate for values {90 degrees (pi/2 radians) <= t <= 180 degrees (pi radians)}
|
As is obvious from these three examples, there are multiple ways to approach this one graphics problem. Each has its own strengths and
weaknesses in various categories (readability, execution speed, memory use - though not to much of a degree in this latter). There are
still other ways you could solve this problem with other algorithms and graphics primitives. Perhaps you can think of a few and even test
them for their relative merits.
Related Items
Back to the main page for Software Design Using C++
|