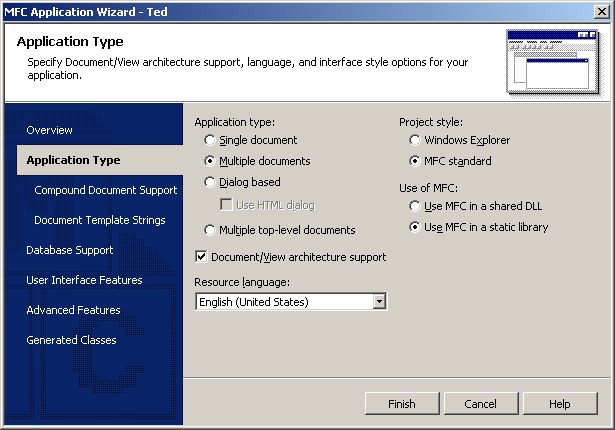
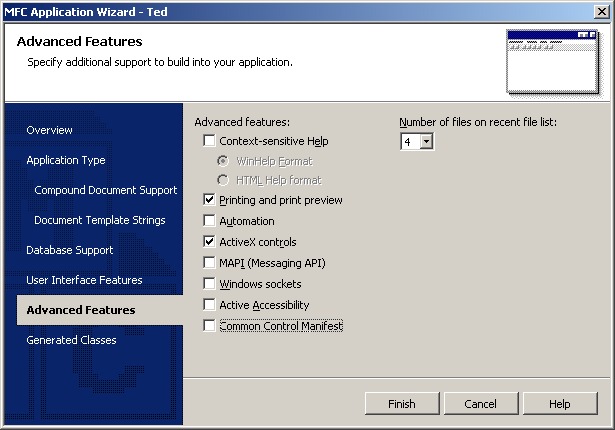
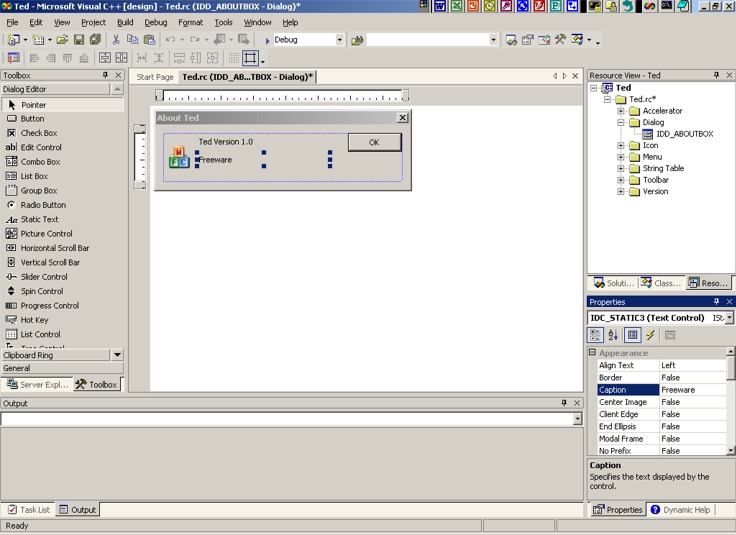
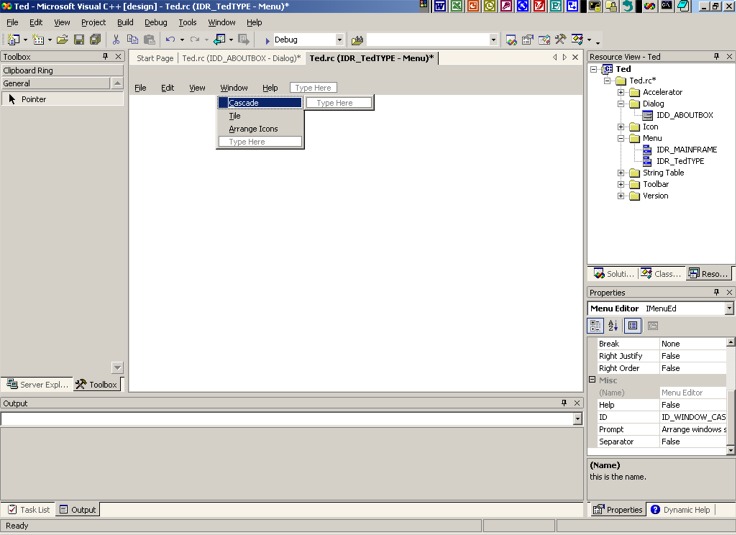
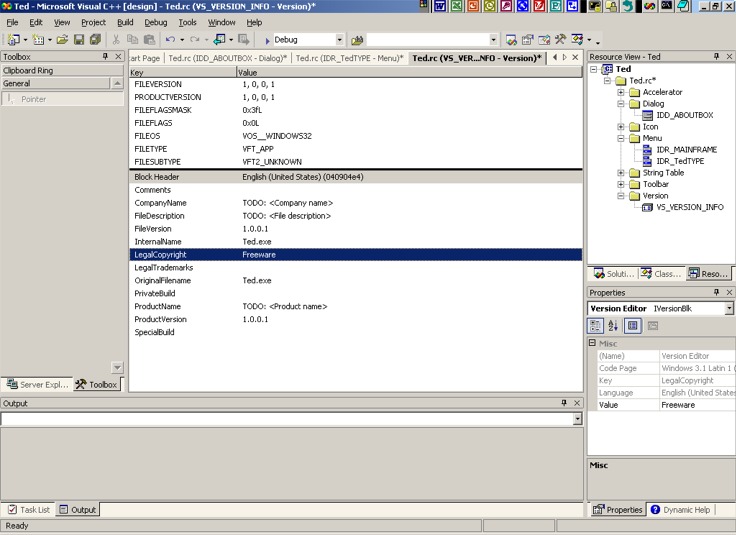
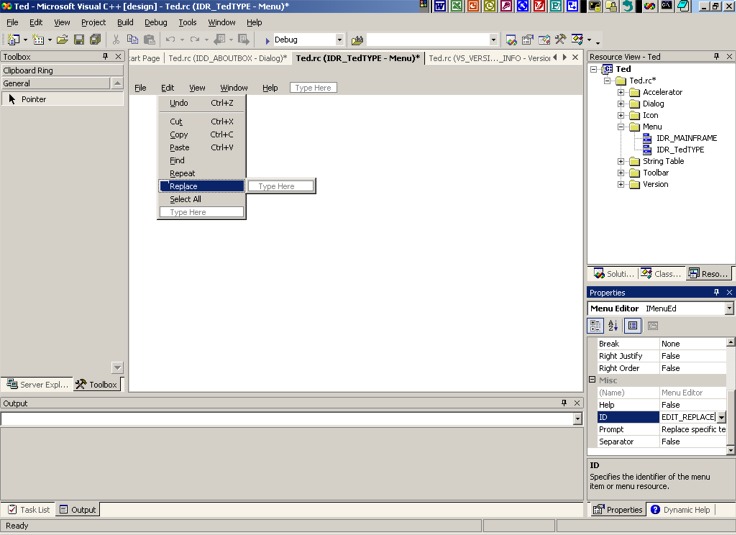
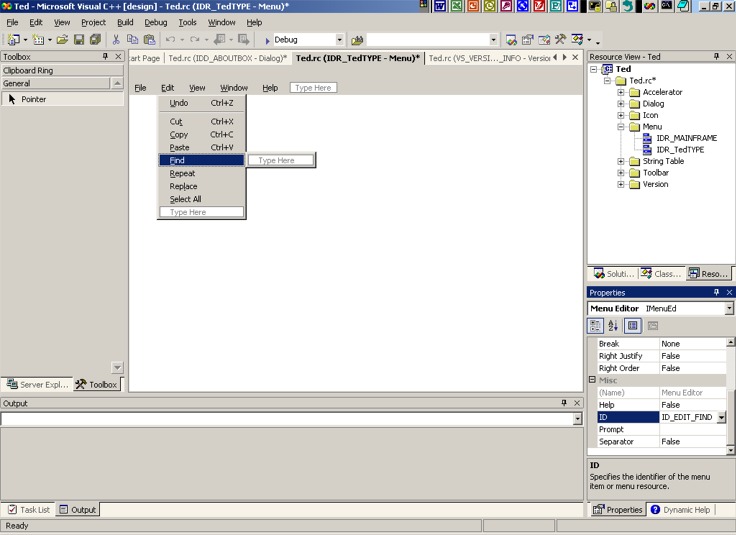
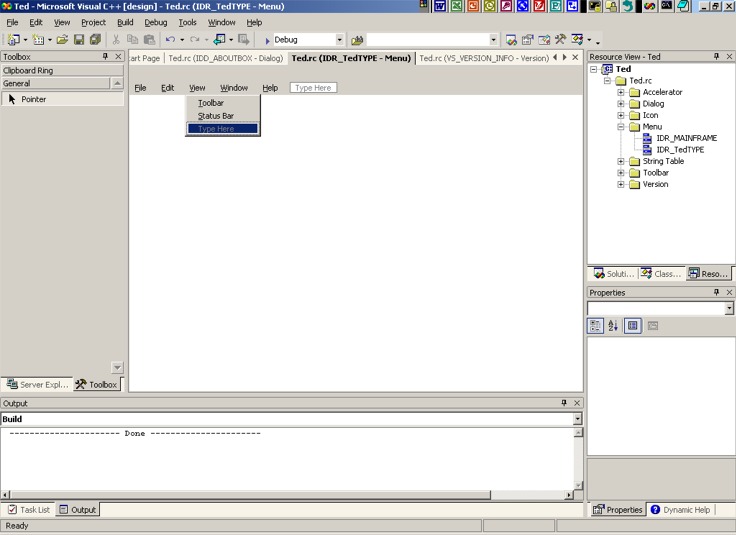
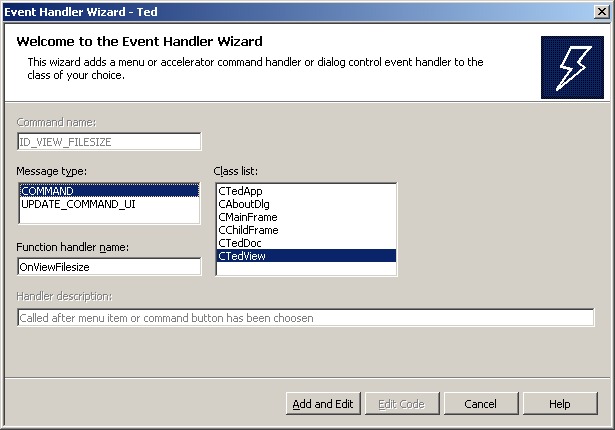
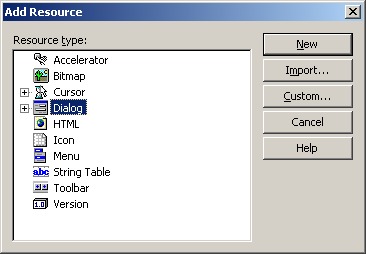
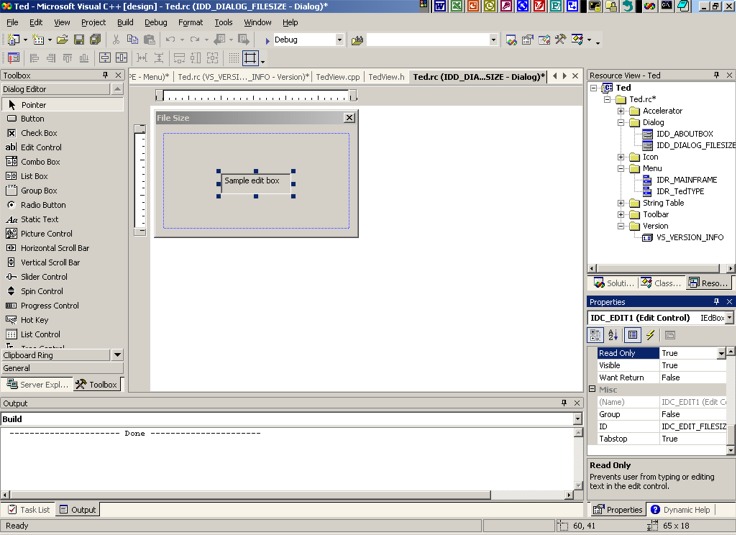
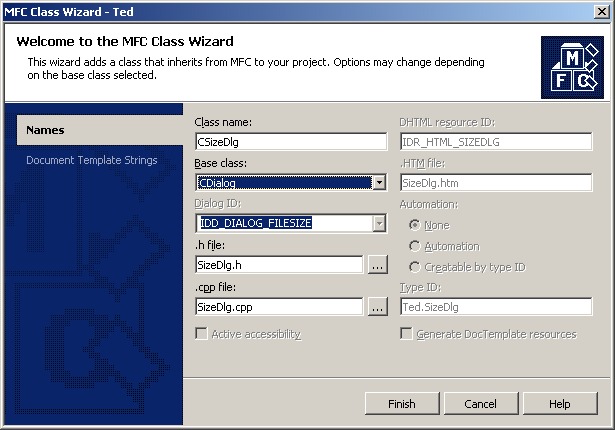
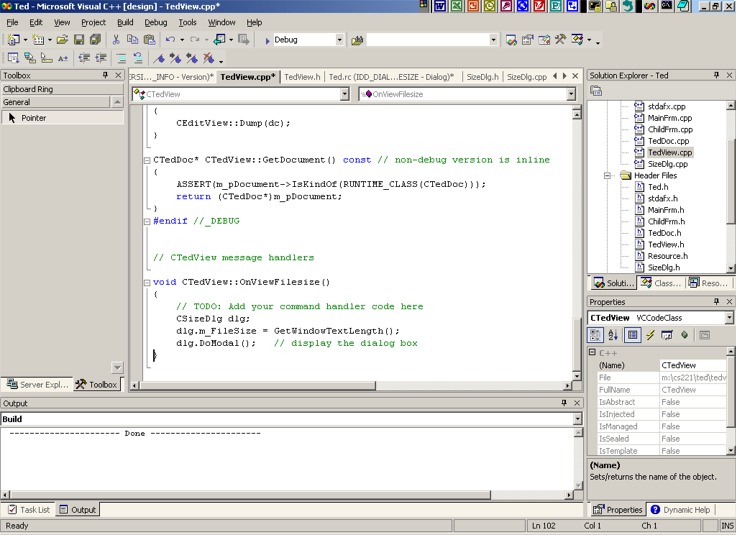
Software Design Using C++Multiple Document Interface with Visual C++ .NETCreating a Text Editor1) OverviewThese directions apply to Visual C++ .NET specifically. The task is to write a Windows app (application) that is a simple text editor. We will use the AppWizard's multiple document interface. The editor itself is similar to Notepad and has some of the same limitations. Since it is based on CEditView, which stores in a single CString object a copy of the file being edited, the size of file that can be handled is limited. We add to the editor a File Size menu item under the View pull-down menu. This reports in a dialog box the number of characters currently in the file. 2) Using AppWizardBegin by making a new project of type "MFC Application". (As usual you do this by using File, New, Project, Visual C++ Projects and then click on MFC Application.) Name the project Ted (short for tiny editor), add the project to your existing solution (if any), and use the default values except as specified in the rest of this paragraph. Under Application Type be sure that Multiple Documents is selected. Under Advanced Features uncheck Common Control Manifest. (It appears that the compiled project will not work correctly under Windows XP if Common Control Manifest is checked.) Under Generated Classes click on CTedView and then select CEditView as the base class. (This step is very important as it automatically supplies most of the code for our editor.) Click on Finish when you have completed these items. 3) Change the About Box and CopyrightClick on the Resource View tab (or use View, Resource View). Click on the + signs to expand the folders for Ted, Ted.rc, and Dialog. Double click on IDD_ABOUTBOX and then click on the Copyright line. Right click and select Properties (if the Properties window isn't already showing). Change the caption field to one word: Freeware. In Resource View, expand the Menu folder and double click on IDR_TedTYPE. In the menu editor, click on Window and then on New Window. Press the Delete key to remove this menu option. (We are using CEditView to create our editor. It cannot handle multiple views of the same document.) In Resource View, expand the Version folder and double click on VS_VERSION_INFO. Double click on Copyright (C) followed by the year. This should let you modify this item to also say Freeware. Do File, Save All. 4) Easy Edit Menu AdditionsNow we will add more options to the Edit menu. These are the ones that work automatically just by adding the items to the menu. Expand the Menu folder in Resource View if necessary. Double click on IDR_TedTYPE. In the menu editor click on Edit. Then click on the blank item at the bottom of the pull-down menu. Type &Find and press Enter. (Note that the ampersand indicates what letter gets underlined for those selecting a menu item by keypress.) Click on the blank item now at the bottom of the pull-down. Type &Repeat and press Enter. In the same way add menu items with Rep&lace and &Select All as the text. The final result should look like that shown in this screen shot. Next click on the Select All menu item. In the "Menu Item Properties" box, change the ID to ID_EDIT_SELECT_ALL. Make sure you have that underscore before ALL. In a similar way make sure that the ID for the Replace menu item is ID_EDIT_REPLACE, that the ID for the Repeat menu item is ID_EDIT_REPEAT, and the ID for the Find menu item is ID_EDIT_FIND. Then close this box and do File, Save All. Do Build, Build Ted. Then run the program by using Debug, Start Without Debugging and see what you get. You should have a functional editor at this point. 5) File Size Menu ItemLet's add the menu item for displaying the current file size. In Resource View find the Menu folder and click on IDR_TedTYPE within it. In the menu editor, click on View. Click on the blank item at the bottom of the pull-down menu and then enter the text &File Size. Now we need to add an event handler for this menu item. Right click on the new menu item and select Add Event Handler. In the class list select CTedView. The Command name field should already have ID_VIEW_FILESIZE in it. Under Message type select COMMAND. This picture shows what you should see at this point. Click on the button labeled Add and Edit. The Function Handler Name field will be filled in automatically with the name of the event handler function. Do File, Save All. 6) File Size Dialog BoxNow we need to add a dialog box in which to show the file size. Use Project, Add Resource and click on Dialog and then on New. This should show you a form for the new dialog box. We don't need the Cancel button, so click on it and then press the Delete key. Do the same with the OK button, as it is not needed either. (People can close the box with the x in the corner.) If the properties window for this dialog box isn't showing, right click on the dialog box and select Properties. Then change the caption field to File Size. Also change the ID to IDD_DIALOG_FILESIZE. Here is what you should see after carrying out these steps. Next we need to add an edit control to our dialog box. The edit control will be used to display the file size. If you do not have a Toolbox menu showing, find the Toolbox button at the top of Visual Studio and click it (or use View, Toolbox). Right click on the middle of the toolbox and see that Show All Tabs is checked. Click on Dialog Editor. You should see a list of items that can be added to your dialog: Button, Check Box, Edit Control, etc. If you do not see this list, right click on the Toolbox, select Customize Toolbox, and click on Reset and then on Yes. Once you have the list of items, drag the edit control to your blank dialog box. Put it in the middle of your dialog box. Drag the edge of the edit control to resize it, move it around, and resize the entire dialog box until things look good. With your edit control selected, go to Properties (if need be by right clicking on the edit control and selecting Properties) and change the ID to IDC_EDIT_FILESIZE. Also change the Read Only property to true. It would not make sense to allow the user to try to change the file size number. You can close the Toolbox window now if you wish. Do File, Save All. 7) Adding a ClassRight click on your new dialog box and select Add Class. (We want to create a new class as our interface with the dialog.) Fill in CSizeDlg as the name of the class. Change the base class to CDialog. The Dialog ID box should automatically contain IDD_DIALOG_FILESIZE. Here is a screen shot of the Class Wizard at this point. Click on Finish. Find the place in your TedView.cpp file to insert the code for the CTedView::OnViewFilesize function. (If need be, find this .cpp file with View, Solution Explorer.) Put the following code into this function:
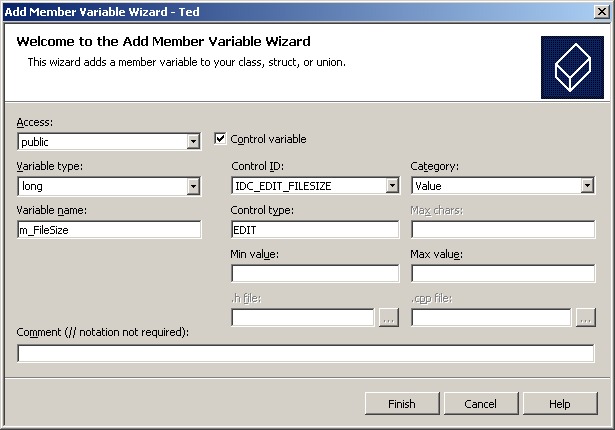
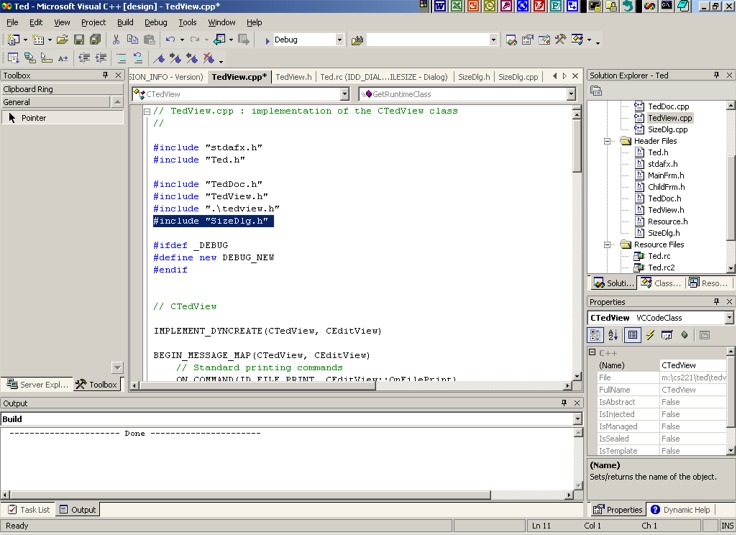
This looks up the length of the text in the view window and places this number into the m_FileSize variable. So, we had better add an m_FileSize variable that is associated with the edit control in our new dialog. (That way, the file size will get displayed in the edit box.) Use View, Class View. If need be, click on the + in front of ted in Class View so as to expand the list of classes used by ted. Right click on CSizeDlg and select Add, Add Variable. Check the Control Variable box and make sure that the Control ID box contains IDC_EDIT_FILESIZE, the ID for our edit control. Change the Category entry to Value and the Variable Type to long. Make sure that the Access entry says public. We want our new variable to be a public field. Fill in m_FileSize as the name of the variable. Compare your work to this picture of the Add Member Variable dialog box. Click on Finish. Add a #include of SizeDlg.h at the top of your TedView.cpp file, after any #include lines that are already present. (Remember that you can use View, Solution Explorer to find TedView.cpp if need be.) Do a File, Save All. Then try Build, Build Ted (or Rebuild Ted if Build doesn't behave properly). Run your program and try out the File Size menu item both when a document is open and when no document is open. You should now have a nice little text editor. 8) For Further Practice (Optional)If you are brave, you might want to try the following. Note that complete directions are not given, so that you will have to figure out on your own how to deal with a number of complications. The suggestion is to place under the Edit pull-down a Spell Check menu item. It should bring up a Spell Check dialog box that shows in an edit control each word (one by one, in succession) that the program thinks may be misspelled. You will have to find a file of common words. (If you have access to Linux, see if you have the linux.words file.) To get fast lookup to see if a particular word is present, you may want to store the words in a file-based hash table. The Spell Check dialog box could show in a separate edit control the words immediately surrounding the suspected misspelled word. This is to provide the user with the context. You could provide a Continue button and an Ignore All button. If the user has not changed the displayed word, the Continue button should just let the spell checker go on. If the word was modified by the user, clicking Continue should cause the new spelling to replace the old. The Ignore All button should tell the spell checker to ignore all instances of the current word. This can be handled by placing each word to be ignored on a linked list that can be checked every time you reach a word that is not in the file of common words (dictionary). The STL list container is suggested for this. 9) Reference:This example is partially based on an article by Marshall Brain entitled Understanding the AppWizard and ClassWizard in Visual C++ Version 6.x that appeared at DevCentral. The article might no longer be there by the time that you read this. Related ItemMultiple Document Interface with Visual C++ 6.0 Back to the main page for Software Design Using C++ |
Computing & Information Systems |
|

 Search CIS Site
Tutorials
Search CIS Site
Tutorials
|