Manually Configure a Data Source for a Grid View
The Goals for this Example
In this example we recreate essentially the same web app as in the previous example,
Quick.aspx. However, we will not take the fast route of dragging the table
to the web form. Instead we put a grid view on the form and manually configure its data source,
including setting up the SQL statement used to retrieve the data.
Important note: You must have completed this earlier example, as we will use the connection string that
we created in that one and will even begin by copying items from that form to the new one here.
Creating the Example
Setting up the Form
- Open your solution in Visual Studio, the solution that contains the web site that you have
been working on in these examples.
- In Solution Explorer, add a new web form to your web site. Name it Display.aspx.
- For a fast start, copy the items on the web form in the previous example, Quick.aspx, and paste them
onto Display.aspx. Perhaps the easiest way to do this is to look at both forms in Design View. In Quick.aspx highlight with
the mouse everything inside of the div section. Then go to Display.aspx and copy that inside of its div section.
- Right click on the grid view and select Delete. Do the same with the SqlDataSource. We want to see if we can set these
up manually.
- Change the title of the web form to "Displaying SQL Server Data" or similar.
The easiest way to do this might be to type the words after the opening title tag in source view.
- Save your work so far by using File, Save All.
|
Preparing a Grid View to Show the Data
- Drag a grid view inside of the panel of your form. Set its positioning to absolute and drag it so that it is
at or near the upper left corner of the panel.
- Use the smart tag (in the grid view's upper right corner)
to get to the GridView Tasks menu. Select Auto Format, Colorful.
- Under GridView Tasks, click on the pulldown for Choose Data Source and select SQL Database. The default ID for
this data source should be fine. Click OK.
- In the pulldown for choosing the data connection, click on carlsondwebappConnectionString or whatever you named
the connection string created in the last example for accessing SQL Server using SQL Server authentication.
- You can click on the + in front of the Connection string to see what this string is and thus verify that you have
the right connection. Then click Next.
- You then get a window for configuring your SELECT statement. This is where you create the SQL that retrieves your data.
- Make sure that 'Specify columns from a table or view' is selected.
- In the pulldown for Name select your product table.
- Under Columns, * will be selected by default. This means to use all of the columns. However, it is better to select each
individual column that you want, so click on ProductName, Price, and NumInStock. We will leave out ProductNum since it
is not very interesting. Notice that the check on * goes away.
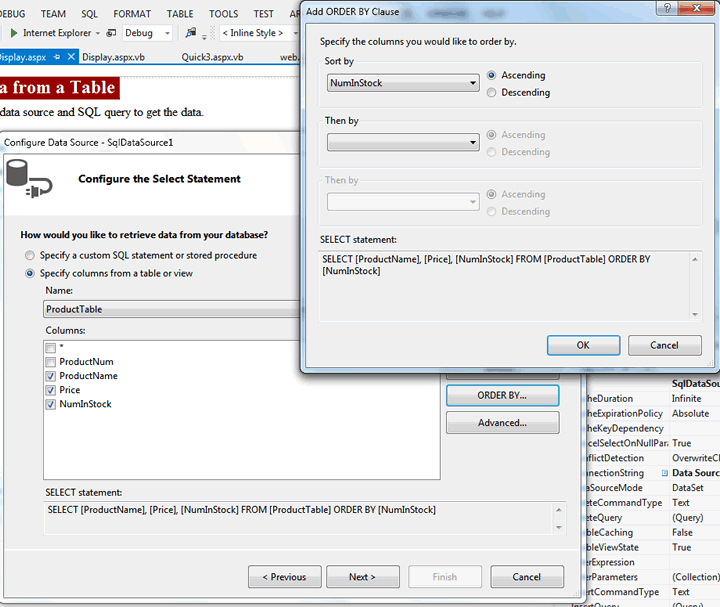
- Let's display the data in some sorted order. Click on the ORDER BY button. Under "Sort by" select NumInStock and
select Ascending order. Check this picture showing the window for configuring the SELECT
statement as well as the window for choosing an order for the data. Once you have things right, click OK in the window
for choosing an order for the data.
- Note that the Configure window now shows the SQL statement that the above steps has generated. Click Next.
- Click on the Test Query button and make sure that you get data back and that it is what was expected.
- Click Finish. Your form now has an SqlDataSource sitting next to the grid view, which is configured to use this data
source, as you can see by looking under the grid view's properties.
- Change this grid view's Visible property to False.
- If you wish, set up the Price field so that the numbers are rounded to 2 decimal places as when we
rounded the price numbers in the previous example.
|
Adding Click Handler Code
- Instead of writing code to handle the Page_Load event, this time we will write code to handle the click event for the button.
- You can either double click on the button or select the button, click the lightning bolt Events button in the Properties Window,
and then double click the Click event. This will give you the outline of a click handler named Button1_Click.
- Add code to it so that it looks like this:
|
Partial Class Display
    Inherits System.Web.UI.Page

    Protected Sub Button1_Click(sender As Object, e As EventArgs) Handles Button1.Click
        'Page gets reloaded because the user clicked the button.
        Button1.Visible = False
        GridView1.Visible = True
        Label3.Visible = True
    End Sub
End Class
|
Building and Running Your App
- Save all of your files in Visual Studio.
- Then use Build, Build Page.
- If the build succeeded, the Output window will give you a message to that effect.
- If not, fix any problems.
- Use the debugging methods suggested in the last example, if need be.
- Then run your app by going to the correct URL with a browser. For example, it would be similar to this:
http://cis2.stvincent.edu/carlsond/ConfigDataSource/Display.aspx
|
|

 Search CIS Site
Tutorials
Search CIS Site
Tutorials