Maintaining Session State Information
The Goals for this Example
In many web applications we need to keep track of information about each particular user's
session. This may be needed to keep track of each user's preferences. Also, if a web form
collects user data that we want to use somehow in a second web page, then we need a way to get
this session information to that second page. This does not happen automatically. Two typical methods
that are used for this in VB .NET web apps include the use of cookies and HttpSessionState objects.
We discuss the latter in this particular example.
As an example, we modify our previous web app so that the results
of the database lookup are displayed on a separate page. To do this we take
the maximum and minimum price information that we
collect on the first page and make it available to the second page, which retrieves from the
database the products that fit that price range.
Making the Modified Web App
What the App Should Do
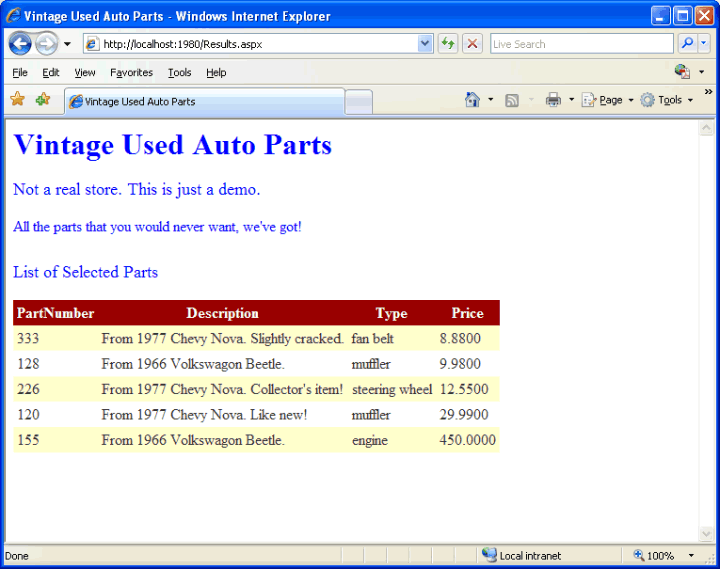
- Like the previous web app, this one will display auto parts data
that fits the price range that the user inputs.
- However, this time the results will be displayed on a new page.
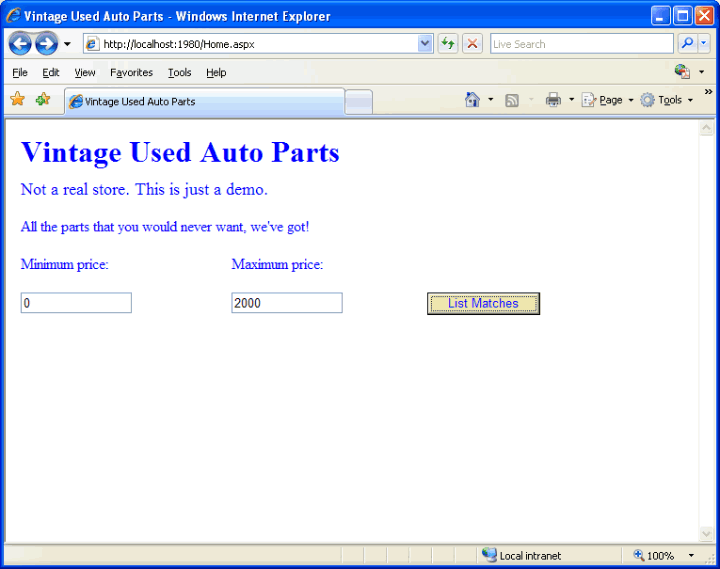
- The initial view of the application
shows that the user begins with a page in which to enter the desired price range.
- Once the "List Matches" button is clicked, the web app shows the
selected auto parts data on a new page.
- Thus the app works much the same as before, except that the results are not shown on
the original page.
|
Copying the Previous Web App
- Use My Computer to copy your previous web app
to a folder names Session in a convenient locationi (such as your M drive).
- Then open the new copy in Visual Studio 2005.
|
Adding another Web Form
- We will use this new web form to display the results of the user's query for auto parts data.
- In Solution Explorer, right click on the new project.
- Select Add, New Item, Web Form.
- In the dialog box, type in the name Results.aspx as the name of the new web form.
- Change the title on Results.aspx to Vintage Used Auto Parts.
- Also change the name of the Default.aspx form to Home.aspx.
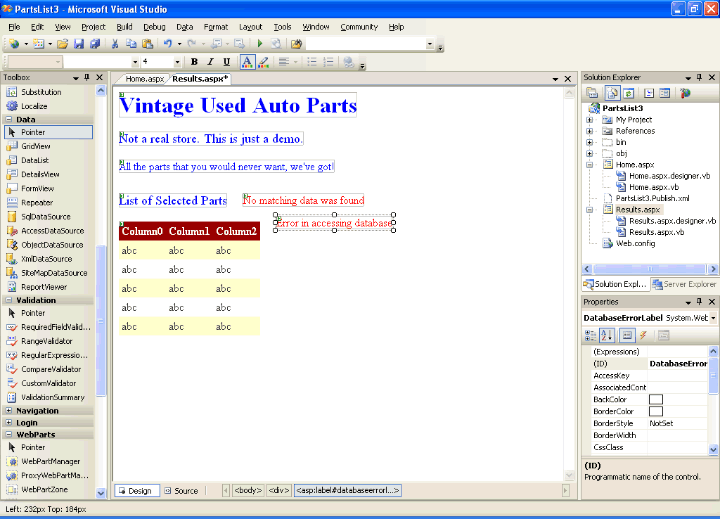
- Copy controls to the Results.aspx form until it looks like
this screen shot.
Note that the bottommost blue label has ID PartsLabel.
Make sure that it is visible, as in the previous web app it was not. The GridView has ID PartsGridView,
has Visible set to False, and has no data source specified.
It is suggested that you use the GridView's smart tag, then Edit Columns to go in and remove the
4 bound fields. Then you need to set the
GridView's AutoGenerateColumns property to True, as otherwise the GridView
won't display anything. (The alternative is to leave the 4 bound columns in place
and not use AutoGenerateColumns. We want to try out AutoGenerateColumns here.)
The 2 red error labels have
IDs NoDataLabel and DatabaseErrorLabel, are not visible, and have text fields of
"No matching data was found" and "Error in accessing database".
- Once you have copied PartsLabel, PartsGridView, DatabaseErrorLabel, and NoDataLabel to the new form,
you should delete them from Home.aspx, as we no longer need them there.
- Do File, Save All.
|
Enabling Session Tracking
- Actually, session tracking is enabled by default. You just need to know how to use it.
- Click on the topmost pull-down in Properties for the Results.aspx web form.
Select Document so that we see the properties for the overall web form.
- Then, in Properties look for EnableSessionState. Make sure that this is set to True.
- Check the Home.aspx web form in the same way.
- In web applications that do not require the tracking of session information, it is advisable
to set EnableSessionState to false. This reduces the amount of overhead. Thus, in our
previous web examples we really should have turned off EnableSessionState.
- With EnableSessionState turned on, information from a web form that you add to an
HttpSessionState object
is sent to the server and stored there, where it can be used by your code for another web form.
Note that every user's browser session gets its own session state. Session state information
expires after 20 minutes of activity by default, though the timeout interval can be adjusted.
(Note that cookies use the opposite approach, saving the information at the client PC, with
2 flavors of cookies, those that store the information on disk and those that
just save their information temporarily in RAM.)
- Security note: Since each user's session information is stored on the server, you should
worry a little about what happens if too many users are active at the same time. Could someone use
this as a denial of service attack on your web site, for example?
- There is also a property called EnableViewState. Although the details of this are beyond
what we want to discuss here, it has to do with saving certain information about what you see
in a control so that this information is still present if the page posts back to itself.
If a page does not post back to itself, it should be possible to turn EnableViewState off
in any control that uses it and thus reduce the amount of overhead.
EnableViewState saves the information (as a hashed string)
in a hidden field of the web page. You can find this hidden field on the web apps that we have
produced thus far in our sequence of examples, as we never turned EnableViewState off. Just look at
the page in a browser and use View, Source.
- Leave EnableViewState set at True in the controls in the current web application.
- For more information, look up EnableViewState and EnableSessionState under Help, Search.
Also search for the specific articles "ASP.NET Session State Overview",
"Introduction to Web Forms State Management", and
"State Management Recommendations".
|
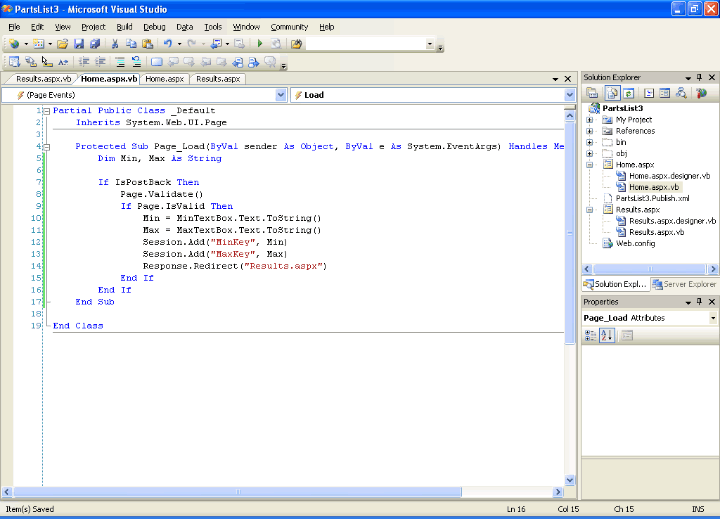
The Code for Home.aspx.vb
- In Solution Explorer double click on Home.aspx.vb, the "code-behind" file for your web form,
to bring it up in the editor. This is where we add the code for your web page.
- Once again we will not add a click handler for the button on your form. Instead,
we will use the fact that a postback happens whenever the user click on this button.
- Thus, we just write code to handle the postback in the Page_Load procedure.
- Make your
Page_Load procedure match the following:
|
    Protected Sub Page_Load(ByVal sender As Object, ByVal e As System.EventArgs) Handles Me.Load
        Dim Min, Max As String

        If IsPostBack Then
            Page.Validate()
            If Page.IsValid Then
                Min = MinTextBox.Text.ToString()
                Max = MaxTextBox.Text.ToString()
                Session.Add("MinKey", Min)
                Session.Add("MaxKey", Max)
                Response.Redirect("Results.aspx")
            End If
        End If
    End Sub
|
- Notice that none of the above code deals with getting data from the database. That
will be handled in the code-behind file for the Results.aspx form.
- If a postback has occurred and the user input validates as reasonable,
the above code gets the minimum and maximum values from the text boxes.
- Then we use Session.Add to add a pair of items to the HttpSessionState object. The pair
consists of the key "MinKey" and the minimum value just retrieved from the appropriate text box.
- In a similar way we add another pair of items to this object. This pair has key "MaxKey"
and value Max, the maximum number taken from the other text box.
- These key/value pairs will be available for our use in the code for our Results.aspx web form.
This is what we mean by session state information. Note that this information (the minimum
and maximum prices defining the user's desired price range) are associated with a particular
user's web session. Another user may be using the same web app at the same time with different
session state information (that is, a different price range). In fact, the same user
could be using this web app in a different browser session, also with its own price range.
|
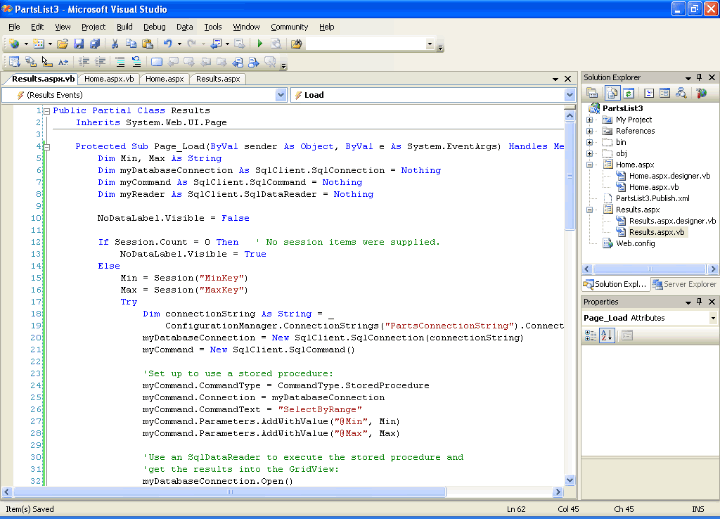
The Code for Results.aspx.vb
- In Solution Explorer double click on Results.aspx.vb, to get it into the editor.
- The Page_Load procedure for Results.aspx.vb is where we get the
desired data from the database and display it.
- Make your Page_Load procedure match the following:
|
Protected Sub Page_Load(ByVal sender As Object, ByVal e As System.EventArgs) Handles Me.Load
    Dim Min, Max As String
    Dim myDatabaseConnection As SqlClient.SqlConnection = Nothing
    Dim myCommand As SqlClient.SqlCommand = Nothing
    Dim myReader As SqlClient.SqlDataReader = Nothing

    NoDataLabel.Visible = False

    If Session.Count = 0 Then   ' No session items were supplied.
        NoDataLabel.Visible = True
    Else
        Min = Session("MinKey")
        Max = Session("MaxKey")
        Try
            Dim connectionString As String = _
                ConfigurationManager.ConnectionStrings("PartsConnectionString").ConnectionString
            myDatabaseConnection = New SqlClient.SqlConnection(connectionString)
            myCommand = New SqlClient.SqlCommand()

            'Set up to use a stored procedure:
            myCommand.CommandType = CommandType.StoredProcedure
            myCommand.Connection = myDatabaseConnection
            myCommand.CommandText = "SelectByRange"
            myCommand.Parameters.AddWithValue("@Min", Min)
            myCommand.Parameters.AddWithValue("@Max", Max)

            'Use an SqlDataReader to execute the stored procedure and
            'get the results into the GridView:
            myDatabaseConnection.Open()
            myReader = myCommand.ExecuteReader()
            If myReader.HasRows Then
                PartsGridView.Visible = True
                PartsGridView.DataSource = myReader
                PartsGridView.DataBind()
            Else
                NoDataLabel.Visible = True
            End If
            myDatabaseConnection.Close()
            myDatabaseConnection.Dispose()
        Catch exception As System.Data.SqlClient.SqlException
            DatabaseErrorLabel.Visible = True
        Catch exception As Exception
            DatabaseErrorLabel.Visible = True
        Finally    'Do cleanup tasks here:
            myCommand = Nothing

            If Not myReader Is Nothing AndAlso _
                Not myReader.IsClosed Then
                myReader.Close()
            End If

            myReader = Nothing

            If Not myDatabaseConnection Is Nothing AndAlso _
                myDatabaseConnection.State = ConnectionState.Open Then
                myDatabaseConnection.Close()
                myDatabaseConnection.Dispose()
            End If

            myDatabaseConnection = Nothing
        End Try
    End If
End Sub
|
- Note that the code is very similar to what was used in the
previous web app. Review the explanation under that link if need be.
- One thing that we have added here is some extra checking.
- First, if Session.Count is 0, that means that we have no session state information and cannot
do a database query with our stored procedure or display any results.
This should not happen, but just in case, we can
check for this. In such a case, we make the label visible that says that there was no matching data.
- It is very easy to look up session information when it is present. All you need is the key
in order to find the value associated with the key. For example,
Min = Session("MinKey")
retrieves the value that was associated with "MinKey" on the Home.aspx web form.
- The code to execute the stored procedure is really the same as before,
so we will not analyze it here.
- However, we do check myReader.HasRows to see if any data was returned by the stored procedure.
If so, we display the data in the GridView. Otherwise, the database query
found no matches and we make the label visible that says this.
|
Testing and Debugging The App
- Save all of your files in Visual Studio.
- Then build your application.
- Fix any problems until you get the build to succeed.
- Use Debug, Start Without Debugging to run your web app locally.
- Fix any problems that you see.
- Then publish your app to the live web server, get the web server admin to make it
an official IIS web app, and point your browser to the URL for
this published app.
- Make sure that the app works on the live web server, as sometimes an app will work
locally, but not on the real web server.
- Fill in reasonable minimum and maximum values (such as 5 and 50) and click on the
List Matches button to see what you get.
|
|

 Search CIS Site
Tutorials
Search CIS Site
Tutorials