A Simple Web App
The Goals for this Example
This example is presented for two reasons. First, the description on this page shows you how to
use Visual Studio 2005 to set up a web application. Second, you learn how to put a few simple features
onto the form for a web app. These features include labels, hyperlinks, and images.
Using Visual Studio .NET 2005
The following directions tell you how to set up a brand new web application using Visual Studio .NET 2005.
Visual Basic is used as the language. You would follow these directions whenever you want to
create a new web app using Visual Basic. Note that you need to have appropriate access to a web server
in order to publish the results for others to see,
though you can see your working web application on your own PC even
if you do not have a web server on which to publish your finished product.
We assume that the web server is IIS and
that the web server administrator is willing to convert your published
results to a web application in IIS. This last
step is needed before others can view your application.
- Start Visual Studio .NET 2005 on your PC. It is probably found under Start, Programs.
- Select File, New, Project.
- For project type, select Visual Basic, Web.
- For template, select ASP.NET Web Application.
- In the location box for your project, put in a reasonable location.
In the CIS department
at Saint Vincent College we suggest that you browse to your M drive and select or create an appropriate
folder there to hold your web project.
- Use the name Pizza for your web app.
- Click OK.
- If you get a warning that the project location is not trusted, just click OK and go on. This warning
commonly appears for network drives.
- You should be given a new Default.aspx page.
- Make sure that Solution Explorer is visible. If need be, use View, Solution Explorer.
Also, click on Solution Explorer's Show All Files button, as that will make it easier for you
to find the files that are part of your project.
- Also make sure that the Properties Windows is visible. Use View, Properties Window if need be.
- Click on Default.aspx in Solution Explorer.
- Click again and change the name of the file to something more meaningful.
For example, you could change the name to Pizza.aspx.
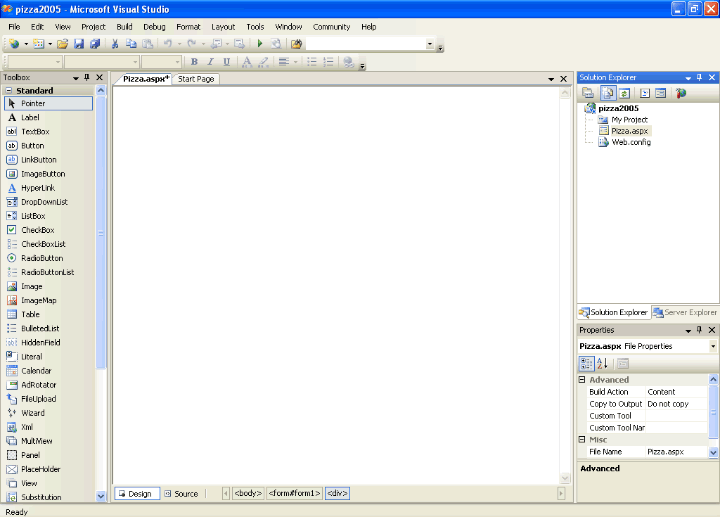
- You can see what we have at this point in Visual Studio
by looking at this first picture.
|
Creating The Simple Example
Now we will build a simple web app for an imaginary business called Pizza Paradise.
Changing the Title
- At the bottom of the web form mentioned above should be tabs for Design View and Source View.
Go to Design View. It should show a blank form.
- Look at your Properties window. The first line under Properties should tell you what item for which
you are seeing the properties. If this does not say Document,
use the drop down window to find and select
Document. This allows you to see the properties of the overall web document, including the title.
- Find title in the properties listing and click to the right of it to fill in a value. Use
Pizza Paradise as the title.
- It is also possible to change the title in Source View.
|
The Toolbox
- Open the Toolbox. If necessary, use View, Toolbox to do so.
Sometimes there is a Toolbox tab that you click on to open the Toolbox.
- Within the Toolbox click on Standard to show the items under it, if these are not already visible.
- You are now ready to add items from the Toolbox to your web form.
|
Adding Labels
- Click Layout, Position, Auto-position Options. Make sure that No Positioning Option is selected
in the pull-down. If you don't see this, make sure that the Show All Settings box is checked.
No Positioning is probably the default. It has the items you place on your web form displayed
as if they flow by like a stream, with the browser deciding exactly how they will fit on the page.
That will be fine for this first web app. In later apps we will change this.
- Before actually adding a label, click on the top of your web form and press Enter twice.
Pressing Enter is the basic way to space down before inserting an item. We will talk about
other ways to space and arrange the items on your page in later projects.
- Add a label to the top of your form by dragging a label from the Toolbox to the postion on your form
where the pressing of Enter took you.
- It will have the default name of Label1.
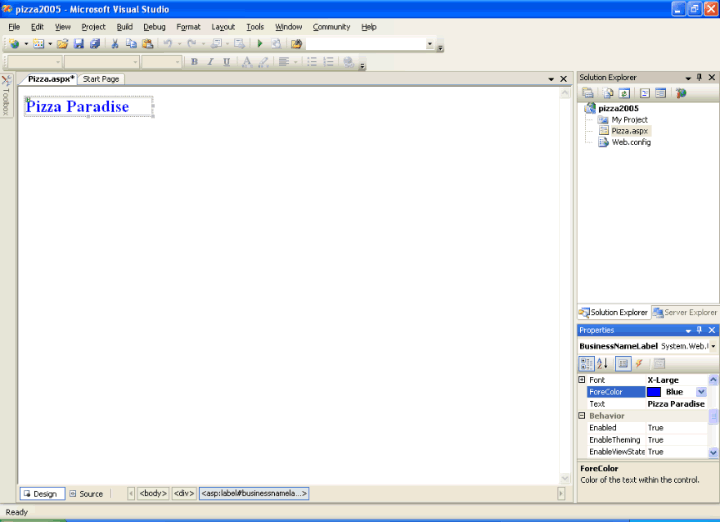
- Click on the label to make sure that it is selected, and then
in the Properties Window change the ID to BusinessNameLabel.
- Also change the text field to Pizza Paradise.
- Change the size of the label text. In the Properties Window, click the + in front of Font
to expand it. Go to the Size field and click the value box to the right of it. Click on
the down triangle to look at the choices in the drop down box. Select X-Large.
- Now make the text bold by setting the Bold field to be True. (Note that you can double click
a true/false field to reverse its value.)
- Resize this label as desired with the mouse.
- In the Properties Window, select Foreground Color. Change this color to blue.
- You can see what we have at this point by viewing this second picture.
- Now that you know how to handle labels, press Enter a couple of times to move down below the first label
and add a second label at that point.
- Make its size to be Large.
- Change the color to blue again.
- The text should read "Only an example, not a real business."
- This is to keep any visitors to your web page from thinking that
this is a functional online business!
- Change the ID of this label if you wish.
|
Adding Images
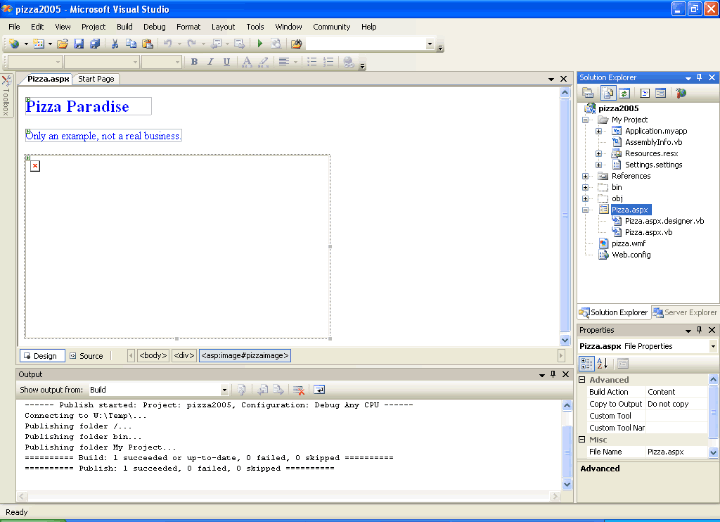
- After your second label, press Enter a couple of times to move down a bit on the form.
- In the Standard section of the toolbox find the Image item and drag it
onto the form below the labels.
- In the Properties Windows, change the image's ID to PizzaImage.
- Next, we want to set the image control so as to display the image of a pizza.
You can use any image of a pizza that you wish to use.
Locally, in the CS 305 class, you can find one on your course network drive.
Find your image in My Computer and do Edit, Copy on it.
Then in Solution Explorer, right click on your solution
(the first line of information about your project)
and select Paste. This pastes a copy of the image into your project's folder.
- Click on the image control and then go to the Properties window. Find the ImageURL field.
- Click on the 3 dots at the right of this field and browse to your pizza image file.
Select this image file and click OK.
- On your web form, resize the box containing the image as needed so that things look good.
- Here is a third picture showing what we have on screen now.
|
Saving Your Work
- At this point it would be good to save the work that we have done thus far.
- Use File, Save All (or the Save All button on the toolbar).
- You may notice that the asterisk on the tab for the Pizza.aspx window goes away.
- An asterisk indicates that the file has been changed since it was last saved.
- If there is no asterisk showing, all changes to the file have been saved.
|
Adding Hyperlinks
- Next, let's place a hyperlink below the image on your web form.
- Press Enter a couple of times after the image so as to move down the page
a bit before adding the hyperlink.
- Drag the hyperlink item from the Standard section of the Toolbox
and place it on the form at the spot you just moved to by pressing Enter.
- In the Properties Windows, change the ID to DisclaimerLink.
- Also set the text to read "Disclaimer".
- In the Properties window, change the so-called Navigate URL so that it uses the
http://cis.stvincent.edu/html/policies/disclaim.html URL for the standard disclaimer that student
web pages on the CIS servers are required to display.
- Finally, change the foreground color to blue and the font size to small.
|
Using Build
- Click on the Save All button in Visual Studio or use File, Save All.
- Then use Build, Build Pizza (or whatever you named your application).
- Hopefully the Output window will give you a message that the build completed successfully.
- If not, take a look to see if you can tell what went wrong.
- If the build completed OK, you have a finished web app!
- You can close that Output window to get it out of your way.
|
Testing Your Application
- If the build worked, the next step is to view the completed web app locally on your PC.
Click Debug, Start Without Debugging.
(If you get an error at this point, it may be that the security settings
in the .NET Framework configuration on your PC need to be adjusted.)
If successful, a simple local web server will
be started so that you can see your working web app in a browser.
Your browser will be automatically started and
pointed to a page similar to http://localhost:2282/Pizza.aspx.
- View this screen shot of the completed web app
to see how your web page should look in a browser.
- Although you can see your working web app, no one else on the Internet can yet do so.
To make your app available
on the Internet, you must publish it on a real web server on the Internet.
- Close the browser that is displaying your web app running locally.
- Click on Build, Publish and publish your app to the web server to which you have access.
For example, in CS 305 at Saint Vincent College, you can publish to your W drive,
which is your web folder on the cis2.stvincent.edu server.
Click on the Create Folder button to make a new folder to hold your web app.
Use a name such as Pizza for the folder.
- Now try looking at your web app by going to the appropriate URL for the above web page.
For the example described above, the correct URL would be
http://cis2.stvincent.edu/studentj/Pizza/Pizza.aspx, where we assume that your
username (and hence your web folder) on cis2.stvincent.edu is studentj.
- This will probably fail. Certainly on cis2.stvincent.edu it will fail.
The IIS web server requires that the web server administrator manually convert your
project folder (the one you placed on your W drive) to a web app.
This can be done easily, but only an administrator on the server can do this.
(This gives the administrator control over what .NET web apps get displayed on his/her server.)
So, contact your administrator and ask that your web project be converted to an "official" web app.
Then point your browser to the same URL to see your working web app.
Now everyone on the Internet can see your working web app.
- View this
screen shot of the completed web app running on a real web server.
- Congratulations on producing your first web app with Visual Studio .NET 2005!
|
|

 Search CIS Site
Tutorials
Search CIS Site
Tutorials