|
There are a number of ways to influence the appearance of webpages with color, text sizes, font faces, etc. One piece of advice to
designers of websites, is that it is a good idea for all of the pages of a website to have the same basic
appearance. This provides a context and clues to the user regarding where they are in terms of web navigation.
If you wish to do a good bit of customizing the appearance of the pages of a website, you can imagine how
tedious and error prone it would be to include all of these customizations on each page of the website. If you wanted to
dictate other aspects of the pages' appearance, all of these would need to be written down as "rules"
to be followed when editing or adding a webpage for the site. For example, suppose you never wanted
to use an <h1> level heading because you feel that it is just too large or you wanted every <h1> level
heading to be red. Whenever you, or someone else, worked on a webpage, the "rules" would need to
be consulted to ensure a consistent appearance with the rest of the site. If the "rules" were changed,
each webpage on the site would need to be updated to conform to the new version of the rules. This
process would be tedious and errors would be likely.
CSS is a solution to this problem. Using a style sheet, the web designer
can define the appearance aspects of many tags in one place. Then, each webpage only needs to link to the
style sheet in order for the appearance specifications to be implemented on each page. If the style sheet is
changed, the change will be seen the next time each page is displayed in a browser.
The "cascading" aspect of CSS is a consequence of the "styles" that can be dictated
by the browser, the user and the designer. Styles defined by the author of a webpage take precedence
over the style set by the user, which take precedence over the default style of the browser. We will look
at styles that can be set by the author. However, users can specify their own style sheets, if they so desire.
For example, a visually impaired person may want to specify a very large font size in their own style sheet to
be used with a browser. The user can instruct the browser to ignore author style sheets. Additionally, when nesting tags for
which styles have been defined, the inner tag will "inherit" the style of the outer tag unless the inner tag is
more specific (has more details). In that case, the inner tag style will override the style of the outer tag.
An example of nesting styled tags will be reviewed later in this section.
This section will first take a brief look at applying the style attribute to individual tags. Then, embedded
style sheets will be discussed followed by how to link to an external style sheet. Please note that many
of the examples used in this section were adapted from Deitel, Deitel & Nieto (2002).
Before getting into CSS, we will look at how the appearance of individual tags
can be altered with the style attribute. The style attribute for a tag uses CSS
properties and values to change the appearance of an element. (For a complete list of CSS properties,
see http://www.w3.org/TR/CSS2/propidx.html.)
<a href="first3.htm#cisdescriptions" style="color: #FF0000">CIS Course Descriptions</a>
The syntax for style attribute values is the CSS property, a colon, a space and then the value.
More than one CSS property can be applied to a tag using a single style attribute by placing a semicolon
between the property: value pairs. For example, the following line
specifies both a color and a background-color for an <h1> heading tag.
<h1 style="color: #0000FF; background-color: #00FF00">Additional Information</h1>
- Open your "second.htm" file in Notepad and save it as "inlinestyles.htm". Edit the first anchor
<a> tag the <h1> tag to include the style attribute as above.
- Save the file and view it in a browser. Note how the background color for the heading tag extends across the width of the browser window.
This section will look at how the style for a particular tag can be described once at the top
of an XHTML document in order to affect every use of that tag within that document.
This is accomplished by using the <style>…</style> tags inside the <head>
section after the <title>…</title> of an XHTML document. For example:
<html>
<head>
<title> Style Tags in the HEAD section </title>
<style type = "text/css">
em { background-color: #0000FF;
color: #FFFFFF}
h1 { font-family: arial}
</style>
</head>
<body>
<h1>Additional Information</h1>
<em>Blah, blah, blah…</em><br />
And even more blah, blah, blah…
<h1><em>More Additional Information</em></h1>
</body>
</html>
In this XHTML page, the style tag follows the <title> of the page in the <head> section.
The type attribute of the style tag indicates the MIME
type. CSS documents use the text/css MIME type. Other MIME types define file types for
images, scripts, etc.
Following the beginning <style> tag, is a list of tags for which styles will be defined. In this
example, styles are defined for the <em> and <h1> tags. Note
that the tags for which styles are specified do not include the angle brackets that are required
when the tag is used in the body of the document. The style for each tag is enclosed in a set of
curly braces, { }. The style for a tag is defined with property: value pairs. If more
than one property is defined for a tag, semicolons are used to separate a property: value
pair from the next. The <em> tag style demonstrates this. The <em> style specifies two properties:
a color (text color) attribute as well as a background-color. The style for the <h1> tag specifies only one property, a font-family.
-
Open a new file in Notepad called "embeddedstyles.htm" and copy the code above in this
section to the file. Save it and view it. Notice that the second use of the
<h1> tag has an <em>
tag nested inside of it. The result of this nesting is that the style for the <em> tag is taking precedence
over the default color of the <h1> tag and the heading appears in the arial font-family, in white with a
blue background.
If each document of a website has the same style, users will associate that "look" with the
site or organization itself. It becomes a "brand" look identifiable with the site. If the style
is embedded in each document, every change to the style would require changing every
single document individually. If instead of putting the style specifications in each document,
each document is linked to one style sheet, any change to the style need only be done in the
style sheet.
This section introduces a number of style properties, but there are many more that can be utilized.
11.3.1 An External Style Sheet Example
Each part of the following example of an external style sheet will be discussed below:
a { color: #800080;
text-decoration: none}
a:hover { text-decoration: underline;
background-color: #FFFACD}
body { background-image: url("images/cjmlogo.gif");
background-position: bottom right;
background-repeat: no-repeat;
background-attachment: fixed}
p { text-indent: 2em}
div { font-size: 2em;
background-color: #E6E6FA;
padding: .5em;
margin: .5em}
li { list-style: url("images/blueball2.jpg") disc }
.medium { border-width: medium}
.blue { border-color: #0000CD}
.groovy { border-style: groove}
.framelike { border-style: inset}
.ltblue { border-color: #F0F8FF}
The first thing to note about the external style sheet is that it is NOT a XHTML document.
It is a plain text file that was created in Notepad. The content of the style sheet file is similar
to the content contained between the <style> tags of the embedded style document
discussed in the section above.
The a specification: The style for the <a> tag will have the RGB color #800080.
The text-decoration property is none. Other values for the text-decoration property are
underline, overline, line-through and blink. The value none will result in no underlining
for the links in the documents that use this style sheet.
The a:hover specification: :hover is a pseudoclass. Pseudoclasses respond to user
actions. The :hover pseudoclass is activated when the user positions the mouse cursor
over an XHTML element. The result of this style for the :hover pseudoclass for documents
using this style sheet is that the link will have a different background color and will be
underlined. Other pseudoclasses are :link for unvisited links, :visited for links that have
been visited, and :active for links that have been clicked on but have not yet loaded.
Styles can be specified for each of these.
The body specification: The properties used in the body style affect the background image.
The first property, background-image, has the URL for the background image. The background-position property specifies
that the image is to appear at the bottom right of the browser window. The background-attachment
value is fixed, so that no matter how the browser window is re-sized, the image will always be at the
bottom right corner of the window. The background-repeat property is set to no-repeat, so the
image appears only once.
The p specification: The style for the p tag indicates a first line text-indent of 2em.
The em notation is a relative length reference. The em is the "M-height" of the current
font or the height of an uppercase letter "M" in the current font. 2em gives an indentation
of the height of 2 times the M-height. Other relative references are ex, which is the "x-height"
or height of an lowercase letter "x", and px, which is a pixel reference varying with the resolution
of the screen.
The div specification: The <div> tag is similar to using beginning and closing
<p> tags. The <div>…</div> tags define a block of text with margins above and below.
The style defined for the div tag in the style sheet here defines a different background-color,
and a font-size that is twice the "M-height" of the current font. The padding value provides
space around the top, bottom and sides of the elements within the div tag. The margin value
provides space around the outside of the div tags. More will be said about this later in this
section.
The li specification: The <li> list item tags specifies an image to use instead
of the usual bullet (list-style). Note that the URL of the image is placed in parentheses and quotes.
Classes: The last five items in the style sheet file are user-defined classes.
These classes can be applied to tags as desired. Class names are preceded by a period. It is
a good idea to name them something meaningful such as "medium" and "blue" above which
indicate a medium border-width and a border-color of blue. However, just to prove that
you can define the class name, "groovy" is a class indicating a border-style of groove
and "framelike" is a class indicating a border-style of inset.
11.3.2 Linking an XHTML page to an External Style Sheet
Now that we have a style sheet defined, let's look at how we use it and look at
the results of the properties, values and classes defined.
To use an external style sheet, we provide a link to it within the <head> section
of the XHTML document after the <title> tag. The link is implemented with a <link> tag.
- Open a new file in Notepad and copy the style sheet specifications above into it. Save the file as "cjmstyle.css".
- Create a new XHTML document in Notepad. Put any title you like in the
<head> section and leave the <body> blank for now. Save the file as "extstyle1.htm".
-
Add the following
<link> tag after the <title> tags in the <head> section of the file:
<link rel = "stylesheet" type = "text/css" href = "cjmstyle.css" />
The rel attribute of the <link> tag indicates the relationship between the linked file and this one.
The linked file is a style sheet to use with this XHTML file. The type attribute is the same
as was used with the embedded style in the section above. It indicates that the file is a
text file for a CSS. Finally, there is an href attribute which has the
URL for the stylesheet file.
-
Next, in the
<body> section of the file, add the following:
<div style = "float: left; text-align: left; width: 200px" class = "medium groovy blue">
Sea Jam <br />
Web Site <br />
Consulting
</div>
The beginning <div> tag contains both a style and a class definition. The float property for
the style lets us place the contents of the <div> tags and let other text flow around them. Here, the div
contents will be aligned to the left of the browser window. The text within the <div> tags will be
aligned to the left according to the text-align property. Finally, the width of the div block is
specified to be 200px. The effect of this will be seen when we view the page. We could
have set the width to a percent of the browser window. If we had done that, the div block
would change width as the user re-sizes the browser window.
Some of the classes defined in the style sheet above are applied to this use of the <div> tag
by using the class attribute. All of the classes that we wish to apply are listed within double
quotes and separated by spaces. Here a blue groove border with a medium width will be
applied to this use of the <div> tag. Remember that the styles and classes applied to this <div>
tag are in addition to the style specified for the <div> tag in the external style sheet.
-
Next, copy the following paragraph to your file after the
<div> section above:
<p>
This is a page which uses a style sheet for a fictitious
company called Sea Jam Web Site Consulting. Notice that
this paragraph is indented. Notice that the background
image is fixed and non-repeating in the top right corner.
Notice that the items in the list below use an image
instead of the usual button. Notice that this page
is not necessarily well-designed. Notice that
<a href = "extstyle2.htm"> this link</a>
is not very noticeable until you put your cursor over it.
Try moving your cursor over the list items below. The
list items are links as well. That effect was done with
the <em> hover</em> pseudoclass. That pseudoclass is
activated when the user moves the mouse cursor over the link.
</p>
-
Save the file and view it in a browser. It should look like this:

-
The box in the top left corner has an appearance very similar to that of an image,
but it was done using the
<div> tags and a combination of style properties implemented in
part with inline styles and in part by the external style sheet. The paragraph, which follows
in the XHTML file, is to the right of the box due to the float: left property applied inline to
the <div> tag. The float property allows one to position elements and change the default
flow of the text.
Try re-sizing the window. Notice that the box in the top left corner stays
the same size when the window is re-sized. This is because the <div> tag
was given a set width in pixels. If the width had been set using a percentage
for the width, this box would change width with the window and the text
inside would re-arrange itself accordingly.
Notice also, that as the window is re-sized, the background image in the
bottom right corner stays in place and the paragraph text flows over it
when necessary. This is due to the fixed placement specified for the
<body> tag in the external style sheet.
Additionally, look at the link in the middle of the paragraph.
It is not underlined, which is the default appearance for links,
because the text-decoration property was set to none in the
external style sheet.
Move your cursor over the link. When the mouse cursor is
over the link, the background of the link text should change to yellow
and the link text should be underlined. This is due to the :hover
pseudoclass available for the anchor, <a>, tag.
-
Let's try out some of the other styles specified in the external
style sheet. Add the following to the "extstyle1.htm" file after the
paragraph entered earlier:
<p>
This paragraph is also indented because of the
style set for the P tag. The box in the top
left corner of this page looks like a graphic,
but it is actually done by setting a style for
the DIV tag. The width for the DIV tag has been
set to a pixel value. The width could be set to
be a percentage of the browser window, but then,
if the browser window is re-sized, the size of the
box changes also. Notice that there is a background
image at the bottom right corner of the page. The
image does not repeat, as a standard image will do.
Try clicking the restore button on the top right of
your browser window. Notice that the background
image remains in the corner. Even if you scroll
the page, the background image remains in the corner.
This is because the background image attachment has
a fixed position.
</p>
<br />
<h3 class="framelike ltblue medium"> Here is a list with images instead of the usual bullet discs </h3>
<ul>
<li> <a href="extstyle2.htm"> one link to the second page</a></li>
<li> <a href="extstyle2.htm"> another link to the second page</a></li>
</ul>
-
Save your file and view it in a browser. The new code should appear as follows:
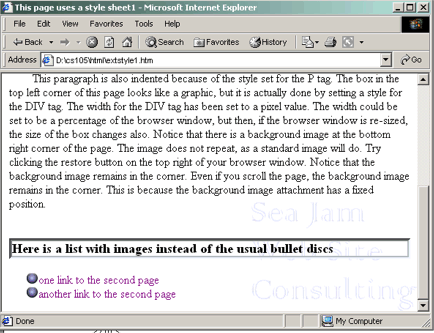
Notice that the new paragraph is indented and flows after the previous paragraph.
The classes defined for borders are applied to the <h3> tag to put an inset light
blue border around the headings.
Both of the items in the list are links. Moving your cursor over them changes
the background of the linked text to yellow and the text is underlined.
- Dietel, H. M., Dietel, P. J. & Neito, T. R. (2001) Internet & World Wide Web: How to Program. 2nd Edition. Prentice Hall, NJ.
- Anderson-Freed, S. (2002) Weaving a Website: Programming in HTML, Javascript, Perl and Java. Prentice-Hall:NJ. ISBN 0-13-028220-0
- Lynch, P. J. & Horton, S. (2001) Web Style Guide. Yale University Press: New Haven. ISBN 0-300-08898-1.
- Yale Web Style Guide at http://info.med.yale.edu/caim/manual/contents.html.
- W3C Cascading Style Sheets, Level 2 www.w3.org/TR/REC-CSS2
- W3C CSS Tutorial for HTML http://www.w3.org/TR/REC-CSS2/intro.html#q1
- W3C CSS Properties http://www.w3.org/TR/REC-CSS2/propidx.html
- W3C CSS Pseudoclasses http://www.w3.org/TR/REC-CSS2/selector.html#dynamic-pseudo-classes
- CSS Properties, Browser Support, etc. http://www.webreview.com/style/
|