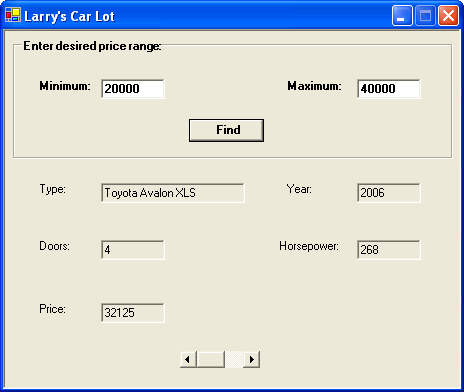
Software Design Using C++Fourth Advanced Windows Forms ExampleOverall PlanThe goal is to create the app shown in this picture. This Windows forms app is for a fictitious business called Larry's Car Lot. The app allows the user to specify the desired price range and then to see the details on Larry's cars that fit this price range. Only one car's data is visible at a time. A scroll bar is used to look through the entire list of data. We will only use a short list of cars for this app and will hard code the data inside of the software itself. A better program would read the list of car data from a file (or perhaps retrieve it from a database). Getting StartedCreate a new Windows forms app, perhaps named showcars. Change FormBorderStyle to Fixed3D, MaximizeBox to False, and Text to "Larry's Car Lot". Resize the form as needed. Designing the FormWe want to place on our form the labels, button, and other controls as shown in our picture of the running application. Note the box around the top part of the form. This is a group box control. Put this onto your form first. (Drag it from the toolbox and resize it to fit the top of the form.) Change the Text property for this group box to "Enter desired price range:". Next, place the labels and controls onto this group box. The labels should use a bold font so that they show up better. We don't care about the names of the labels with Text property "Minimum:" and "Maximum:". However, the label with Text property "Error occurred" should be given the name FindErrorLabel so that we can later easily refer to it in code. Make the foreground color (ForeColor property) red and bold. Set the Visible property to False. We will change this to True within the code if an error occurs in finding matching car data. Use MinTextBox as the name of the text box next to the "Minimum:" label. Similarly, use MaxTextBox as the name of the text box next to the "Maximum:" label. Used Fixed3D for the BorderStyle for both. Make the font bold and the Text property blank. Name the button as FindButton and change its Text property to "Find". Make the font bold. Next we place onto the form the controls that do not go on the group box. Put the five labels onto the form as seen in our picture of the app. Don't bother with bold for these. The text box next to the "Type:" label should be named TypeTextBox. The text box next to the "Year:" label should be named YearTextBox. The text box next to the "Doors:" label is to be named DoorsTextBox. Name the text box next to the "Horsepower:" label as HorsepowerTextBox. Also name the text box next to the "Price:" label as PriceTextBox. Clear the Text property for all five labels and set the ReadOnly property to True for all five. The final control needed is a horizontal scroll bar. This is labeled HScrollBar in the Toolbox. Drag this to the bottom center of your form and change its name to HorizontalScrollBar. As someone uses the scroll bar its Value property changes. This Value fits a certain range, which you can adjust. By default the range is probably 0 through 100. Change the Maximum to 12. Make the LargeChange property 3, which means that when the user clicks, not on the arrow, but to the left or the right of the square on the scroll bar, the Value property will go down or up by 3. This is to help the user to quickly scroll through a lot of data. The SmallChange property should be 1. That means that when the user clicks on one of the arrows on the scroll bar, the Value property will go up or down by 1. Set the Value property to 0 initially. Our code will change it as needed. You can adjust the TabIndex and TabStop properties of the controls if you wish. That can make it easier for the user to use your app. Save all of your files. Also right click on the new project in Solution Explorer and set this project to be the startup project. Beginning on the CodingOur Windows forms app is similar to the console app on car objects found in the Objects and Classes section of the Software Design Using C++ web pages. That console app used a product class and derived from it a car class via inheritance. We can reuse this code, but will make minor adjustments, such as leaving out the Print function. Instead of printing an object's data to the screen we will retrieve it using the various get functions and then display it on our form. The old console app held the data on the cars in an array of Car objects. We will change that slightly, using instead an array of pointers to Car objects. In Solution Explorer right click on "Header Files" under your showcars project. Select Add, Add New Item. Click on the Header File icon and fill in product2.h as the name of the new file. Once you have your new, blank header file, copy in the needed code from this version of the product2.h file.
Then use Solution Explorer to right click on "Source Files" for your project. Select Add, Add New Item.
Click on the C++ File icon and fill in product2.cpp as the file name. Copy in the needed code from
this version of the product2.cpp file. Note that it has been modified to
include the Similarly, add this version of the cars.h header file to your project. Also add this version of the cars.cpp file to your project. Change the top of your Form1.h code to look like the following. All this does is to include the cars.h header file, set up a constant for the number of cars, and create a type for an array of pointers to Car objects.
In the same file, find the beginning of the Form1 class and add the 2 sections of additions shown below.
The first section sets up private fields in our form for 2 arrays of pointers to Car objects. The first array,
Since we have created new objects, we need some way to get rid of them when our app is finished.
The right way to handle this might be to turn our
Code for the Click HandlerIn Design View for Form1.h, double click on the button in order to generate the outline for the click handler. Then in Form1.h, change it to a function prototype. That is, make it look like the following. Note the semicolon on the end of the function prototype line. It is best to include the comments as they will remind you (and inform others) about what this function does.
We then place the code for this click handler at the bottom of the Form1.cpp file. Make it match the following:
The above code begins by extracting from the input text boxes the bottom and top numbers
for the user's desired price range. These two numbers are called
As long as one or more matches were found, the above code
puts an appropriate value into the Maximum property of our scroll bar. This is so that we can scroll
through Value 0, 1, 2, etc. to display matching car 0, 1, 2, etc. Notice that in this case we call
Finally, note that the above code uses exception handling. If anything goes wrong (such as having something in an input text box that cannot be converted to a number) then we make the red error label to be visible. Once you have built your app, try this out. Put something that is not a valid number into the text box for the minimum or maximum price and see what happens. Save all of your files before going on. Adding the Display FunctionNext we add a helping function. You can use Class View to assist with this or you can manually add everything yourself. See our previous example on how to add a function with Class View. In the present case, find the Form1 class under your showcars class in Class View. Right click on the Form1 class and Select Add, Add Function. Name the new function DisplayResults, give it one parameter of type int, and have it return nothing (void). For type of access, use private. That is, this will be a private function of the class. However you create your new function, the prototype should appear at the bottom of your Form1.h file and should look like this:
In Form1.cpp, make the code for this new function match the following:
This
In the normal case, where the value of the
If somehow the value of Save all of your files before going on. Adding a ScrollEventHandlerWe need some code that tells the app what to do when the user clicks on the scroll bar. At the bottom of Form1.h, but before the closing } for the namespace and the closing }& for the class, fill in the following:
You might, at this point, look up ScrollEventHandler by using Help, Search in Visual Studio.
Be prepared for lots of technical information, however!
Roughly, the At this point save all of your files. Then build and run your application to see that it works reasonably. The running app should look like the one shown in our picture. Back to the main page for Software Design Using C++ |
Computing & Information Systems |
|

 Search CIS Site
Tutorials
Search CIS Site
Tutorials
|