E-commerce App 2
The Goals for this Example
The main goal is to add a search capability to the previous
e-commerce app 1. In the process we try out a data list for displaying the
results of the search, though we ultimately decide that it is not the best choice for this particular
application.
Copying the Previous Project and Making Small Changes
- Open the previous project, e-commerce app 1, in Visual Studio.
- Make a copy of this project and name the new project ecommerce2.
- Close the old solution and open the new ecommerce2 project.
- Let's fix an annoying aspect of the product lookup. If you try out your working version of
ecommerce1, you may notice that if you look up a product, use the browser's backspace button,
and then click on "*** Make a choice ***" in the drop down list, the code redirects to the
results page where an error is displayed because no product matching the name
"*** Make a choice ***" can be found.
- Note that since the AutoPostBack property is True for the drop down list, a postback happens
each time the user selects an item in the list that is different from the previous one selected.
Thus a postback happens when a change of selection is made.
- Our annoyance can be fixed by not redirecting to the results page when the selected item is
"*** Make a choice ***".
- You can do this by changing the Page_Load procedure for the products page to look like this:
|
Private Sub Page_Load(ByVal sender As System.Object, ByVal e As System.EventArgs) _
    Handles MyBase.Load

    'Put user code to initialize the page here
    Dim TargetProduct As String

    If Not IsPostBack Then
        Try
            ProductList.Items.Add("*** Make a choice ***")
            SqlConnection1.Open()
            dReader = SqlDataAdapter1.SelectCommand.ExecuteReader
            While (dReader.Read())
                ProductList.Items.Add(dReader.GetString(0))
            End While
        Catch exception As System.Data.SqlClient.SqlException
            ErrorLabel.Visible = True
        Catch exception As Exception
            ErrorLabel.Visible = True
        Finally
            SqlConnection1.Close()
        End Try
    Else   ' Postback case:
        TargetProduct = ProductList.SelectedItem.Text
        If Not Equals(TargetProduct, "*** Make a choice ***") Then
            Session.Add("ProductSelected", TargetProduct)
            Response.Redirect("Results.aspx")
        End If
    End If
End Sub
|
- This is the same as the code used before except for the added TargetProduct variable
and the code for the postback case.
- Note the use of an IF to skip adding the selected product name to the session state and to skip
redirecting to the results page in the case when the selected item is "*** Make a choice ***".
|
Adding Search Functionality
Search Page
- You already have a search page named search.aspx.
- We want to change this page so that it contains 3 labels, a text box, and a button as
shown in this screen shot
As before, these items begin several inches from the top and a couple of inches from the left edge.
If you wish, you can copy the text for these labels from the following box:
|
You  can search for products whose name or description
contains a desired term or substring.
Search for:
|
- Note that all 3 labels use medium font and that the last one is in bold.
- Change the ID of the text box to SubstringBox.
- Change the ID of the button to SearchButton and its Text field to "Search".
- Since we included the header.txt and footer.txt files in each web form of ecommerce1, the
search.aspx web form should still contain this.
- Go to HTML view and check that these 2 files are included as in
the ecommerce1 web app.
- Save your work so far by using File, Save All.
|
The search.aspx.vb Code-Behind File
- Adjust the Page_Load procedure so that it looks as follows:
|
Private Sub Page_Load(ByVal sender As System.Object, ByVal e As System.EventArgs) _
    Handles MyBase.Load

   'Put user code to initialize the page here
    Dim Target As String
    If IsPostBack Then   'Search button was clicked
        Page.Validate()
        If Page.IsValid Then
            Target = SubstringBox.Text.ToString()
            Session.Add("TargetSubstring", Target)
            Response.Redirect("SearchResults.aspx")
        End If
    End If
End Sub
|
- The Page.Validate is present because we hope to add validators to the search web form in
a later version of this project. We should, for example, use a required field validator
for the text box. We skip the validators for the moment so as to keep this example short.
- If a user clicks on the search button, a postback happens. In this case
we use session state to keep track of the string to search for and redirect to another page,
the SearchResults.aspx form.
- Save all of your files before going on.
|
The Search Results Page
- Add a new web form to your project and name it SearchResults.aspx.
- Change its title to "Search Results, Br. David's Software".
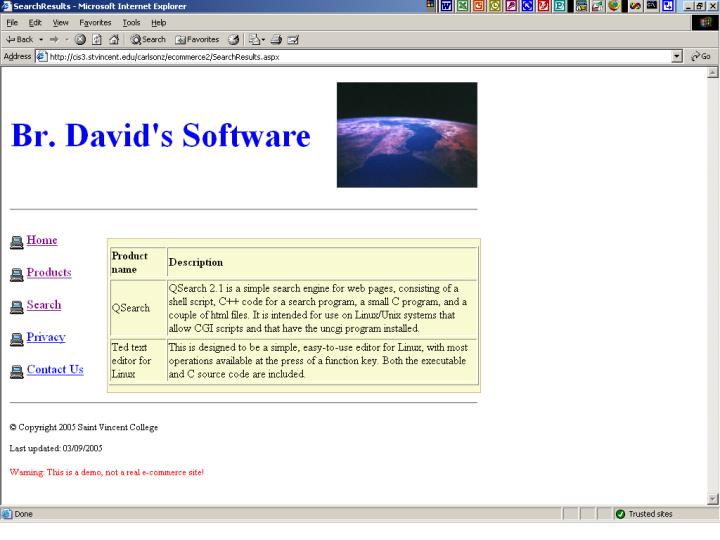
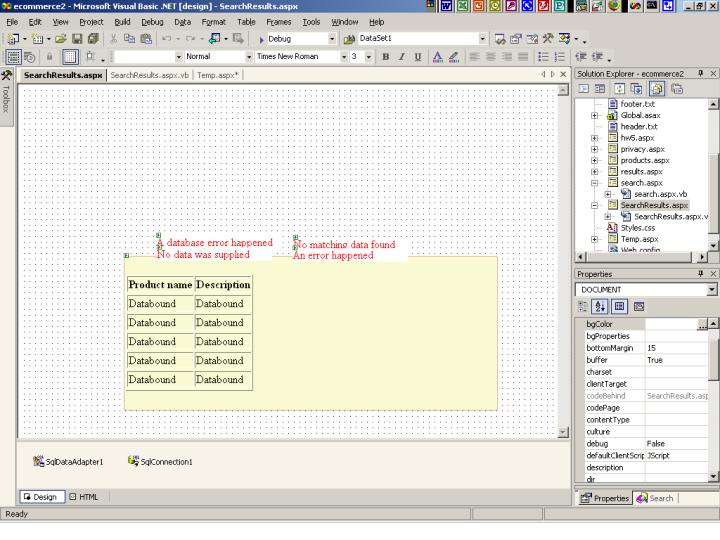
- We want to set up this form as shown in this screen shot of the
results page or in this view of the form in Visual Studio.
- Drag a data list from the Toolbox and place it on the form in the location shown in the above images.
Do not worry about resizing the data list.
- Leave the ID of the DataList as DataList1. Since it is our only data list, that will be
obvious enough.
- Set the Visible property for DataList1 to False.
- Place 4 labels for error messages just above the data list.
All should use small and red for their text. The Visible property should be False.
- Change the ID of one label to DatabaseErrorLabel and set its Text field to
"A database error happened".
- Change the ID of another of the 4 labels to SessionErrorLabel and set its Text field to
"No data was supplied".
- Change the ID of another of the labels to NoDataLabel and set its Text field to
"No matching data found".
- Change the ID of the remaining label to ErrorLabel and set its Text field to
"An error happened".
- If security is a concern, it would be better to have only one error label with a very generic
message such as "An error happened." There is no sense in giving away clues to attackers who
are trying to hack your web application.
- Now let's start to set up that data list.
- Go to HTML view for the SearchResults.aspx form.
- Find the HTML tags that start and end the data list.
- Just before the closing <asp:datalist> tag, paste in the following HTML:
|
<HeaderTemplate>
    <table border cellspacing="1">
        <tr>
            <th align="left">Product name</th>
            <th align="left">Description</th>
        </tr>
</HeaderTemplate>
<FooterTemplate>
    </table>
</FooterTemplate>
<ItemTemplate>
    <tr>
        <td><%# DataBinder.Eval(Container.DataItem, "ProductName") %></td>
        <td><%# DataBinder.Eval(Container.DataItem, "ProductDescription") %></td>
    </tr>
</ItemTemplate>
|
- The general idea of the above, is that we are setting up 3 templates for the data list.
The HeaderTemplate indicates that the data list will display data as a table and that the
column headers will be "Product name" and "Description". The FooterTemplate just contains
the closing tag for the table. The ItemTemplate is the most important.
It indicates the data items to display in each row of the table. As we will see later when
we write the code-behind file for this form, we will query the database and place the results
in a data set. Actually a data set can contain several data tables. The results of the stored
procedure query will be in a data table with the same name as the stored procedure.
In the ItemTemplate we use the notation:
|
<td><%# DataBinder.Eval(Container.DataItem, "fieldname") %></td>
|
- Just by filling in the desired field name we indicate what field (column) of the current data table
row we wish to put into the data list as a table data item.
- Note that the <% %> tags are script delimiter tags. They indicate that the commands inside
of these tags should be processed on the server, not in the user's browser.
- The # is used when a data binding expression follows.
- The DataBinder.Eval function places the current value of the desired fieldname into this location
between the opening and closing table data item tags.
- While in HTML view include header.txt and footer.txt in the exact
same locations we used for the other web forms. (If you have forgotten where this is, look at
one of the other web forms in HTML view.)
- What you should now see in HTML view, with the various additions completed,
should look like this picture.
- Although Visual Studio may underline some of the HTML as if there are errors, this will work!
- Switch to Design view for your SearchResults.aspx form.
- Click on your data list and in the Properties view, click on the Property Builder link.
- Click on Borders. Then fill in 2 for "Cell padding", Tan for "Border color", and 1 for
"Border width".
- While still in Proerty Builder, click on Format and then on DataList. Fill in Black as the
"Forecolor" and LightGoldenrodYellow as the "Back color".
- Click OK to get out of Property Builder.
- You can, of course, experiment with other colors.
- You should also be able to supply the above settings in Properties and skip the use of
Property Builder.
- You should now be able to drag the edges of the data list to resize it. Make it fairly wide,
as seen in this screen shot.
- For more information it is suggested that you look up DataList in the Visual Studio help system.
- Save all of your files before proceeding further.
|
The DataAdapter and Stored Procedure
- Add an SQLDataAdapter to the SearchResults.aspx web form.
- We will use this data adapter and an associated stored procedure to look up the data for the
product or products that are the results of the search.
- Since you have created similar stored procedures before, we do not give detailed directions
here. Refer to the user input example if you need help.
- Set up your stored procedure so that it is named SelectProdSearch and so that it
selects the ProductName and ProductDescription fields from any Prod5 row that matches
the search condition.
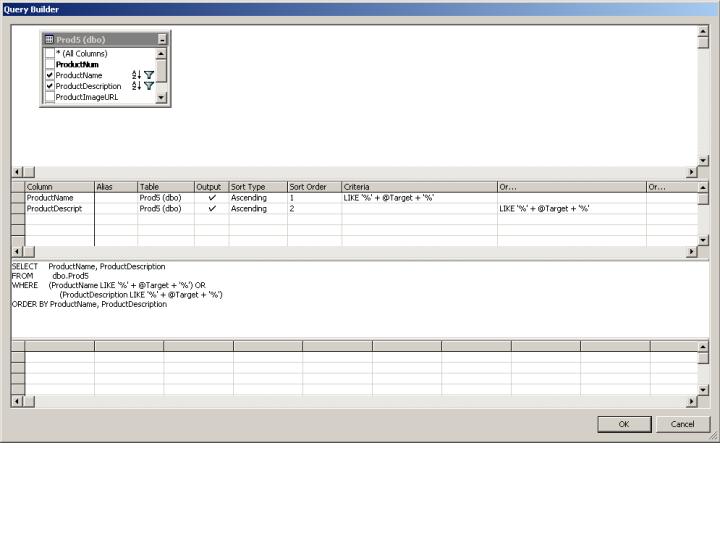
- How do we set up the search condition? By using LIKE to see if the target string occurs
as a substring of the ProductName or the ProductDescription. The exact SQL is shown in the
box below, but you would probably generate it by using Query Builder as seen in
this screen shot.
- Note that some databases use the * symbol instead of % as the wildcard to indicate zero or more
characters.
- In
ProductName LIKE '%' + @Target + '%' we are specifying that the ProductName
should be any number of characters, followed by the target string that the user is looking for,
followed by any number of characters. The + is used to append the items on either side of it.
- Also order the results of this query in ascending order, first by ProductName and then by
ProductDescription (in the unlikely event that we have 2 products with the same name).
- Do NOT generate insert, delete, or update stored procedures to go along with this one.
- When finished, your stored procedure should look like the following:
|
CREATE PROCEDURE studentc.SelectProdSearch
(
    @Target varchar(50)
)
AS
    SET NOCOUNT ON;
SELECT ProductName, ProductDescription FROM dbo.Prod5
WHERE (ProductName LIKE '%' + @Target + '%') OR (ProductDescription LIKE '%' + @Target + '%')
ORDER BY ProductName, ProductDescription
GO
|
- Remember to go to SQL Server Enterprise Manager and give the SQL or IWAM account Exec access
to this stored procedure. (Use whatever fits your server configuration.)
- In the Properties window for your new data adapter, expand the SelectCommand field.
Replace what is in the CommandText field with yourid.SelectProdSearch.
(Of course, fill in your user ID in place of yourid.) Say Yes and Yes to the questions asked.
- In the Properties window for the data adapter, try out the Preview Data link to see if your
stored procedure is working.
- In Visual Studio do File, Save All.
|
The results.aspx.vb Code-Behind File
- Look at the code inside of the "Web Form Designer Generated Code" region.
- Add the following line in the usual location:
Protected dSet As New DataSet
- Adjust the Page_Load procedure so that it looks as follows:
|
Private Sub Page_Load(ByVal sender As System.Object, ByVal e As System.EventArgs) _
    Handles MyBase.Load

    'Put user code to initialize the page here
    Dim Substring As String
    If Not IsPostBack Then
        If Session.Count = 0 Then   ' No session items were supplied.
            SessionErrorLabel.Visible = True
        Else
            Try
                Substring = Session("TargetSubstring")
                If Substring = "" Then
                    SessionErrorLabel.Visible = True
                Else
                    SqlConnection1.Open()
                    SqlDataAdapter1.SelectCommand.Parameters("@Target").Value = Substring
                    SqlDataAdapter1.Fill(dSet)
                    If dSet.Tables.Item(0).Rows.Count = 0 Then
                        NoDataLabel.Visible = True
                        DataList1.Visible = False
                    Else
                        DataList1.DataSource = dSet
                        DataList1.DataMember = "SelectProdSearch" _
                        'Use the name of the stored procedure.

                        DataList1.DataBind()
                        DataList1.Visible = True
                    End If
                End If
            Catch exception As System.Data.SqlClient.SqlException
                DatabaseErrorLabel.Visible = True
            Catch exception As Exception
                ErrorLabel.Visible = True
            Finally
                SqlConnection1.Close()
            End Try
        End If
    End If
End Sub
|
- The purpose of this code is to use the data adapter and stored procedure just created above
to get the data on the selected product into a data set and then to display this data in the data list.
- The code only tries to get data from the database if there is no postback and if something
(hopefully the TargetSubstring) is available in the session state.
- The TargetName is retrieved from the session state and plugged in as the value of the
@Target parameter to the stored procedure.
- The results of the stored procedure's query are placed into the DataSet named dSet.
- We check
dSet.Tables.Item(0).Rows.Count to see if the number of rows of data is 0. If so,
then an error label is displayed. Note that dSet.Tables
is a collection of the data tables in dSet. Then Item(0) is used to pick out the
first (and only) data table. Rows gives the collection of rows from this data table.
- Next we use
DataList1.DataSource = dSet to indicate that the source of the data for
DataList1 should be our data set.
- Then we use
DataList1.DataMember = "SelectProdSearch"
to specify which table of the data set should be used. The name of the data table containing
the results of the query has the same name as the stored procedure.
- However, some users report that the name of the data table is the same as the name of the table
in the SQL Server database. One user even reported that the line of code to set the DataMember
can be skipped. If anyone can explain this, please let the
author of these pages know.
- We then bind the data to the data list.
- Save all of your files.
|
Testing Your Web Application
- Build your project.
- View your new web app in a browser and check that all pages display correctly
and that the database-related code works on the products and results pages as well
as the search and search results pages.
- Note that if you search for a common string such as Windows, you may get so much data in
your data list that it does not fit in the empty region on the search results page. This is
a problem, as the data and footer information get superimposed.
|
Conclusions
- Because of the problem just noted, we decide that a data list is not the best way
to display the search resulsts in this web app. If we did not care about having the consistent
layout on each web page, we could just abandon this layout (as supplied by header.txt and footer.txt)
and let the data list be as long as needed.
- In our next web app, we will switch to the familiar data grid to display the results of the search.
This is because the data grid has an easy way to control how many rows of data display at once.
Using this we can fit the data into our fixed page layout.
- In spite of the fact that we have decided to abandon the data list, it is useful to know how to
use it, since it could be helpful in a different application. Also, we learned how to use a
data set in the current web app, which is also useful.
|
|

 Search CIS Site
Tutorials
Search CIS Site
Tutorials