A Web App that Gets Data from a Database
The Goals for this Example
Our goal in this example is to learn the basics of writing a web app that gets data from an
SQL Server database. To do this, we need to learn a bit about how SQL Server works, how to
set up a connection from our web app to SQL Server, and other database-related topics.
Warning: With this type of web app there are many things that can go wrong. On the database
end there are roles for various users as well as permissions for the tables and stored procedures.
The NTFS permissions that various users have on the web app's folder and files are also important.
You may have to consult the system administrator for your server, the admin for the web server, as
well as the admin for SQL Server before you can get everything to work!
Creating the Example
The Desired Web App
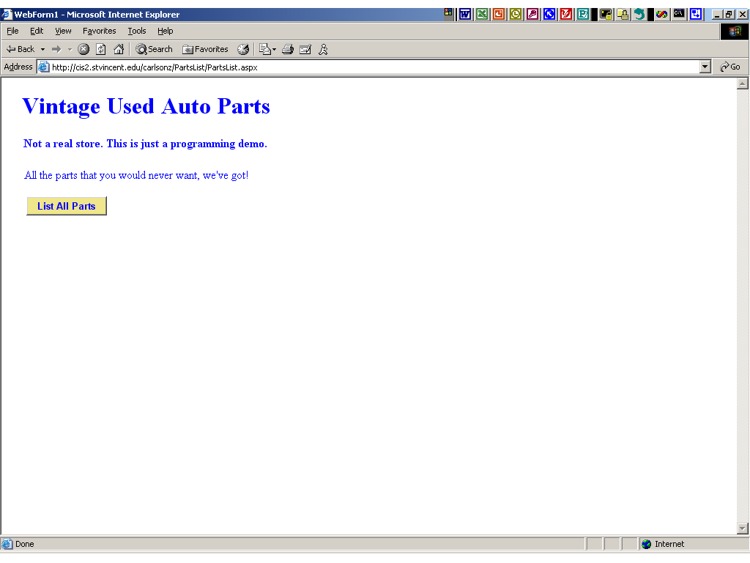
- We will create a web app that does a very simple lookup of all data in a database table.
- The idea is that the app is the web site for a nonsensical used auto parts store. The user
can click on a button to have all of the data on all of the auto parts displayed. We will
simply display the data on the same web form.
- In a later example, we will figure out how to search for particular data instead of getting it all.
- The initial view of the application shows a web page with a few labels and
a button.
- Once the button is clicked, the web app shows the auto parts data.
|
Starting the Web App
- As usual, make a new project of type Visual Basic Project and having template
ASP.NET Web Application. In the location box put in a reasonable location such as:
- https://cis3.stvincent.edu/studentc/PartsList
- http://cis2.stvincent.edu/studentc/PartsList
- We will assume from here on that the folder name used is PartsList.
- Change the name of the web form, WebForm1.aspx, to PartsList.aspx. (Recall that you do
this in Solution Explorer. Right click on WebForm1.aspx, select Rename, and then fill
in the desired name. This will also automatically rename the accompanying code file.
- Save your work so far by using File, Save All.
|
SQL Server
- Get your SQL Server administrator to give you a login on
SQL Server. This login should be for your Windows account.
- Also have the administrator give you access to a particular database,
probably a new, empty database. Make sure that you know the name for
this database. In our example here the name used for the database is Summer2003.
- Start SQL Server Enterprise Manager. (We assume that the client software to access
Enterprise Manager is installed on your PC. This allows you to manipulate your
database on SQL Server, which is physically on a server, from your PC.)
- If need be, click on the + sign in front of Microsoft SQL Servers in the tree in the left pane.
This will expand the node to show what is within it.
- One item that you should see inside is named SQL Server Group. Expand this node to see
what is within it. If you are lucky, your particular server will be listed here.
- If your server does not show up in the Server Group in Enterprise Manager, then you must add it.
- To add your server, right click on SQL Server Group in the left pane of Enterprise Manager.
- Then select New SQL Server Registration.
- Follow the wizard, adding your particular server to the group but leaving the defaults
in place everywhere else in the wizard.
- If the new server registration fails, contact your SQL Server administrator.
- Right click on the + in front of your server's name to expand this node.
- Within this, expand the node labeled Databases and look for your particular database,
such as the Summer2003 database mentioned above.
- Expand the node for your particular database.
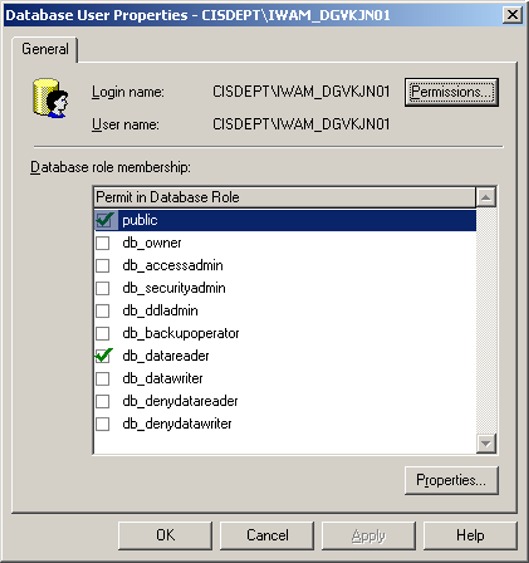
- The first time that you reach this point, click on the User's icon.
Exactly which users you need to have in here may depend on how your server has been set up.
You may, for example, need one or all of the users ASPNET, IWAM, and SQL.
(Note that the "IWAM" user name is longer. Given here are just the first 4 letters of the name.)
To add a needed user, right click on the right pane and select New Database User.
The pulldown for Login name should allow you to select each of these users.
For each one, check the boxes to give public and db_datareader access to your database.
Look at this picture of the IWAM user properties box showing the
boxes selected. Click on OK when finished with this box.
How do you know which users are needed? You can ask your database administrator or instructor.
You can also perhaps figure it out by trial and error.
- For some later web apps you might also need to give the IWAM or SQL user db_datawriter access
as well.
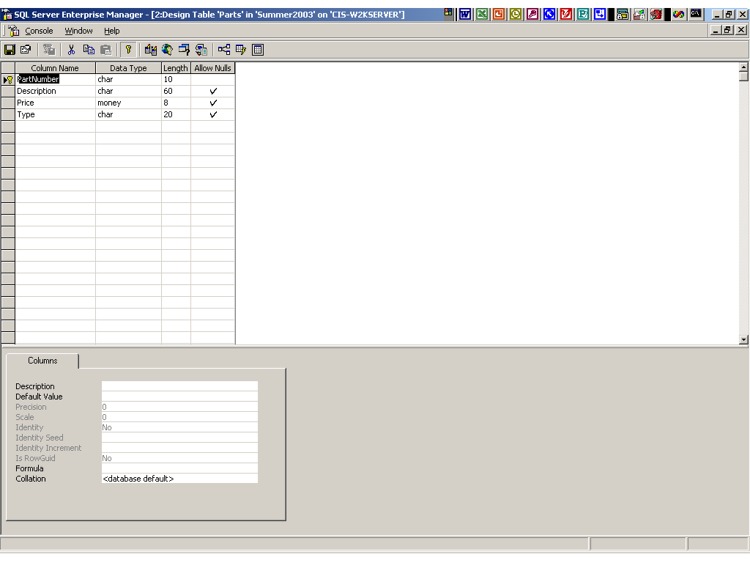
- Next, right click on the Tables icon and select New Table. This allows you
to add a new table to your database. We are going to create a parts table for our used
autoparts store.
- Fill in the 4 fields as shown in this picture.
Use the types, lengths, etc. as shown. This data is also listed here for convenience:
|
| Column Name |
Data Type |
Length |
Allow Nulls |
| PartNumber |
char |
10 |
no |
| Description |
char |
60 |
yes |
| Type |
char |
20 |
yes |
| Price |
money |
8 |
yes |
- Click at the front of the PartNumber field and then click on the key button
in order to set this to be the primary key field.
- Close this window (the inner window, not the outer one for Enterprise
Manager). You will be asked to supply a name for this table. Call it Parts.
- Next we use Enterprise Manager to add data to this Parts table.
- You should see the Parts table in the right pane of Enterprise Manager. (If not,
go to the left pane and click on the Tables icon within your particular database.)
- Right click on the Parts database in the right pane. In the resulting context-sensitive
menu, select Open Table, Return all rows.
- In the resulting window you can fill in data for this table. Use what is
shown in this image and also listed below:
|
| PartNumber |
Description |
Price |
Type |
| 120 |
From 1977 Chevy Nova. Like new! |
29.99 |
muffler |
| 128 |
From 1966 Volkswagon Beetle. |
9.98 |
muffler |
| 155 |
From 1966 Volkswagon Beetle. |
450 |
engine |
| 226 |
From 1977 Chevy Nova. Collector's item! |
12.55 |
steering wheel |
| 333 |
From 1977 Chevy Nova. Slightly cracked. |
8.88 |
fan belt |
- Note that if you need to edit data in a char field such as description so as to add more characters,
you will have to delete the blanks at the end of the line before you can insert new characters.
- Then close the inner window, but not Enterprise Manager itself.
We may need Enterprise Manager later. The data is saved automatically.
- You can right click on your table and select Open Table, Return all rows at any time that
you want to adjust the data.
- Similarly, you can right click on your table and select Design Table if you wish to change
the design of the table. This could be used to add another field, for example.
|
Getting Data into the Web App
- Back in Visual Studio drag 3 labels and a button from the Web Forms section of
the Toolbox and place them on your web form.
- Adjust them so that the results match what we want in our
initial view of the web app.
- Change the ID of the button to be ListAllButton. That will make it easier to refer
to this button later in the code that we will write.
- Drag a DataGrid from the Web Forms section of the Toolbox to the form.
Resize it to fill most of the bottom half of the screen.
We will use this data grid to hold the data that we look up in the Parts database.
- While the data grid is selected use AutoFormat under Properties. Select Colorful1.
- Set the visible property of this data grid to False since we don't want to see it initially,
but only after the user clicks on the button.
- Drag a label onto the form, just to the right of the button,
and rename it as AllPartsLabel. The text for it should be "List of All Parts". Set its
visible property to false. We will make it visible when we display the data on the form.
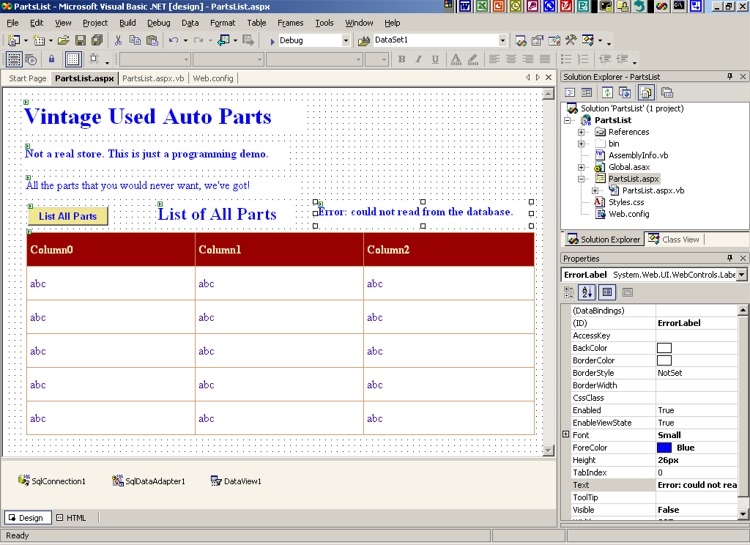
- Also drag another label onto the form and rename it as ErrorLabel. Set it up as seen
in this view of the form and error label. Note that the visible
property is initially set to False and that the text is "Error: Could not read from database".
We will make this label visible in the code if an exception is detected.
If you want this error message to be especially noticeable, change the foreground color to red.
- Drag a DataView from the Data section of the Toolbox and place it at the bottom of your web form.
- Then click on the data grid on your form and change the DataSource field to DataView1.
That is, the data grid will get its data from the data view. (We will see later in the
code where the data view gets its data.)
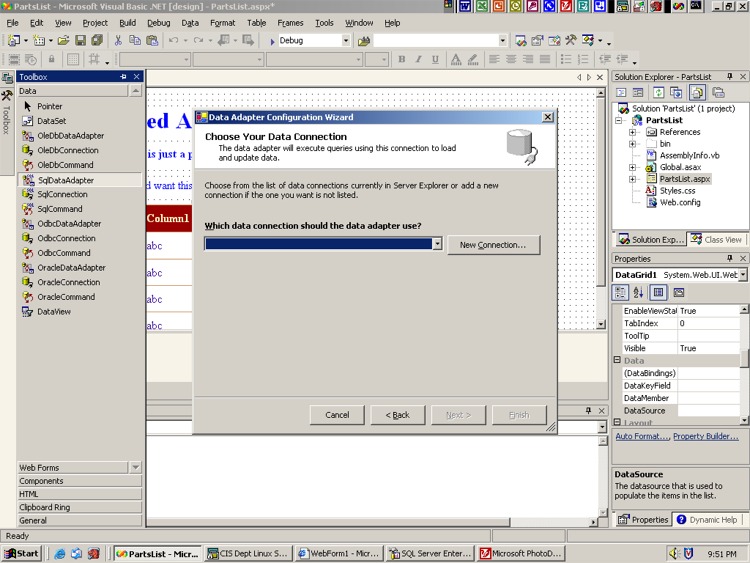
- Next, drag an SqlDataAdapter from the Data section of the Toolbox to the form.
This will start up a wizard.
- Select New Connection unless there is one present that suits your needs.
(That is, one that connects to the correct server and your particular database.)
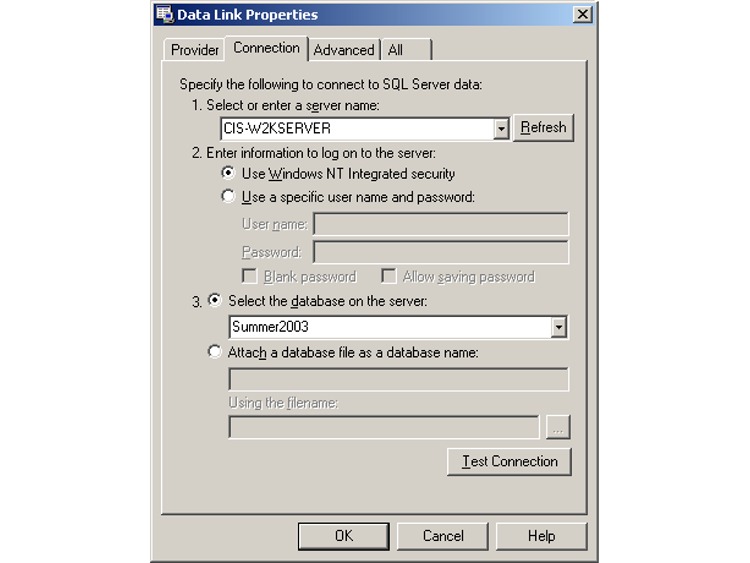
- See this view of the connection properties for the settings to use.
(Of course, the name of your server and the name of your database are probably different.)
- Then click on the Test Connection button to verify that this connection works.
- Click OK and Next.
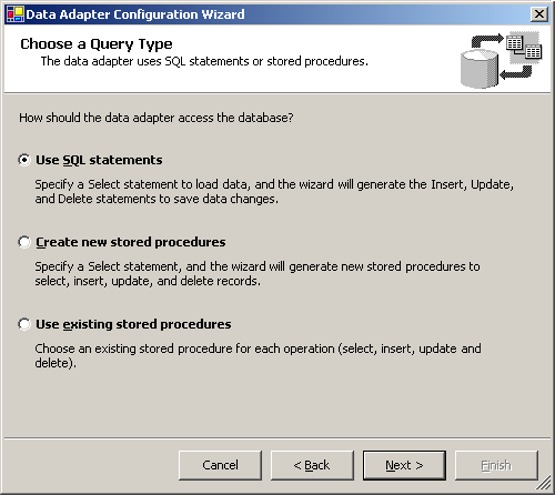
- This should bring up a dialog box for choosing a query type.
- Select Create New Stored Procedures.
- We will always use stored procedures, not ordinary SQL statements.
The reason for this is that stored procedures are faster and more secure.
(Attackers love to use SQL injection attacks against a database. In particular, if your
web app allows user input as part of an SQL query, the attacker may be able to append
extra SQL as part of the input in just the right way to make the database return data
that you never intended to be seen by any user. Stored procedures can limit this problem.
- Click Next.
- Select Query Builder.
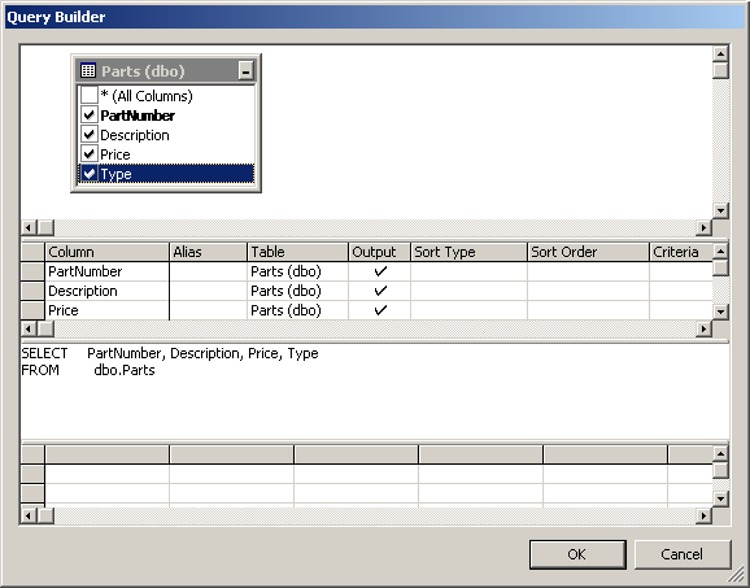
- Select the Parts table. Then click on Add and Close. This is the step where you
select what table(s) to use in your database query, the query that your stored procedure will run.
- Check all 4 fields in the top half of the window as shown in this
image of Query Builder.
- Select OK.
- Then select Advanced Options.
- Uncheck the first box as shown in this
image of the Advanced Options dialog box.
This is because we do not need insert, update, or delete statements; we merely want
to select data from our table.
- Click OK and Next.
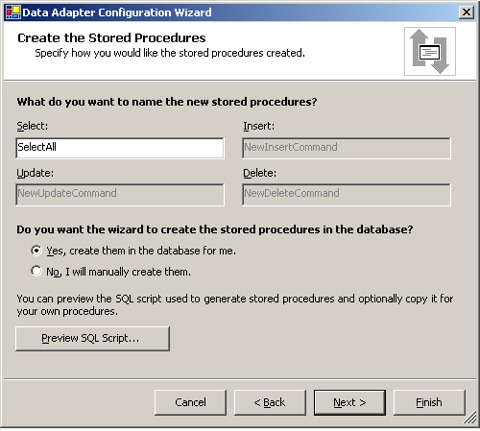
- In the Select box on the Configuration Wizard's dialog, fill in SelectAll as the
name of your stored procedure.
- Also be sure that the radio button is selected to have the stored procedure created
in the database for you.
- See this picture of the Data Adapter Configuration Wizard
in connection with the previous two steps.
- Click on Next and then on Finish.
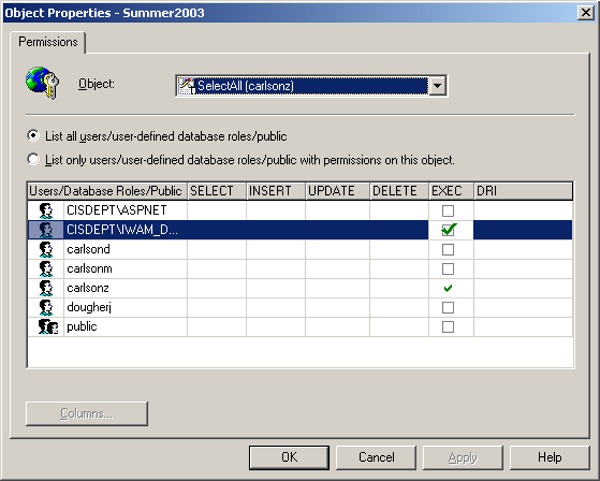
- You also need to give the correct database user execute permission on your stored procedure.
- Once again, it depends on your server configuration which user is needed, though
the user may be SQL or IWAM. The directions here assume that IWAM is the name of the
user that needs to be allowed to execute the stored procedure on behalf of your web app.
- At Saint Vincent, the correct user name to use is SQL.
- In Enterprise Manager, click on the Stored Procedures icon under your particular database.
- Find your SelectAll stored procedure in the right pane and right click on it.
- Select Properties, then Permissions.
- Check the Exec box for the IWAM (or SQL) user as shown in
this picture.
- If need be, consult your database administrator concerning what database user to give
execute access to the stored procedure.
- In Visual Studio we probably need to adjust the Select Command.
- Click on the DataAdapter1 icon at the bottom of your form.
- In the Properties window for this data adapter, expand the SelectCommand item.
- Note that the CommandType is listed as StoredProcedure.
- Change the CommandText entry to yourid.SelectAll where you replace
yourid by studentc or whatever your user ID is, the user ID that you were logged in
as when you created your stored procedure.
- Visual Studio will change the entry to look like yourid.[SelectAll], but do not
type it in that way yourself. Let it handle this change.
- Respond Yes when asked if you want to regenerate the parameters collection for this command.
- Say Yes to the next question that warns that information may be lost and asks whether
to apply the new parameter configuration.
- You are now the proud owner of a stored procedure! It was a long process, but you got it.
- You should now check to see if you can indeed get your data from the database.
- Click DataAdapter1 at the bottom of your form.
- Then in the Property window, click on the Preview Data link.
- Click on the Fill Dataset button.
- You should then see your data as shown in this picture of the preview.
- If this does not work, recheck your work on the stored procedure. You can even delete
the data adapter from your form and create a new one.
- Remember to save all of your files in Visual Studio before going on.
|
The Code to Get Data into the Web App
- If you have reached this point, you have been able to get data from your database into Visual Studio.
However, you need to write some code in order to have your web app retrieve this data.
- In Solution Explorer double click on PartsList.aspx.vb to bring it up in the editor.
- If the following "Imports" commands are not present, put them at the very top of this file:
|
Imports System
Imports System.Collections
Imports System.Drawing
Imports System.Data
Imports System.Data.SqlClient
Imports System.Web
Imports System.Web.SessionState
Imports System.Web.UI
Imports System.Web.UI.WebControls
|
- Visual Studio may well have already supplied these for you.
- These allow you to refer to SqlException instead of System.Data.SqlClient.SqlException, etc.
- Click on the + to show the code inside of the "Web Form Designer Generated Code" region.
- Find the section of code that sets up your labels and other items as protected fields.
- Add to the bottom of this list the code
Protected dTable As New DataTable
to create a DataTable in your web form.
- A DataTable can hold within your program the data from an actual database table.
- This section of code should now look something like this:
|
    Protected WithEvents Label1 As System.Web.UI.WebControls.Label
    Protected WithEvents Label2 As System.Web.UI.WebControls.Label
    Protected WithEvents Label3 As System.Web.UI.WebControls.Label
    Protected WithEvents DataGrid1 As System.Web.UI.WebControls.DataGrid
    Protected WithEvents ListAllButton As System.Web.UI.WebControls.Button
    Protected WithEvents AllPartsLabel As System.Web.UI.WebControls.Label
    Protected WithEvents ErrorLabel As System.Web.UI.WebControls.Label
    Protected WithEvents SqlConnection1 As System.Data.SqlClient.SqlConnection
    Protected WithEvents DataView1 As System.Data.DataView
    Protected WithEvents SqlDataAdapter1 As System.Data.SqlClient.SqlDataAdapter
    Protected WithEvents SqlSelectCommand1 As System.Data.SqlClient.SqlCommand
    Protected dTable As New DataTable
|
- We will not add a click handler for the button on your form. Instead,
we will simply use the fact that a postback happens whenever the user clicks
on this button.
- Thus, we just write code to handle the postback into the Page_Load procedure.
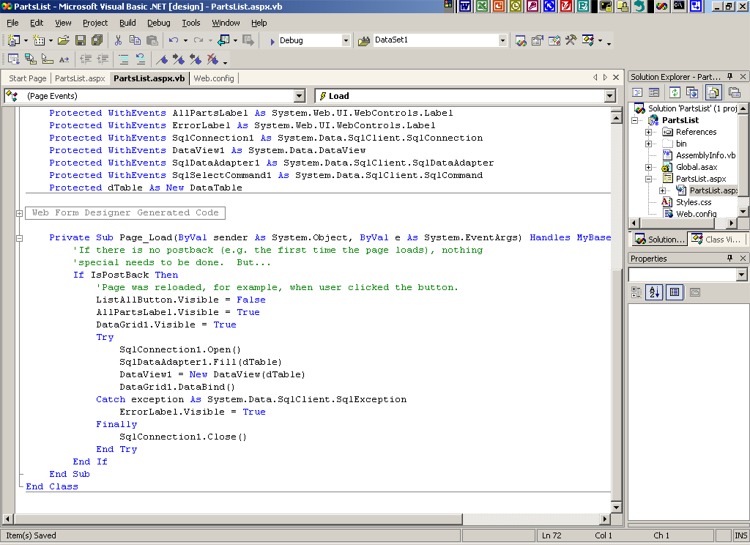
- Make your Page_Load procedure match the following:
|
Private Sub Page_Load(ByVal sender As System.Object, ByVal e As System.EventArgs) Handles MyBase.Load
    'If there is no postback (e.g. the first time the page loads), nothing
    'special needs to be done.  But...
     If IsPostBack Then
        'Page was reloaded, for example, when user clicked the button.
        ListAllButton.Visible = False
        AllPartsLabel.Visible = True
        DataGrid1.Visible = True
        Try
            SqlConnection1.Open()
            SqlDataAdapter1.Fill(dTable)
            DataView1 = New DataView(dTable)
            DataGrid1.DataBind()
        Catch exception As System.Data.SqlClient.SqlException
            ErrorLabel.Visible = True
        Finally
            SqlConnection1.Close()
        End Try
    End If
End Sub
|
- To see how this looks on screen, look at this
picture of the code in the Visual Studio editor.
- Note that if you included the "Imports" lines mentioned above, you can simplify the line
Catch exception As System.Data.SqlClient.SqlException
to just
Catch exception As SqlException
Still, it does not hurt to write out the long form.
- If a postback has occurred, we want to read the data from the database and display it
in the data grid on the web form.
- As a first small step, we make the ListAllButton not visible since the user
should not be clicking on this button if we have already displayed the data.
- However, we do make the AllPartsLabel and DataGrid1 to be visible as we do want
the user to see these.
- A
try..catch construct is used when accessing the database so that
we can catch an exception if one occurs.
- Inside this construct we first open the connection to the database.
- Then we use the data adapter (and its stored procedure out on the database) to
get the data from the database and place it into the data table that sits inside
of the web app.
- The data view then gets its data from the data table.
- Then the data grid is bound with the data from the data view.
- It's a multi-step process, but it gets the data where we want it! (There are also
alternative ways to code this, but we will not go into that here.)
- If all works OK, the last step in the procedure is to close the connection to the database.
- If an exception occurs (specifically an SqlException), we make the error label visible
in order to warn the user.
|
Build Your App
- Click on the Save All button in Visual Studio or use File, Save All.
- Then use Build, Build PartsList (or whatever you named your application).
- If the build succeeded, the Output window will give you a message to that effect.
- If not, fix any problems.
|
Testing and Debugging The App
Finding Errors
- Look at your app in a browser by going to the appropriate URL. For example, the URL might be
something like one of the following:
- http://cis3.stvincent.edu/studentc/PartsList/PartsList.aspx
- http://cis2.stvincent.edu/studentc/PartsList/PartsList.aspx
- Click on the List All Parts button and see what happens.
- If it does not work, you might try setting the Web.config file so that you can see
any error messages, as we have done in previous web apps.
Double click the Web.config file in Solution Explorer and edit the line that says
<customErrors mode="RemoteOnly" /> so that it instead reads as
<customErrors mode="Off" />
- Save everything, rebuild your application, and refresh the initial page in your browser.
- See if you get an error message now when you click on the button.
- Often it is a matter of getting the permissions right on the stored procedure if you
get an error at this point. Note that the stored procedure may work fine when you preview
the data in Visual Studio, yet not work when called from your web app. This is because the
stored procedure is run by one user (such as IWAM or SQL)
when the web app calls it, but is no doubt run
by a different user when called from Visual Studio. Consult your system admin or another
.NET web developer if you cannot get rid of an error at this point.
- When finished with debugging, undo all of your changes to Web.config, save everything,
and rebuild your app. This will leave your app in a more secure state. If a runtime
error crops up later, you don't want everyone on the Internet to be able to read the
detailed error messages.
- Congratulations on completing your first database-related web application!
|
|

 Search CIS Site
Tutorials
Search CIS Site
Tutorials