A Web App with a Drop-Down List
The Goals for this Example
One main goal is to show how to use a drop-down list to allow the user to make a selection.
In addition, as soon as the selection is made the user's browser is redirected to another
page containing the response to the selection. This example also uses a button to send the
user back to the initial page and uses links that are images.
Creating the Example
What the App Should Do
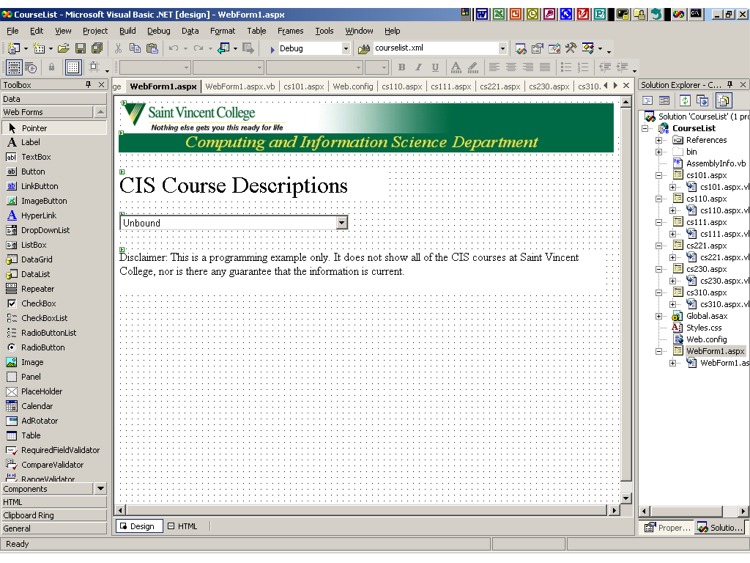
- The main idea is that the application will present the user with a list of courses in
a drop down list. When a selection is made, the user will be redirected to a page
giving the course description.
- Here is an image of the completed web form
as it appears in Visual Studio.
|
Adding Images that are Links
- Begin as usual by creating a new project of type Visual Basic Projects, and having template
ASP.NET Web Application. In the location box put in a reasonable location similar to one of the
following:
- https://cis3.stvincent.edu/studentc/CourseList
- http://cis2.stvincent.edu/studentc/CourseList
- This assumes that you want to name the project CourseList. Adjust the rest of the
location to suit your situation.
- The 2 images at the top of the web form are links, so that the user can click on either
in order to go to the home page for Saint Vincent College or the CIS Department.
- You can use your own images and link destinations instead if you like.
We will assume here that you use the Saint Vincent images, but you can modify the instructions
if you wish to use something else.
- Begin by getting a HyperLink from the Toolbox and placing it at the top of the form.
- Resize this link to be big enough to hold the first image, the one for Saint Vincent College.
- Under Properties for this link, click in the value box for ImageURL, then click on the little box
that appears with 3 dots in it.
- In the resulting Select Image dialog box, fill in http://cis2.stvincent.edu/carlsond/svc.gif
as the URL. You can change the URL Type to Absolute, but this is not necessary as Visual Studio
will do so for you once you click OK to close this dialog box. So, click OK.
(As an alternative you can copy the image to your server and add it to your
project in Solution Explorer, as described in previous projects.
You would then use a relative URL.)
- In a similar way, find NavigateURL under Properties for this link and change the URL
to http://www.stvincent.edu (or whatever you wish). This is so that clicking on the link
will take the user to http://www.stvincent.edu.
- Resize the box for the link as needed so that the image just fits inside of it.
- In the same manner, create a second HyperLink right under the first.
- Set its ImageURL to http://cis2.stvincent.edu/carlsond/cis.jpg (or to the appropriate relative
URL if you decide to put a copy of the image file on your server).
- Set its NavigateURL to http://cis.stvincent.edu.
- Resize the boxes for the 2 links as needed and drag them so that they line up as seen in
the image of the completed web form that was mentioned above.
- Then add a label beneath the 2 image links and set its Text property to CIS Course Descriptions.
Under Font, Size in the Properties window, change the size to extra large.
- Save your work so far by using File, Save All.
|
The Drop-Down List
- Find DropDownList in the Toolbox and place a drop-down list on the form, just below the label.
- Resize the drop-down list so that it will hold 1 short line of data (as seen
in the image of the completed web form).
- Change the AutoPostBack property to true. This is what allows the web app to process the
user's selection from the drop-down list as soon as the selection is made. This is more
convenient that making the user click on a button in order to submit the selection.
- Below the drop-down list add a label containing the following text (or whatever text you wish):
Disclaimer: This is a programming example only. It does not show all of the CIS courses
at Saint Vincent College, nor is there any guarantee that the information is current.
|
Adding Additional Web Forms
- In Solution Explorer you should see the name of your solution (workspace) at the top and right
under it the name of your project. Below that is the list of files used by your project.
- Right click on the name (or icon) for your project and select Add, Add Web Form. In the
resulting dialog box, fill in cs101.aspx as the name of the new web form.
- Click on Open and you should get your new, empty web form.
- Put the same 2 HyperLinks at the top of this form as used on the original web form above.
You can do this by selecting the 2 image links on the old form (with CTRL click),
copying them (with right click, copy), and then pasting them into the new form (with
right click, paste).
- We want the resulting cs101.aspx form to look as shown in this
screen shot.
- Add a label to hold the course number, CS 101, and set it to use a font size of large.
- Add another label to hold the course title, Survey of Computers and Computing, and
have it use a font size of medium.
- Add one more label to hold the course description. Resize it to be big enough to
hold this text. Leave the font size at its normal default value.
- You can copy in the text for the CS 101 course description from the
working web application itself.
Or, you can copy in the description for this (and other courses) from the simple
Computing & Information Science Courses web page.
(Of course, you can really use any text you like for your example web app.)
- Add a button below this and change its Text property to Back. Then change its BackColor
(background color) property to LightGray.
- In the same manner, create web forms for each of the rest of the courses in the list for this
web app: CS 110, CS 111, CS 221, CS 230, and CS 310.
- Save your work by using File, Save All.
|
Processing the Selection
- We need to add code to handle the user's selection in the drop-down list found on the original
web form, called WebForm1.aspx (unless you renamed it).
- If WebForm1.aspx.vb is not already available under one of the editor tabs, find this file
in Solution Explorer and double click on it to display it in the editor.
- The first step is to add code to show the choices, the course numbers, in the drop-down list.
In a fancier application we might read this information from a database, but in this example
we simply hard-code the data. Add the code shown below to the Page_Load procedure:
|
Private Sub Page_Load(ByVal sender As System.Object, _
    ByVal e As System.EventArgs) Handles MyBase.Load

    'Put user code to initialize the page here
    If Not IsPostBack Then
        DropDownList1.Items.Add("make a selection")
        DropDownList1.Items.Add("CS 101")
        DropDownList1.Items.Add("CS 110")
        DropDownList1.Items.Add("CS 111")
        DropDownList1.Items.Add("CS 221")
        DropDownList1.Items.Add("CS 230")
        DropDownList1.Items.Add("CS 310")
    End If
End Sub
|
- Note that this code assumes that you left the default name DropDownList1 as the name of the
drop-down list. Just change the name in the code if you renamed the drop-down list itself.
- If we don't have a postback, then we are on the initial loading of the page. That is when
we need to add the course numbers to the drop-down list.
- Next, we need to add a whole new procedure to process the course selected by the user in
the drop-down list. Here is how to do that:
|
Private Sub DropDownList1_SelectedIndexChanged(ByVal sender As System.Object, _
    ByVal e As System.EventArgs) Handles DropDownList1.SelectedIndexChanged

    If DropDownList1.SelectedItem.Text = "CS 101" Then
        Server.Transfer("cs101.aspx")
    ElseIf DropDownList1.SelectedItem.Text = "CS 110" Then
        Server.Transfer("cs110.aspx")
    ElseIf DropDownList1.SelectedItem.Text = "CS 111" Then
        Server.Transfer("cs111.aspx")
    ElseIf DropDownList1.SelectedItem.Text = "CS 221" Then
        Server.Transfer("cs221.aspx")
    ElseIf DropDownList1.SelectedItem.Text = "CS 230" Then
        Server.Transfer("cs230.aspx")
    ElseIf DropDownList1.SelectedItem.Text = "CS 310" Then
        Server.Transfer("cs310.aspx")
    End If
End Sub
|
- Note that there are 2 ways to redirect to a new web page.
- One is to use something like
Response.Redirect("cs101.aspx").
Although this works fine, it sends a response to the user's browser telling it to redirect
to the new web page on the server. This round trip (from server to PC and back) can take a
noticeable amount of time.
- It is faster to use
Server.Transfer("cs101.aspx")
since this is handled entirely on the server; no round trip to the user's browser is needed.
- We have chosen the faster method above.
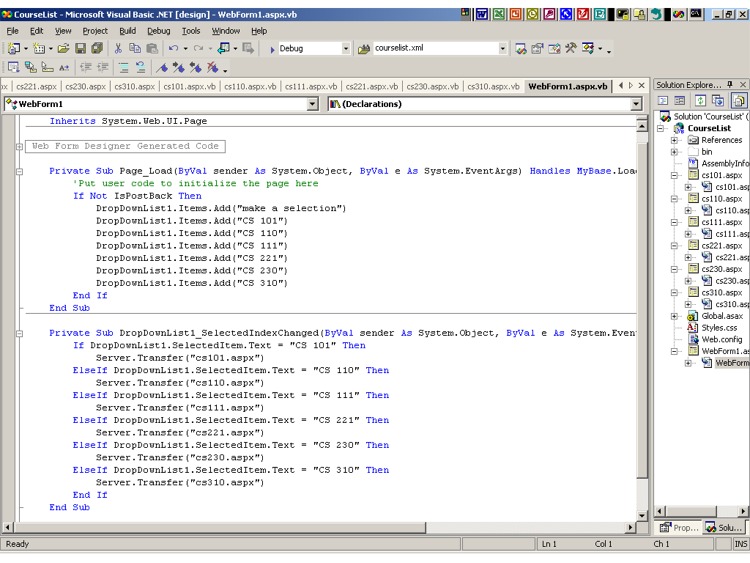
- You can see all of the code for the main web form in this
screen shot of WebForm1.aspx.vb.
|
Implementing the Back Buttons
- Compared to the above, this is very easy.
- Begin by double clicking on the Back button on the cs101.aspx web form.
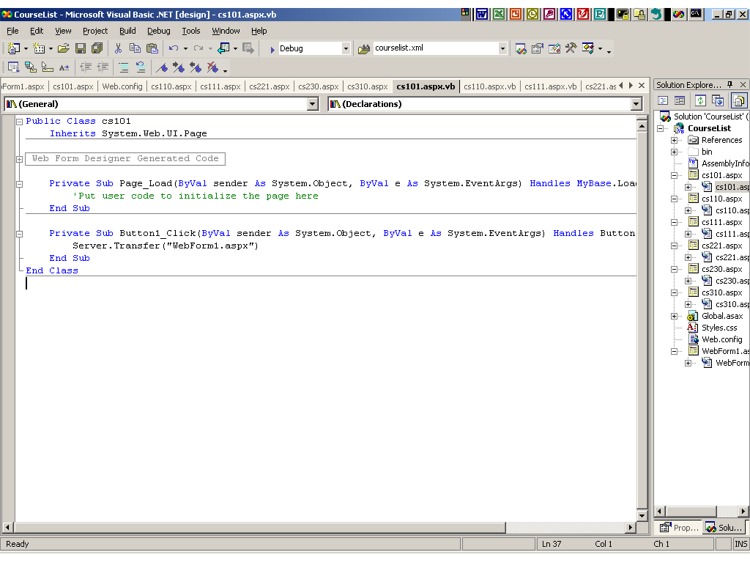
- This should show the code for cs101.aspx.vb
in the editor and place in it the outline for a procedure named Button1_Click.
- Simply fill in this one line of code inside this procedure:
Server.Transfer("WebForm1.aspx")
- The above screen shot for cs101.aspx.vb already shows
this line of code in the Button1_Click procedure.
- Do the exact same steps to implement the Back Button on each of the other course web forms.
- Use File, Save All to save your work.
|
Building and Testing Your App
- Use Build, Build CourseList (or whatever you named your project).
- If the build succeeded, the Output window will give you a message to that effect.
- If not, fix any problems.
- Then try out your web app in a browser. With the example locations given above, you would
use one of the following URLs in your browser. Adjust this to fit your situation.
- http://cis3.stvincent.edu/studentc/CourseList/WebForm1.aspx
- http://cis2.stvincent.edu/studentc/CourseList/WebForm1.aspx
- If you watch carefully you will probably see one strange thing: Once you have selected a course
(and possibly used the Back button), the browser seems to display the wrong URL at the top of
each page. This is because of our use of the quick
Server.Transfer method.
It tells the server to immediately switch to the new page, leaving the URL bar still holding
the old URL. If this nuisance bothers you, you can use the slower Response.Redirect
instead as it does not suffer from this problem.
- You may also have realized that the design used in this web app does not scale well. It works fine
for a list of 6 courses, but would be unwieldy with 100 courses. In the latter case, we might
have the information on the courses in a database and have our web app retrieve the data from
there. Then we would not need to manually add each course number to the drop-down list, nor
have a separate web form containing the description of each course.
|
|

 Search CIS Site
Tutorials
Search CIS Site
Tutorials