Car Store 2
The Goals for this Example
This example simply expands on the previous car store app.
Thus you should work on a copy of that web site. The main goal is to add the shopping cart, but the checkout
process is not implemented in this example.
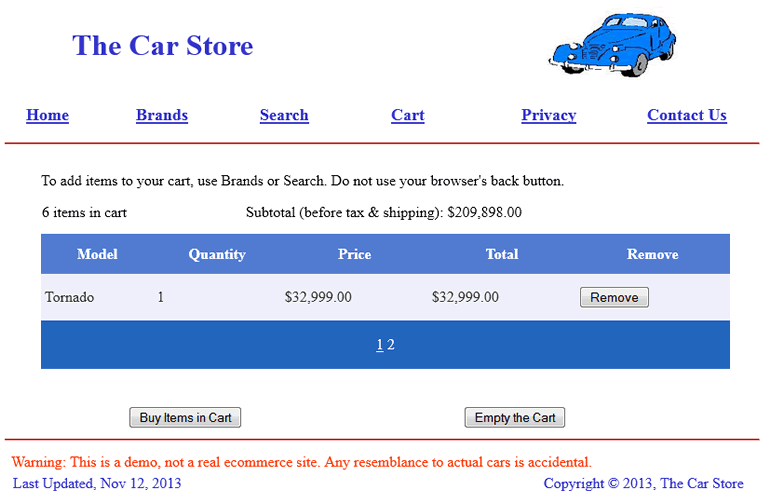
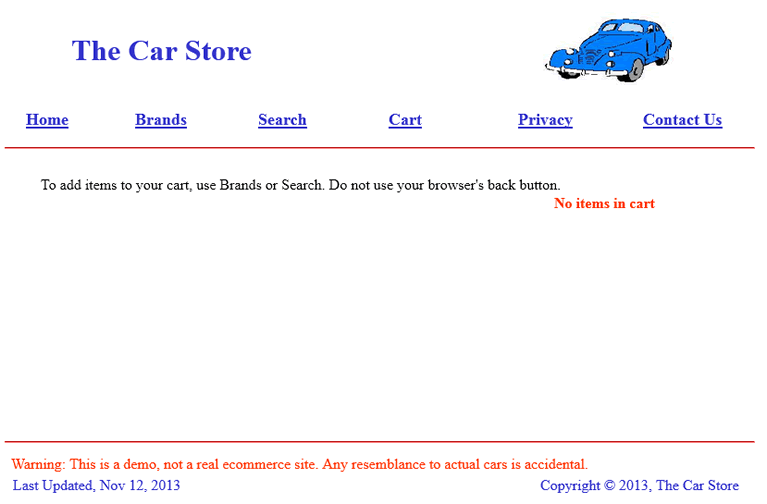
- This version has several new features, such as the shopping cart page. Here are some screen shots:
|
Database Work
The directions below assume that you use SQL Server Management Studio to do all of the database
work that is described.
CarProduct Table
- The CarProduct table from the previous web app should work fine.
|
CarCategory Table
- This table, too, should work unchanged.
|
CarCategoryProduct Table
- This table will work unchanged unless you added new car data to the CarProduct table.
- If you did add new data to the CarProduct table, then add rows to this table to indicate which
of the new cars belong in which categories. (Since each category is a car manufacturer, a given model
of car should only belong to one category. With products other than the cars you might want a
particular product to belong to more than one category.)
|
CarBasket Table
- This table is used to hold general information about the shopping basket (cart).
- A separate BasketItem table will hold information about each item in the shopping basket.
|
| Column Name |
Data Type |
Allow Nulls |
| BasketNum |
int |
no |
| ShopperNum |
int |
no |
| BasketNumItems |
int |
no |
| BasketOrderPlaced |
int |
no |
| BasketSubtotal |
money |
no |
| BasketTotal |
money |
no |
| BasketShipping |
money |
no |
| BasketTax |
money |
no |
- Make BasketNum the primary key.
- Also make it an identity field.
- The idea for the BasketOrderPlaced field value is that it indicates whether the order has been placed (value 1)
or not (value 0).
- Set up all fields except the first 2 to have a default value of 0.
This is done by click on the margin in front of a particular field and then
putting 0 into the property at the bottom of the screen labelled
"Default Value or Binding".
- Save this table under the name CarBasket. Do NOT save it until you have set up the primary key, the identity
field and the default values.
- No data is added to the Basket table ahead of time. Our e-commerce app will add data when users create
shopping baskets.
|
CarBasketItem Table
- This table is used to hold information about an individual type of car in the shopping basket.
- Note that a user is able to purchase 1 or more cars of the same type. The BasketItemQuantity field
will show the number of these identical cars.
- Also note that what you might call the BasketItem number uses the simpler field name of ID.
- Design the table as shown below.
|
| Column Name |
Data Type |
Allow Nulls |
| ID |
int |
no |
| BasketNum |
int |
no |
| ProdNum |
int |
no |
| BasketItemPrice |
money |
no |
| BasketItemProdName |
varchar(24) |
no |
| BasketItemQuantity |
int |
no |
| BasketItemAttributes |
varchar(64) |
yes |
| BasketItemTotal |
money |
no |
- Make ID the primary key.
- Also make it an identity field.
- Give a default value of 0 to the BasketItemPrice, BasketItemQuantity, and BasketItemTotal fields.
You find this as a property in the Column Properties box below the table designer.
- Save this table under the name CarBasketItem.
- No data is added to this table ahead of time. Our e-commerce app will add data
when users add products to their shopping baskets.
- As sample data you might see, for example, that basket 4 has basket items 6 and 7, which hold
1 Kangaroo car and 3 Tornados, respectively.
|
CarShopper Table
- This table is used to hold the name and contact information of each shopper.
- We might keep this data long term since it would allow us to send email or paper mail advertising
products to our customers. Keeping this data would also enable us to implement user profiles (so that
a user could submit a password and have the user's name, address, etc. automatically available).
We skip user profiles here so as to keep this app from being overly long.
- Design the table as follows:
|
| Column Name |
Data Type |
Allow Nulls |
| ID |
int |
no |
| ShopperFirstName |
varchar(24) |
yes |
| ShopperLastName |
varchar(32) |
no |
| ShopperStreet |
varchar(32) |
no |
| ShopperCity |
varchar(32) |
no |
| ShopperState |
varchar(2) |
no |
| ShopperZipCode |
varchar(15) |
no |
| ShopperPhone |
varchar(30) |
yes |
| ShopperEmail |
varchar(48) |
no |
- Make ID (which is essentially the shopper's ID number) the primary key.
- Also make it an identity field.
- Save this table under the name CarShopper.
- No data is added to this table ahead of time. Our e-commerce app will add data
when a shopper checks out.
|
CarOrder Table
- This table is used to hold the name and contact information on the shopper who is placing an order
along with the date the order is placed and the basket ID number.
- Design the table as follows:
|
| Column Name |
Data Type |
Allow Nulls |
| ID |
int |
no |
| ShopperNum |
int |
no |
| BasketNum |
int |
no |
| OrderFirstName |
varchar(24) |
yes |
| OrderLastName |
varchar(32) |
no |
| OrderStreet |
varchar(32) |
no |
| OrderCity |
varchar(32) |
no |
| OrderState |
varchar(2) |
no |
| OrderZipCode |
varchar(15) |
no |
| OrderPhone |
varchar(30) |
yes |
| OrderEmail |
varchar(48) |
no |
| OrderDateOrdered |
datetime |
no |
- Make ID the primary key.
- Also make it an identity field.
- Make the BasketNum field to be a unique key.
This is to prevent the possibility of having two or more
orders for the same basket. Here are the steps to follow in creating this unique constraint:
- In the table design window, click on the margin in front of the BasketNum field.
- Click on Table Designer, Indexes/Keys (or click the Indexes/Keys button).
- There should already be an entry named PK_CarOrder.
If you check its Columns property, you will
see that ID is listed there. That says that ID is the primary key.
- Click the Add button.
- Click in the box to the right of the Columns property. You will then see a "..." button.
Click on it to get the screen for choosing the column.
Choose BasketNum, of course, and click OK.
- Click in the box to the right of the Type property and
choose Unique Key from the drop-down list.
- Click on Close.
- Save this table under the name CarOrder.
- No data is added to this table ahead of time. Our e-commerce app will add data when
a shopper checks out.
- Although the address data is the same as that stored in the Shopper table, we might
periodically purge old data from the Order table, whereas the Shopper table data is likely
to be kept around for a longer time (so that we can send promotions to our customers and so
that the customers might have user profiles).
|
CarPayment Table
- This table is used to hold a customer's credit card information as well as the order number so as to
link the credit card information to a particular order.
- We plan to keep the information in this table only as long as necessary in order to verify
the credit card information and process the order. This is to reduce our exposure to
thieves interested in stealing credit card information.
In fact, the credit card number should be stored in encrypted form, even if it is only kept
for a short time. We will skip that in order to keep this example from being too lengthy.
- Design the table as follows:
|
| Column Name |
Data Type |
Allow Nulls |
| ID |
int |
no |
| OrderNum |
int |
no |
| PaymentCardType |
varchar(16) |
no |
| PaymentCardNumber |
varchar(30) |
no |
| PaymentExpirationDate |
varchar(24) |
no |
| PaymentCardOwnerName |
varchar(64) |
no |
- Make ID the primary key.
- Also make it an identity field.
- Make OrderNum a unique key much like above.
This is to prevent the possibility of having two or more
sets of payment information for the same order.
- Save this table under the name CarPayment.
- No data is added to this table ahead of time. Our e-commerce app will add data when
a shopper checks out.
|
Relationships Between Tables
- We should next set up the appropriate relationships between tables based on where we have foreign keys present.
- For a reminder on how to set up this type of relationship, look at the directions
in the store1 car app.
- Set up the following relationships. In each case, check the screen shot to be sure you
have the same thing. Detailed directions are only given for the first relationship.
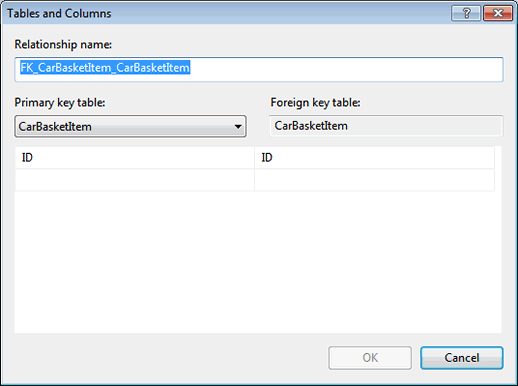
- The CarBasketItem table contains BasketNum as a foreign key since BasketNum is the primary key
in the CarBasket table. The following are the details on how to set up this relationship.
- Begin by opening table design for the table containing the foreign key.
Thus, in this case, you would right click on the CarBasketItem table and select Design.
- Click on Table Designer, Relationships (or click the Relationships button). This gives you
a dialog box showing the relationships and their properties.
- Click the Add button.
- Then click in the box to the right of the Tables and Columns Specification property.
A button labelled with "..." then shows up. Click on it to get the
Tables and Columns dialog box.
- First select the other table in the left column, the so-called primary key table.
In this case, the table containing the primary key is the CarBasket table.
- Make the BasketNum primary key to be the only field displayed underneath this.
If there are other fields shown, click in its box and use the pull-down to change
the entry to nothing. That will clear out the unwanted value.
- The righthand column should already have the correct foreign key table shown, namely
the CarBasketItem table. The field shown under it should be the BasketNum field, the one
that matches with the left column. Both field choices should be on the same line.
- Check this picture of how the dialog box should now look.
Click OK when you have this set up correctly.
- Note that for me and some others, this relationship later interfered with the code that handles
the Add to Cart button, so that I ended up
deleting it and rebuilding my entity framework model. However, you may want to try leaving this in to see
if you can get your code to work with it. If you do omit this relationship, once your project works,
you could add the relationship back in, as described above, save what you have done in SQL Server Management
Studio, and then in Visual Studio, delete all the files in the App_Code folder and build a new model
based on your updated database. This has worked for me and others. It might also work
to keep your App_Code files, right click on the screen where
Visual Studio displays your model, and get it to update the model from the database.
- The CarBasketItem table also contains foreign key ProdNum since it matches with ID, the primary key
in the CarProduct table. Check this screen shot showing this relationship.
When finished with the CarBasketItem table, be sure to save it.
- Next, open the CarBasket table. It contains foreign key ShopperNum since it matches with ID,
the primary key in the CarShopper table.
When finished with the CarBasket table, be sure to save it.
- Now open the CarOrder table. It contains ShopperNum as a foreign key since ShopperNum matches with ID,
the primary key in the CarShopper table.
- The CarOrder table also contains BasketNum as a foreign key since BasketNum is the primary key
in the CarBasket table. When finished with the CarOrder table, be sure to save it.
- Open the CarPayment table. It contains foreign key OrderNum since OrderNum matches with ID, the primary key
in the CarOrder table. When finished with the CarPayment table, be sure to save it.
|
Adding and Adjusting Forms
New or Revised Forms
- First, make sure that you have made a copy of your Store1 website folder and named the copy Store2. Have this on your
W drive so that it can be accessed by the live web server.
- The new files and revised ones can be obtained from Store2.zip.
- Files such as Cart.aspx that you already had in Store1 should replace your old ones.
- If, in Store1, you figured out some useful VB code, you probably want to check if you can fill it in at the same
places in the new files.
- Note that the new aspx.vb files do have a few blanks for you to fill in with the correct code. These lines are usually
commented off to try to keep syntax error messages to a minimum. Once you get the code filled in, uncomment these lines.
- The .aspx files should be whole and complete.
|
The Results Page
- As we left this page in store 1, it simply displayed the information on a particular car looked up by brand and model or
with the search page and then clicking on the View button.
- Now we need to make the "Add to Cart" button work.
- There is nothing unusual on the Results.aspx form itself. You can look up the details of each item under properties, or,
for the dropdown list, under its smart tag, Edit Items.
- In Results.aspx.vb, the Page_Load routine needs to do two main tasks: Make sure that the user has a shopper number
and display the data about the selected car on the form. Here are some of the details:
- If there is no shopper number in Session state that means that this is the first time the user has reached this page
during the user's current browser session.
- On the other hand, it would be awkward to ask the user for first name, last name, address, etc. at this point in order
to create a new, complete CarShopper table entry in the database.
- Instead, a new CarShopper object is created with empty strings for most of its data. The last name is filled in with the
current system time (in ticks, a very small unit of time). This is just a temporary and (probably) unique name to be used
until the user goes to check out and fills in the name and address data.
- This new CarShopper object is added to the entity collection and saved to the database.
- We then need to know the ID number for the record just added to the CarShopper table. This is the shopper number.
- One way, the method shown here, to get this ID number is to do a LINQ query to obtain the CarShopper object that has the
saved current time as the last name. We then grab the ID number from this object.
- The rest of Page_Load does a LINQ query to get the car data for the car whose brand and model are currently saved in
Session state. This information, as well as the brand and model, are then displayed on the form in the text box and various
labels. The car data is also saved to Session state in case we need it later.
- Also in Results.aspx.vb, we have the AddToCartButton_Click routine. It does the following:
- It gets the quantity desired from the dropdown list and saves it in Session state.
- If there is no shopping basket number, that means that the user has not previously clicking this button during
the current session. (Note that we use a shopping cart theme on the store web pages, but internally in the
code we have a shopping basket theme. You might prefer to consistently use one theme.)
- Checking to see if Session("BasketNum") is the empty string, though it sounds reasonable, does not work.
You have to use the Is Nothing test.
- So, if a shopping basket number is needed, we make a new basket object, with just the shopper number filled in.
Other data will get added later. Of course, the database will automatically supply a new basket number, since
that is an identity field. Notice how we obtain that basket number: the basket object that we just saved to the
database now automatically contains the basket number that the database supplied. The basket number is saved
to Session state so that we can easily access it again.
- Next, the routine retrieves several items from Session state and calculates the total cost for the items in the
current car and quantity (as retrieved from Session state).
- The next task is to get this new desired purchase into the database.
- But we need to know if the same shopper already has some quantity of this car in the shopping basket or if this
would be a new item for this shopping basket.
- A LINQ query is used to find all basket items that have the same product number and basket number as the new desired
purchase.
- If there are no such basket items, a new CarBasketItem object is made and saved to the database.
- If there is such a basket item, it would be the only one (because our web app doesn't allow the same car to be
put into two different basket items). In this case, we just update the existing basket item to reflect the shopper's
wish to purchase more of the same item.
|
The Cart Page
- In store 1, Cart.aspx was an empty form. Now, it contains a lot of controls. There are labels, a grid view,
and buttons, some of which are within the grid view and some outside it.
- You can examine the properties of any of these, but the most complex and interesting one is the grid view.
- Under Properties, the grid view has AllowPaging set to True, AutoGenerateColumns is set to false (as the columns are
manually configured), certain colors are selected (including under the EmptyDataRow style), PagerSettings has the
PageButtonCount set at 3 (the maximum number of buttons or links to pages at the bottom of the grid view when not all of the
data fits on one page), and Visible is set to False initially.
- Under the grid view's smart tag, Edit Columns shows how the columns were set up. All are bound fields except for
Remove, which is a command field. For each bound field, HeaderText gives the text at the top of the column and
DataField indicates the column (field) name for the data to be placed in this column. In other words, the data coming
from the database (via the Entity Framework in our case) must have the exact field name listed as the DataField for the
data to be placed in this particular column of the grid view.
- The command field called Remove has several properties that were set up for you: the button type is button (instead of link
or image), DeleteText (the text on the button) is Remove, HeaderText (the text for the top of the column) is also Remove,
and under the Behavior section, ShowDeleteButton and ShowHeader are both True.
- In Cart.aspx.vb there is an UpdatePage routine. Its main task is to display the basket items in the grid view.
This routine is private and is used by some of the other routines in Cart.aspx.vb at the point where they need to update
the data on the Cart.aspx form.
- A LINQ query is used to retrieve all of the basket items having the current basket number, the one in Session state.
- If there are no such basket items, an error message is shown and most of the other controls on the form are
made invisible, as it would now make no sense to see or to use them.
- Otherwise, the data from the basket items retrieved is placed into the grid view. In addition,
a For Each loop is used to add up the total cost of all the items in the basket as well as to add up the number
of cars in the basket. The numbers to be added are obtained from basket item objects that the query produced.
- These two computed numbers are displayed in labels on the form.
- The Page_Load routine runs as soon as the Cart page is loaded. It starts by using the same code that the Results page used
to be sure that the user has a shopper number. This is redundant and could probably be removed. Other than that, Page_Load
displays an error message if there is no basket number in Session state. (As before, it checks to see if Session("BasketNum")
Is Nothing, not if it equals the empty string.) If there is a BasketNum, this routine uses the UpdatePage routine to
display the shopping basket data on the form.
- The BuyButton_Click routine redirects to the Shipping.aspx form (which we will create in the next version of the car store).
However, it only redirects to the new page if there are no errors showing on the current page.
- The EmptyButton_Click routine is used when the user clicks the "Empty the Cart" button. It uses a LINQ query
to find all of the basket items for the current basket number. A For Each loop is used to go through each of these basket
item objects and mark them for removal. Then these changes are made permanent (which means that the data in
the database is adjusted).
- GridView1_PageIndexChanging is simple. It tells the grid view what new page index to use and then calls our
UpdatePage routine to display the data correctly on the form.
- Finally we reach the GridView1_RowDeleting routine. Its task is to delete the basket item for the row in which the
user has clicked the Remove button. This is a bit tricky. Here are the steps:
- e.RowIndex is used to tell us what row of the current page of the grid view is the row where the user clicked
the Remove button.
- By adding this to the grid view's grid size (maximum number of rows per page) times its page index (which page is
currently displayed), we get the number within the overall grid view for the data in question. For example,
if page index is 1 (really the second page of the grid view), page size is 3 (3 rows per page) and e.RowIndex
is 2 (indicating the third item on the current page since numbering starts at zero), we then get
3 * 1 + 2 = 5 as the location, or index, for the desired row of data in our collection of objects. Since numbering
starts at zero, 5 really means the 6th object in the collection.
- A LINQ query is used to retrieve all of the basket items having the current basket number.
- Then we use Skip(location), which would be Skip(5) in our example, to skip over the first 5 objects returned by
the query. Then we apply Take(1) to obtain the first item from that result. This would be object 6, the one
we want. Since we really obtain a collection that contains this one object, we use FirstOrDefault to get the
actual object. From that object, we extract the ID number.
- We then use that ID number to find the CarBasketItem object with that ID number among the CarBasketItem objects
in our entities.
- Finally, we mark it for removal and make that change permanent (that is, the change is made on the database end
as well as here in our entity objects.
|
Improvements
- Now that most of the car store is working, it is time to start thinking of possible improvements to it.
In CS 305, students are asked to make a few improvements that can be shown in the presentations to the class
in finals week. These improvements do not have to be done now (in store 1, store 2, or even in the upcoming store3),
though if you have time to do something now, that would make things easier later.
- These improvements might include polishing the user interface. Perhaps better colors, font sizes, etc. could be used.
Even nicer would be the use of CSS to specify items like this, or perhaps themes or skins. These are explained in our
text and in many other ASP.NET books.
- There are places where the code could be written simpler or better. Some suggestions for these are in the VB code
as comments, and others may occur to you as you read through the code. Some clumsy coding was left in deliberately
so that you would have something to work on!
- If you can find any place where store 2 does not work, that itself is a plus. Better yet, if you can fix it,
that is worth more.
- If you can find a way to get the car store to work with the
relationship in place between the CarBasketItem and CarBasket tables,
that would be an improvement. Recall that I removed that relationship because it was
interfering with the functioning of the code.
- If you have the time to do so, you might consider adding the ability to customize the type of car that goes into
a basket item. For example, you could allow the user to select the color from a list maintained in a table in your
database. For some ideas on how to do this you can refer to the old VB 2005 directions for the
second larger ecommerce app. Look for its use of product
attributes, the tables it used, the coding, etc. Note, however, that this old app gave the user the ability to
customize both the car color and the type of seat covering. It would be simpler to just have one item that can be
customized. If you choose to do this, you should use LINQ instead of stored procedures, if possible.
- Car store 3, the next iteration of this web application, may suggest further possible improvements.
- Car store 4 will be your final version, with all of your improvements.
- Students in CS 305 should email me a list of the improvements they made to the car store no later than our final exam
period (which we use for the final project presentations). This is to make sure that I am aware of all of your improvements
and thus give you credit for doing these.
|
|

 Search CIS Site
Tutorials
Search CIS Site
Tutorials