E-commerce App 2
The Goals for this Example
In our first e-commerce app we created an outline
of an e-commerce app that sold software.
The user could select a product from a drop-down list and was then
given a page of information on that product.
This example just adds to that application. In particular, it implements
the search page that was just a placeholder
before. The user can search for a software title by name or use
a word or phrase to search for a desired item or items.
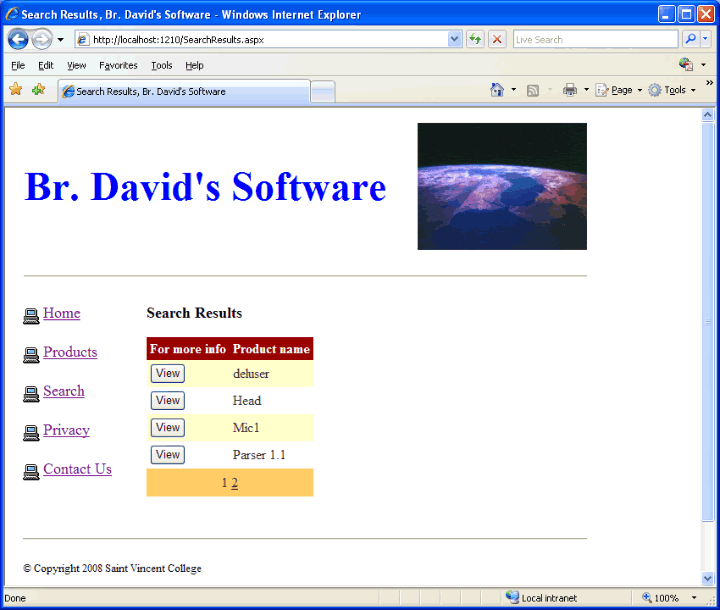
The results are displayed in a grid view that uses paging
to limit the number of rows of data seen on any page to a maximum of 4. Here is a
picture of the first page of results after a search was done.
As you can see, the user can click on the link labelled 2 to go to the second page of search results.
Look at this screen shot of the second page of results for the same example search.
In addition, we decide not
to display all of the fields about the products that match the search condition, as that would not easily
fit into the grid view. Instead, each row of the grid will just display the name of the product and
a button to click on to go to a new page showing all of the data on this product. In fact, we will
simply redirect to the existing Results.aspx page
to show all of the data on the selected product.
Starting this Project
- Use My Computer to copy the previous project, e-commerce app 1,
to a new folder in a convenient location (such as your M drive).
- Use e2 for the name of this new project folder.
- Open the new project in Visual Studio 2005.
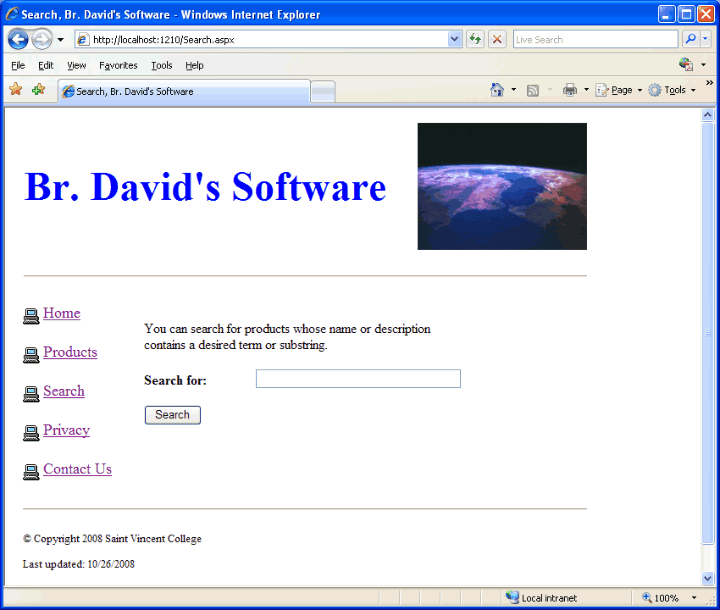
- You already have a search page named Search.aspx with very little on it.
- We want to change this page
so that it contains 2 labels, a text box, and a button as
shown in this screen shot. The items in red are validators that
we will add later.
- The text for the first label is "You can search for products whose name or description
contains a desired term or substring."
- The text for the second label reads "Search for:".
- Note that the second label's text is in bold.
- Change the ID of the text box to SubstringBox.
- Change the ID of the button to SearchButton and its Text field to "Search".
- Since we included the header.txt and footer.txt files in each web form of the first
e-commerce app, the Search.aspx web form should still contain this.
- Go to HTML view and check that these 2 files are included as in
the previous web app.
- Now add a required field validator and use it to validate the text box. That is, SubstringBox should
be chosen as the value of the Control to Validate field.
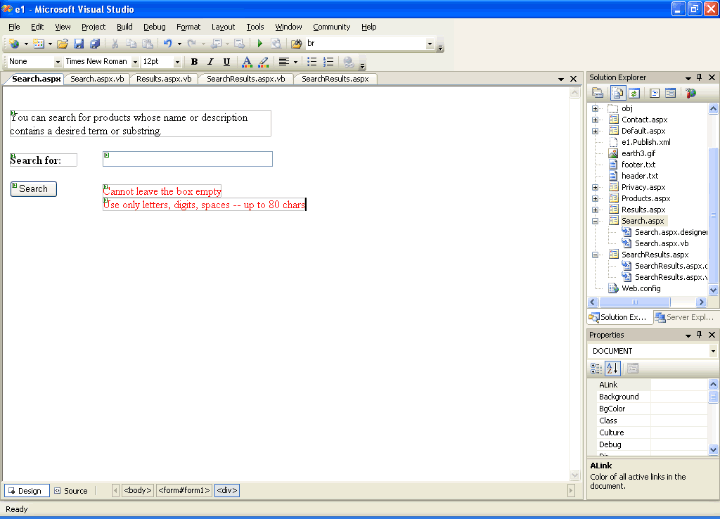
- For this validator use the error message: "Cannot leave the box empty."
- Add a regular expression validator and use it to also validate the text box.
- Put in "Use only letters, digits, spaces -- up to 80 chars" as the error message.
- Use [a-zA-Z0-9 ]{1,80} as the validation expression. Notice that there is a blank character
after the 9. This regular expression only allows user input that consists of at least 1 and at
most 80 characters, where the allowed characters are alphabetic (lower or upper case), digits,
and the blank character. This would seem to be sufficient for users who want to search for
our products and leaves out the more unusual characters that hackers like to use.
- Save your work so far by using File, Save All.
|
The search.aspx.vb Code-Behind File
- Adjust the Page_Load procedure so that it looks as follows:
|
Protected Sub Page_Load(ByVal sender As Object, ByVal e As System.EventArgs) Handles Me.Load
    Dim Target As String
    If IsPostBack Then   'Search button was clicked
        Page.Validate()
        If Page.IsValid Then
            Target = SubstringBox.Text.ToString()
            Session.Add("TargetSubstring", Target)
            Response.Redirect("SearchResults.aspx")
        End If
    End If
End Sub
|
- The Page.Validate is present because we are using validators.
- If a user clicks on the search button, a postback happens. In this case
we use http session state to keep track of the string to search for and redirect to another page,
the SearchResults.aspx form.
- Save all of your files before going on.
|
Search Results
The Actual SearchResults Page
- Add a new web form to your project and name it SearchResults.aspx.
- Change the title of this page to "Search Results, Br. David's Software".
- We want to set up this form as shown in this screen shot of the
SearchResults page or in this view of the SearchResults form
in Visual Studio.
- Place a label at the top of this page containing the text "Search Results" in large, bold.
- Place 4 labels for error messages just above the data list.
All should use the color red. The Visible property should be False.
- Change the ID of one label to DatabaseErrorLabel and set its Text field to
"A database error happened".
- Change the ID of another of the 4 labels to SessionErrorLabel and set its Text field to
"No data was supplied".
- Change the ID of another of the labels to NoDataLabel and set its Text field to
"No matching data found".
- Change the ID of the remaining label to ErrorLabel and set its Text field to
"An error happened".
- If security is a concern, it would be better to have only one error label with a very generic
message such as "An error happened." There is no sense in giving away clues to attackers who
are trying to hack your web application.
- Drag a grid view onto this form.
- Change the ID of the grid view to SearchResultsView.
- Set the Visible property for SearchResultsView to False.
- While the grid view is selected, click on the smart tag, use Autoformat, and select Colorful.
- Use the smart tag to edit the columns of the grid view. Do the following:
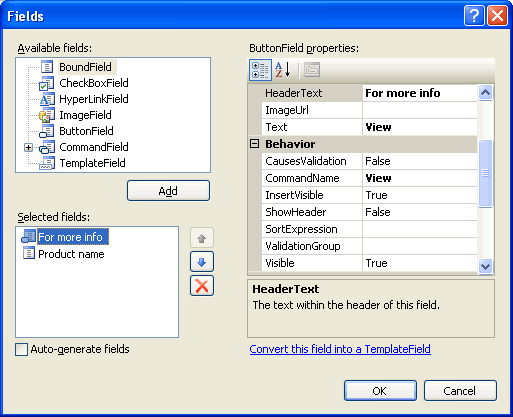
- Add a Button Field.
- Its Header Text should be "For more info".
- Its Text field should contain View.
- The CommandName field should also say View.
- See this screen shot to see what this looks like.
- This sets up a View button that the user can click on, though we will need to have click
handler code for it.
- Also add a Bound Field.
- Its HeaderText should be "Product name".
- Its DataField should contain Name, the actual field name for the software title
in our software table.
- See this screen shot to see what this looks like.
|
The Stored Procedure
- Create a new stored procedure as shown here:
|
CREATE PROCEDURE db_datareader.SelectProdSearch
(
    @Target varchar(50)
)
AS
    SET NOCOUNT ON
    SELECT DISTINCT Name FROM Software
WHERE (Name LIKE '%' + @Target + '%') OR (Description LIKE '%' + @Target + '%')
ORDER BY Name
    RETURN
|
- The main idea of this stored procedure is that it
selects the product name from any record of the Software table that matches
the search condition.
- What is the meaning of the search condition?
By using LIKE, it checks to see if the target string occurs
as a substring of the Name or Description fields.
- Note that some databases use the * symbol instead of % as the wildcard to indicate zero or more
characters.
- In
Name LIKE '%' + @Target + '%' we are specifying that the Name
should be any number of characters, followed by the target string that the user is looking for,
followed by any number of characters. The + is used to append the items on either side of it.
- We also order the results of this query in ascending order by the Name field.
- Save the stored procedure and then execute it.
Give it a reasonable value for the target name and see if it returns correct results.
- In Visual Studio do File, Save All.
Using Paging
- Click on your grid view on the SearchResults page and under Properties set AllowPaging to True.
This turns on the paging of data in the grid view.
- Also under Properties, set the page size to 4, so as to allow up to 4 entries per page.
Also set the PageButtonCount to 5, so as to allow up to 5 page buttons (links)
to get to pages of results.
Set the position of the page buttons to be at the bottom of the grid.
The default numbered page buttons should be fine.
- Save all of your files before proceeding further.
|
The SearchResults.aspx.vb Code-Behind File
- Adjust the Page_Load procedure so that it looks as follows:
|
Protected Sub Page_Load(ByVal sender As Object, ByVal e As System.EventArgs) Handles Me.Load
    Dim Substring As String
    Dim myDatabaseConnection As SqlClient.SqlConnection = Nothing
    Dim myCommand As SqlClient.SqlCommand = Nothing
    Dim resultsDataSet As DataSet = Nothing

    If Session.Count = 0 Then   ' No session items were supplied.
        SessionErrorLabel.Visible = True
    Else
        Try
            Substring = Session("TargetSubstring")
            If Substring = "" Then
                SessionErrorLabel.Visible = True
            Else
                Dim connectionString As String = _
                ConfigurationManager.ConnectionStrings("PartsConnectionString").ConnectionString
                myDatabaseConnection = New SqlClient.SqlConnection(connectionString)
                myCommand = New SqlClient.SqlCommand()

                'Set up to use a stored procedure:
                myCommand.CommandType = CommandType.StoredProcedure
                myCommand.Connection = myDatabaseConnection
                myCommand.CommandText = "SelectProdSearch"
                myCommand.Parameters.AddWithValue("@Target", Substring)

                'Use a DataAdapter to execute the stored procedure and
                'get the results into a dataset for display in the grid view:
                Dim adapter As New SqlClient.SqlDataAdapter(myCommand)
                resultsDataSet = New DataSet
                myDatabaseConnection.Open()
                adapter.Fill(resultsDataSet)

                If resultsDataSet.Tables.Item(0).Rows.Count > 0 Then
                    ResultsGridView.DataSource = resultsDataSet
                    ResultsGridView.DataBind()
                    ResultsGridView.Visible = True
                Else
                    NoDataLabel.Visible = True
                End If
                myDatabaseConnection.Close()
                myDatabaseConnection.Dispose()
            End If
        Catch exception As System.Data.SqlClient.SqlException
            DatabaseErrorLabel.Visible = True
        Catch exception As Exception
            ErrorLabel.Visible = True
        Finally    'Do cleanup tasks here:
            myCommand = Nothing
            resultsDataSet = Nothing

            If Not myDatabaseConnection Is Nothing AndAlso _
                myDatabaseConnection.State = ConnectionState.Open Then
                myDatabaseConnection.Close()
                myDatabaseConnection.Dispose()
            End If

            myDatabaseConnection = Nothing
        End Try
    End If
End Sub
|
- You should be able to follow this code by now as it is similar to what we have used before.
- Overall, we use our data adapter and stored procedure to query the database for the Name
of each product that matches our search condition. As long as we get data back, we place it
in our DataSet and fill the grid with it.
- We check
resultsDataSet.Tables.Item(0).Rows.Count
to see if the number of rows of data is 0. If so,
then an error label is displayed. Note that resultsDataSet.Tables
is a collection of the data tables in resultsDataSet.
Then Item(0) is used to pick out the
first (and only) data table. Rows gives the collection of rows from this data table.
- Save all of your files before going on.
- We need to add the following procedure to the code-behind file to handle paging in the grid view.
Essentially what happens is this: With paging turned on, everytime we go to view a page of data in our
grid view, we have to obtain the search results from the database (via our stored procedure). The data
for the current page is displayed in the grid view, but all the other data is discarded.
- Go ahead and make this addition:
|
Protected Sub ResultsGridView_PageIndexChanging(ByVal sender As Object, _
ByVal e As GridViewPageEventArgs) Handles ResultsGridView.PageIndexChanging
    Dim Substring As String
    Dim myDatabaseConnection As SqlClient.SqlConnection = Nothing
    Dim myCommand As SqlClient.SqlCommand = Nothing
    Dim resultsDataSet As DataSet = Nothing

    If Session.Count = 0 Then   ' No session items were supplied.
        SessionErrorLabel.Visible = True
    Else
        Try
            Substring = Session("TargetSubstring")
            If Substring = "" Then
                SessionErrorLabel.Visible = True
            Else
                Dim connectionString As String = _
                ConfigurationManager.ConnectionStrings("PartsConnectionString").ConnectionString
                myDatabaseConnection = New SqlClient.SqlConnection(connectionString)
                myCommand = New SqlClient.SqlCommand()

                'Set up to use a stored procedure:
                myCommand.CommandType = CommandType.StoredProcedure
                myCommand.Connection = myDatabaseConnection
                myCommand.CommandText = "SelectProdSearch"
                myCommand.Parameters.AddWithValue("@Target", Substring)

                'Use a DataAdapter to execute the stored procedure and
                'get the results into a dataset for display in the grid view:
                Dim adapter As New SqlClient.SqlDataAdapter(myCommand)
                resultsDataSet = New DataSet
                myDatabaseConnection.Open()
                adapter.Fill(resultsDataSet)

                If resultsDataSet.Tables.Item(0).Rows.Count > 0 Then
                    ResultsGridView.DataSource = resultsDataSet
                    ResultsGridView.PageIndex = e.NewPageIndex 'Change the page index!
                    ResultsGridView.DataBind()
                    ResultsGridView.Visible = True
                Else
                    NoDataLabel.Visible = True
                End If
                myDatabaseConnection.Close()
                myDatabaseConnection.Dispose()
            End If
        Catch exception As System.Data.SqlClient.SqlException
            DatabaseErrorLabel.Visible = True
        Catch exception As Exception
            ErrorLabel.Visible = True
        Finally    'Do cleanup tasks here:
            myCommand = Nothing
            resultsDataSet = Nothing

            If Not myDatabaseConnection Is Nothing AndAlso _
                myDatabaseConnection.State = ConnectionState.Open Then
                myDatabaseConnection.Close()
                myDatabaseConnection.Dispose()
            End If

            myDatabaseConnection = Nothing
        End Try
    End If
End Sub
|
- The above procedure is used whenever the user clicks on the numbered buttons at
the bottom of the grid view.
- The code is almost exactly the same as that of the Page_Load procedure.
- However, the line
ResultsGridView.PageIndex = e.NewPageIndex is what is different here.
This indicates what page index to use in the data grid. Because of this we see the proper
page of data.
- There is one more procedure that we need to add to this code-behind file. Add the following:
Protected Sub ResultsGridView_ItemCommand(ByVal Source As Object, _
    ByVal e As GridViewCommandEventArgs) Handles ResultsGridView.RowCommand

    If e.CommandName = "View" Then
        ' Find the index of the row where the user clicked the View button:
        Dim index As Integer = Convert.ToInt32(e.CommandArgument)
        ' Find the name of the software item in this row:
        Session.Add("ProductSelected", ResultsGridView.Rows(index).Cells(1).Text)
        Response.Redirect("Results.aspx")
    End If
End Sub
|
- This procedure is called when the user does something with an item in the grid view. In our
case this something is to click on one of the View buttons.
- The code checks to see that the CommandName is View (which it will be if the user clicked
on a button since we filled in "View" for the Command name for each button).
- As long as we have a match with "View", we add to the session state that the product select
is
ResultsGridView.Rows(index).Cells(1).Text.
As the comment says, index is the row
in the grid view where the user clicked the button. The Cells(1) picks out the
second cell in that row. (Remember that the counting starts at 0 and not 1.) We then
use Text to get the text for that cell. This text is the product name for the
product about which the user wants more information.
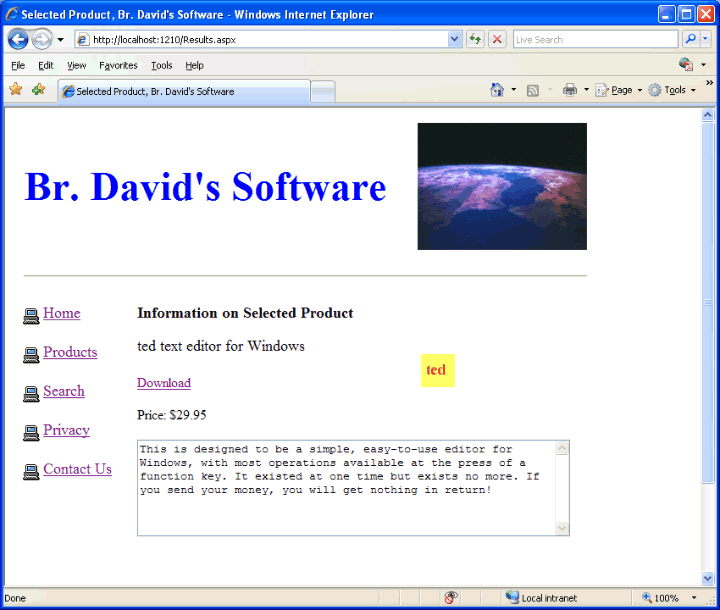
- Finally, the code redirects to the existing Results.aspx form, which we used to display the
details product information on a product selected from a drop-down list on the Products.aspx
page. We might as well re-use this Results.aspx page instead of creating a new one that does
essentially the same thing.
|
Testing Your Web Application
- Save all files and build your project.
- View your new web app locally by using Start Without Debugging
and check that all pages display correctly
and that the database-related code works on the products and results pages as well
as on the search and search results pages.
- On the search results page be sure to try out the navigation buttons at the bottom to see
that paging works correctly. Also check the View buttons to see that they
send you to the results page for detailed information on the selected product.
- Next, publish your web app to your web server
(in our case by publishing to a folder, say e2, on your W drive).
Have your web server administrator mark it as an IIS web app,
and then navigate to it by browser to see that all works OK.
- You now have a very useful search capability in your web app.
|
Back to the main page for ASP .NET Web Apps
|

 Search CIS Site
Tutorials
Search CIS Site
Tutorials