A Database/Web App with User Input
The Goals for this Example
It would be nice to add user input to our previous car parts web app.
Many web applications let the user supply input that is used to select what data to display.
Thus, we need to learn how to get this input and then use it to query an SQL Server database, and have
the results displayed on the web form.
Creating the Example
What the App Should Do
- Like the previous web app, this one will display auto parts data
on a web form for a fictitious store.
- However, this time the app has the user enter a minimum and maximum price for the range of
prices that the person wishes to have displayed. Thus this application displays selected
data items, instead of always giving all of the data.
- We will also have the web app validate the user input.
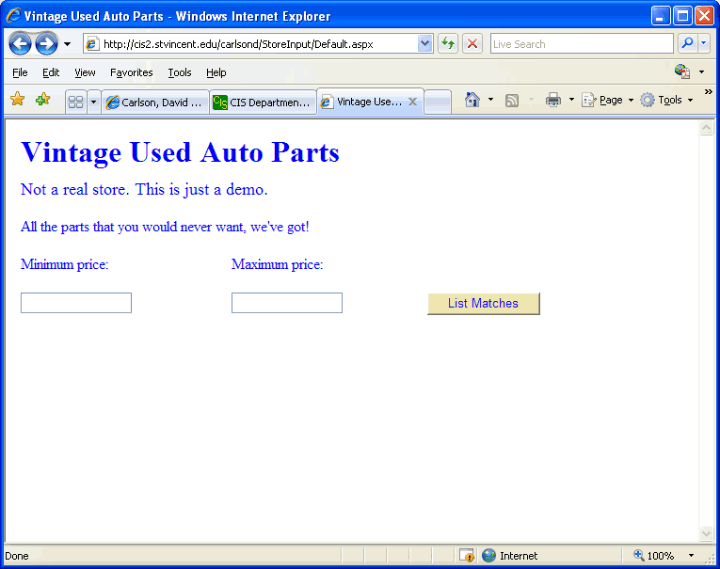
- The initial view of the application
shows a web page with a few labels and a button.
- Once the minimum and maximum price are supplied and the button is clicked, the web app shows the
desired auto parts data.
|
Starting the Web App
- Use MyComputer to copy the folder containing your previous web app.
Save the copy in a folder name StoreInput, in a convenient location (such as your M drive).
- If you wish, change the name of the web form, Default.aspx, to home.aspx.
- Save your work so far by using File, Save All.
|
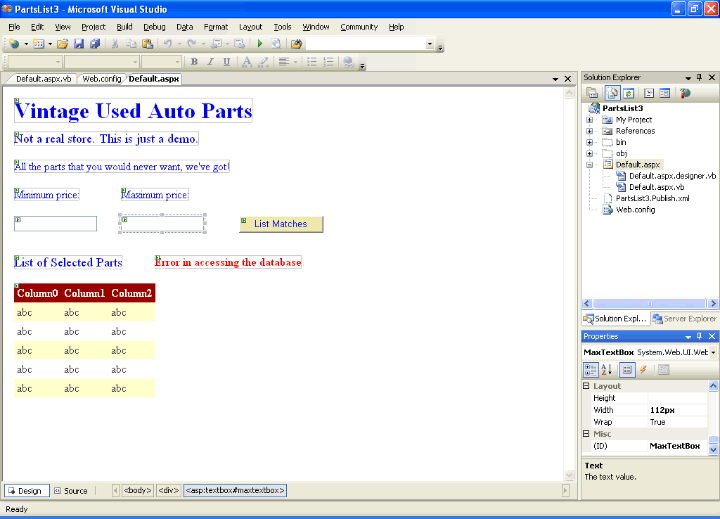
User Input
- First, we adjust the controls on this form so that they fit
this screen shot.
- Note that the label above the GridView has been adjusted to say "List of Selected Parts".
Check that its ID is PartsLabel and that its Visible property is set to False.
- The button now says "List Matches". Make sure that it's ID is MatchesButton.
- Add a text box, with ID MinTextBox, just below the label with text "Minimum price:".
- Copy this text box and label, placing the new ones to the right of the first ones.
Give the text box the ID MaxTextBox and use "Maximum price:" for the label's text.
- Whenever we have user input in a web app, it is very important to validate that input
and to do so at the server end. That's because anyone on the Internet can attack your
web app by supplying malicious input. If you don't verify that the input is reasonable,
an attacker might be able to supply input that gets data from your database that the
attacker should not see. Worse yet, the attacker might be able to change the data in your
database. Even in applications, such as guestbooks, where you want users to post data, you
need to validate the data to be sure that an attacker is not able to save some nasty script
to your database, a script that would get run for some other poor user who views what is in
the guestbook. (This is called a cross-site scripting attack.) Visual Studio says that it
provides automatic checks against these script attacks, but it is still best to explicitly
check to see that the data is reasonable yourself as new attacks are found all the time.
- Although checking user data at the client end (at the user's browser) is often done to assist
the user in filling in reasonable data, it is no good as a protection against an attacker.
That is because the attacker has complete control over his/her computer and can totally bypass
any JavaScript of similar code user to check the data at the browser. Thus we will use
validators, as we did in an earlier app,
since they always run on the server end (though they can in addition check at the client end
if the EnableClientScript property is set to True for each validator -- which they are by default).
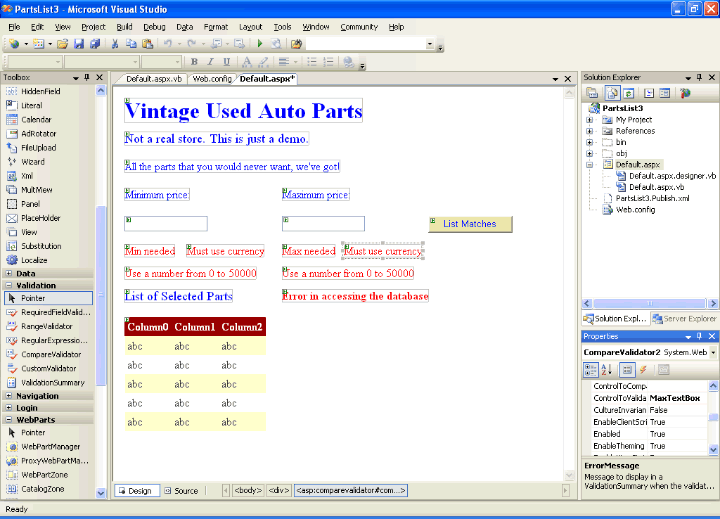
- We now add validators to our web form so that it looks like
this screen shot.
- From the Validation section of the Toolbox, drag a RequiredFieldValidator onto your form, just
below the text box for the minimum. Change the ErrorMessage field to "Min needed" and the
ControlToValidate to MinTextBox. We thus force the user to enter a minimum, even if it is only 0.
- Copy this validator and place it underneath the text box for the maximum. Change the
ErrorMessage to "Max needed" and the ControlToValidate to MaxTextBox.
- These RequiredFieldValidators probably work best if the user's browser has JavaScript enabled
when viewing your web app. That way they can quickly check at the client end and warn the user
if one of the fields is empty. If JavaScript is turned off, then the empty strings in these boxes
will be sent back to the server. The round-trip to the server and back slows down the display
of the validator error messages.
- Drag a RangeValidator onto your form just underneath the "MinNeeded" validator. Change the
ErrorMessage to "Use a number from 0 to 50000" and set the ControlToValidate to MinTextBox.
Set the MinimumValue to 0.0 and the MaximumValue to 50000.0 so as to define the acceptable
range of numbers. Set the Type field to Currency. (If you do not do this, the type will be
String. Since we want a range of numbers, not strings, you will get unexpected results
if you leave the Type field at String.) The user input will be converted (if possible)
into a currency value and then only values that fit the specified range will be accepted.
The range validator is our main way of filtering out malicious input in this application.
- Copy the last validator and drag the copy to just underneath the "MaxNeeded" validator.
Change the ControlToValidate to MaxTextBox but keep everything else the same.
- More is needed to do complete filtering of bad input as explained in this quote from the
Visual Studio help system: If the input control is empty, no validation functions are
called and validation succeeds. Use a RequiredFieldValidator control to prevent the user from
skipping an input control. Similarly, if the value of the input control cannot be converted to
the data type specified by the Type property, validation also succeeds. It is strongly
recommended that an additional CompareValidator control, with its Operator property set to
ValidationCompareOperator.DataTypeCheck, be used to verify the data type of the input value.
Thus, do the following:
- Drag a CompareValidator onto your form and place it near the MinTextBox.
- In this validator's properties, set the ControlToValidate (not the ControlToCompare)
field to MinTextBox.
- Change the ErrorMessage field to "Must use currency".
- In the Operator field select DataTypeCheck.
- In the Type field select Currency.
- Copy this CompareValidator, place it near MaxTextBox, and change the ControlToValidate
to MaxTextBox.
- It would be best to do a File, Save All at this point.
|
Security
- Since security was mentioned in the section above on user input, let's expand on some of
the security issues in web applications here.
- Many of the typical attacks directed against web apps involve malicious input (as mentioned above).
This could be a script, enclosed in script tags and entered into a text box, or perhaps it could
be an SQL command appended to expected input in a text box. (The former is a cross-site
scripting attack, while the latter would be an attempt at an SQL injection attack.)
- The usual solution to the above problems is to filter user input at the server.
- Here are some relevant quotes from the Visual Studio help system:
- By default, the Web Forms page automatically validates that malicious users
are not attempting to send script to your application. So, there is built-in
protection from the script attacks. However, one should still further filter
user input.
- Validation controls perform input checking in server code. When the user submits
a form to the server, the validation controls are invoked to review the user's input,
control by control.
- If the user is working with a browser that supports DHTML, the validation controls
can also perform validation using client script. This can substantially improve response
time in the page; errors are detected immediately and error messages are displayed as
soon as the user leaves the control containing the error. Check that
the EnableClientScript property on your validators is true if you want client-side
script to run (in addition to the server-side code for the validators).
- The page framework performs validation on the server even if the validation controls
have already performed it on the client, so that you can test for validity within your
server-based event handlers. In addition, it helps prevent users from being able to bypass
validation by disabling or changing the client script.
- Validation occurs after page initialization (that is, after view-state and postback
data have been processed) but before Change or Click event handlers are called.
You can perform the validation procedure earlier by calling the control's Validate method,
for example during page load.
- For further information on web app security, use Help, Search to look for the following topics
in Visual Studio:
- Scripting Exploits
- Protecting Against Script Exploits in a Web Application
- Overview of Web Application Security Threats
- Introduction to Web Application Security
- ASP.NET Web Application Security
- How ASP.NET Security Works
- Basic Security Practices for Web Applications
|
Getting Data from the Database
- The data will be looked up in the same Parts database that we used in the
previous web app.
- Check that the GridView has ID PartsGridView, is formatted as you wish, and has its
Visible property set to False. We will make it visible when we are ready to display
the data.
- Also check that the error label has an ID of ErrorLabel and is not visible.
- We need to make a new stored procedure. Begin by going to Server Explorer and expanding
the data connection used in the last couple of web apps.
If you cannot find this data connection, make a new one as in
this old web app.
- Right click on Stored Procedures under this data connection.
Select Add New Stored Procedure.
- This will give you an outline of a stored procedure. This time, do not delete
the parameters.
- Change the parameters section so that it reads as follows:
|
(
@Min money,
@Max money
)
|
- Note that type money is the SQL Server equivalent of currency in VB .NET
and that the @ sign is used to indicate a parameter to a stored procedure.
- We do not use the term OUTPUT on either parameter, so these parameters are input parameters.
That is, they are used to send data into the stored procedure. In particular, we plan to send
in the minimum price and maximum price that the user supplies when running our web app.
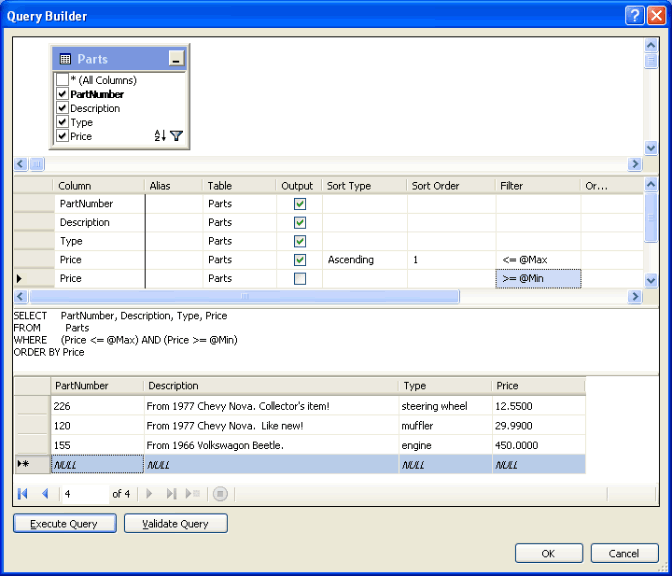
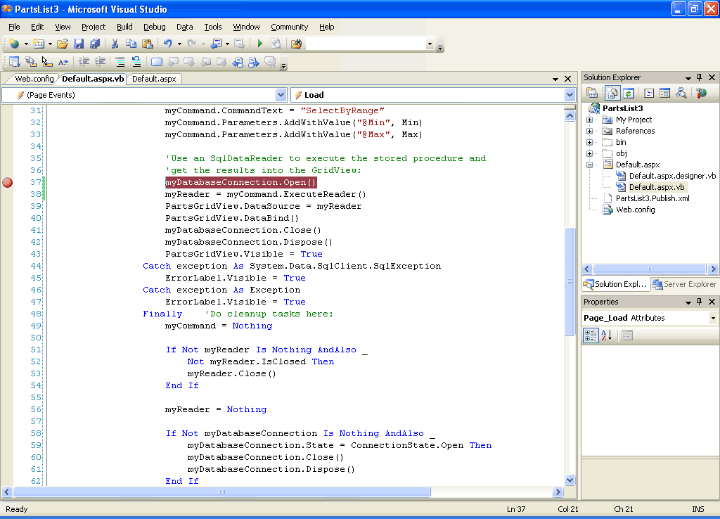
- Place the mouse at the start of the line that says RETURN. Press Enter to get some room to add code.
Right click at this spot and select Add SQL. This will bring up a query builder where
you can create the SQL that should get compiled into your stored procedure.
- Add the Parts table to the query builder.
- Check each of the 4 fields so that they will be selected by the SQL.
- Also click in the Sort Type column for the row (field) named Price. In the drop-down
choose Ascending so that the data will be presented in ascending order by Price.
- In this same row, the one for Price, find the entry for the Filter column and click there.
Type in
<=@Max. This is used to say that we only want to select those rows
of the Parts table with price less or equal to this maximum value.
- The next row should be empty. Click in the first location, the one for the column labelled Column.
Use the pull-down to select Price. This gives a second row for Price.
- Do NOT check the entry in the Output column for this row. Doing so would cause the price to be
display a second time. However, do click in the entry for this row and column Filter. Type in
>=@Min. Now our query is designed to retrieve those rows of the table that have
a price greater than the minimum value and at the same time less than the maximum.
- Click on Execute Query to test the SQL. You will be asked to supply numbers for @Max and @Min.
The resulting data set will be shown
at the bottom of the window.
- Click OK. Change the name StoredProcedure1 to SelectByRange.
- Make sure that the code now reads as in the following listing. If not, edit it manually
to make it match this. Be very sure that the RETURN is the last line of code.
If you do RETURN earlier on, the last part of the stored procedure will never be executed.
|
CREATE PROCEDURE db_datareader.SelectByRange
    (
    @Min money,
    @Max money
    )
AS
    SET NOCOUNT ON
    SELECT     PartNumber, Description, Type, Price
    FROM         Parts
    WHERE     (Price <= @Max) AND (Price >= @Min)
    ORDER BY Price
    RETURN
|
- Now try out your stored procedure:
- This stored procedure should now show up under Stored Procedures
for this data connection in Server Explorer. Right click it and select Execute.
You will be asked to supply values for the minimum and maximum price.
Using reasonable numbers will show you the
data returned by the stored procedure.
- To be more accurate, the code that we wrote above is the code to create a stored procedure that
contains the desired SQL. After you execute it once, note that the word CREATE changes to the
word ALTER. That allows you to adjust the SQL, select Execute again, and get the SelectByRange
stored procedure altered.
- Do File, Save All in Visual Studio before going on.
|
The Code-Behind File
- In Solution Explorer double click on your form's aspx.vb file,
the "code-behind" file for your web form,
to bring it up in the editor. This is where we add the VB code for your web page.
- We will not add a click handler for the button on your form. Instead,
we will again use the fact that a postback happens whenever the user click on the button.
- Thus, we just write code to handle the postback in the Page_Load procedure.
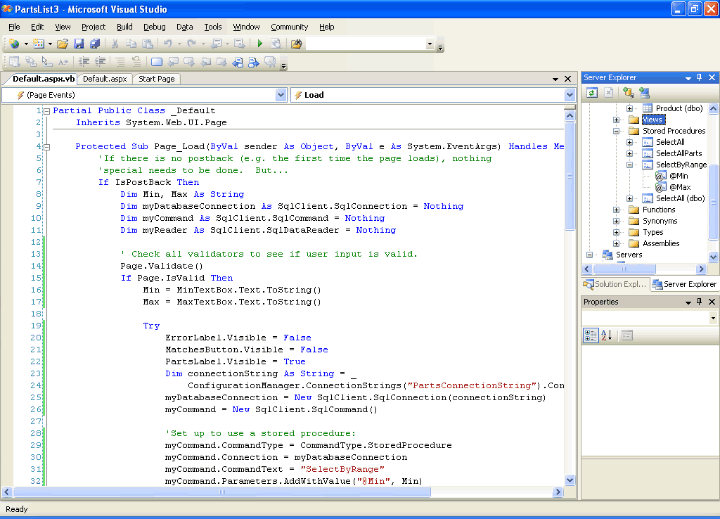
- Make your Page_Load procedure match the following:
|
Protected Sub Page_Load(ByVal sender As Object, ByVal e As System.EventArgs) Handles Me.Load
    'If there is no postback (e.g. the first time the page loads), nothing
    'special needs to be done.  But...
    If IsPostBack Then
        Dim Min, Max As String
        Dim myDatabaseConnection As SqlClient.SqlConnection = Nothing
        Dim myCommand As SqlClient.SqlCommand = Nothing
        Dim myReader As SqlClient.SqlDataReader = Nothing

        ' Check all validators to see if user input is valid.
        Page.Validate()
        If Page.IsValid Then
            Min = MinTextBox.Text.ToString()
            Max = MaxTextBox.Text.ToString()

            Try
                ErrorLabel.Visible = False
                MatchesButton.Visible = False
                PartsLabel.Visible = True
                Dim connectionString As String = _
                    ConfigurationManager.ConnectionStrings("PartsConnectionString").ConnectionString
                myDatabaseConnection = New SqlClient.SqlConnection(connectionString)
                myCommand = New SqlClient.SqlCommand()

                'Set up to use a stored procedure:
                myCommand.CommandType = CommandType.StoredProcedure
                myCommand.Connection = myDatabaseConnection
                myCommand.CommandText = "SelectByRange"
                myCommand.Parameters.AddWithValue("@Min", Min)
                myCommand.Parameters.AddWithValue("@Max", Max)

                'Use an SqlDataReader to execute the stored procedure and
                'get the results into the GridView:
                myDatabaseConnection.Open()
                myReader = myCommand.ExecuteReader()
                PartsGridView.DataSource = myReader
                PartsGridView.DataBind()
                myDatabaseConnection.Close()
                myDatabaseConnection.Dispose()
                PartsGridView.Visible = True
            Catch exception As System.Data.SqlClient.SqlException
                ErrorLabel.Visible = True
            Catch exception As Exception
                ErrorLabel.Visible = True
            Finally    'Do cleanup tasks here:
                myCommand = Nothing

                If Not myReader Is Nothing AndAlso _
                    Not myReader.IsClosed Then
                    myReader.Close()
                End If

                myReader = Nothing

                If Not myDatabaseConnection Is Nothing AndAlso _
                    myDatabaseConnection.State = ConnectionState.Open Then
                    myDatabaseConnection.Close()
                    myDatabaseConnection.Dispose()
                End If

                myDatabaseConnection = Nothing
            End Try
        End If
    End If
End Sub
|
- Next, let's talk our way through the code.
- The Dim section sets up 2 local string variables Min and Max,
as well as empty SqlConnection, SqlCommand, and SqlDataReader objects.
- We use Page.Validate() to cause all of the validators on
this page to run (at the server end). This is in addition to any validation already done
at the client end. The explicit call to Validate() is needed because the validators normally
only run at the server after Page_Load has been executed and before any click handlers are run.
We want to validate the user input here before we try to use it as parameters in a query
of the database. If Page.IsValid is True, we go on to process the user input. If not, we
do nothing, since whatever validator(s) found a problem with user input will display their
error message(s) on the page.
- Assuming that the user input validated fine, we want to read the desired data
from the database and display it in the data grid on the web form.
- Since this web app has user input, we get that user data out of the text boxes
and into the variables Min and Max. The code just uses the Text property of each box
and then converts the number to a string by using the ToString function.
- As in the previous web app, a
try..catch construct is used
when accessing the database so that we can catch an exception if one occurs.
- Inside this construct we first adjust the visibility of items on the form so that
the button and error label cannot be seen, but the PartsLabel can.
- Next, we set up the connection string and a new database connection object
based on that string. If your connection string in the web.config file is not named
PartsConnectionString, then change the VB code to use whatever name it has in web.config.
- Then we create a new SqlCommand object to hold the information about the stored procedure
that we wish to run.
- Its CommandType is set to StoredProcedure, it uses the connection object we just created,
and CommandText holds the name of the particular stored procedure we wish to use.
- However, since this stored procedure requires 2 input parameters, we also need to supply
those in the SqlCommand object. You can see how AddWithValue is used to give the value of
the variable Max to the parameter @Max. Similarly, the value of Min is given to the
@Min parameter.
- Unlike in the previous web app, we will not use a DataAdapter to read the data (sent back
from the stored procedure) into a DataSet. This DataSet would be an in-memory copy
of the returned data and could, in many applications, be rather large. Thus a DataSet
could waste a lot of space and give slower than necessary access to data.
- The preferred method of getting at the data is to use a DataReader.
The reader can read through the data one item at a time, without necessarily saving it
all in memory at once.
Recall that we set up an empty DataReader object named myReader in the Dim section.
- Thus we open the database connection and call ExecuteReader on our SqlConnection object.
- We then use myReader as the data source for our GridView and bind the data to the GridView.
- We are now finished with the database connection and so close it right away.
In addition, we displose of the connection object and make the GridView visible on the form.
- If an SqlException occurs, we make the error label visible
in order to warn the user. This is the most likely exception and typically occurs
when the connection to the database cannot be opened for some reason.
- If there is no SqlException, we also catch any other kind of exception
(since type Exception matches any type of exception)
and make the error label visible in this case as well. It seems unlikely that any exception
but an SqlException would occur in this code, but we have included the extra Catch just in case.
Of course, since we check for type Exception, we could remove the Catch for SqlException.
However, we leave it here in case we might want to have different code executed for
the different types of exceptions. For the SqlException we could display an error message
saying that there was a database error, whereas for any other exception we could display
a more generic message saying just that there was some kind of error.
- The cleanup code is put in the Finally section of the
try..catch construct.
This is similar to what was used in the last web app. The new part is the section that
makes sure that the DataReader is closed and that it is an empty object.
- Note that the code is essentially the same as the
code in the previous web application,
except that we now have to deal with the parameters for the stored procedure
and we have a little more cleanup to do in the Finally section.
|
Build Your App
- Save all of your files in Visual Studio.
- Then build your application.
- If the build succeeded, run your application locally by using Debug, Start Without Debugging.
- If not, fix any problems.
|
Testing and Debugging The App
Finding Errors
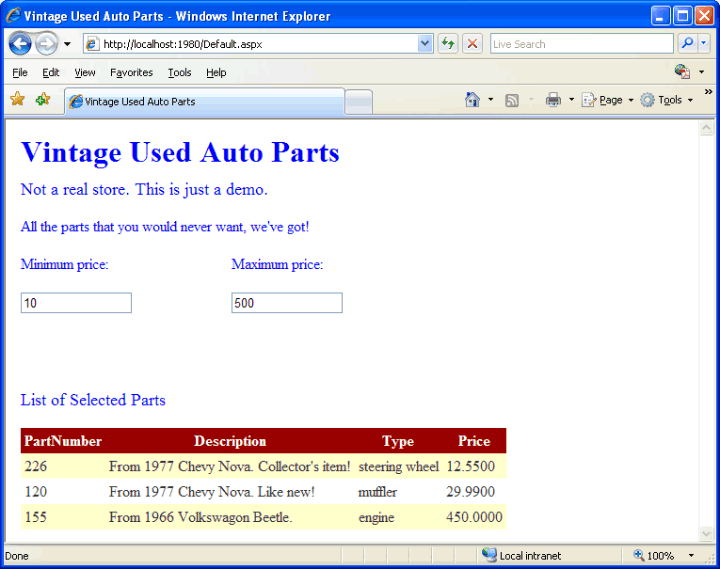
- Fill in reasonable minimum and maximum values (such as 10 and 500) and click on the
List Matches button to see what you get. Here is a
picture of the expected results.
- If it does not work, you might need to set the Web.config file so that you can see
any error messages, as we have done in previous web apps.
Double click the Web.config file in Solution Explorer and add the line
<customErrors mode="Off" />
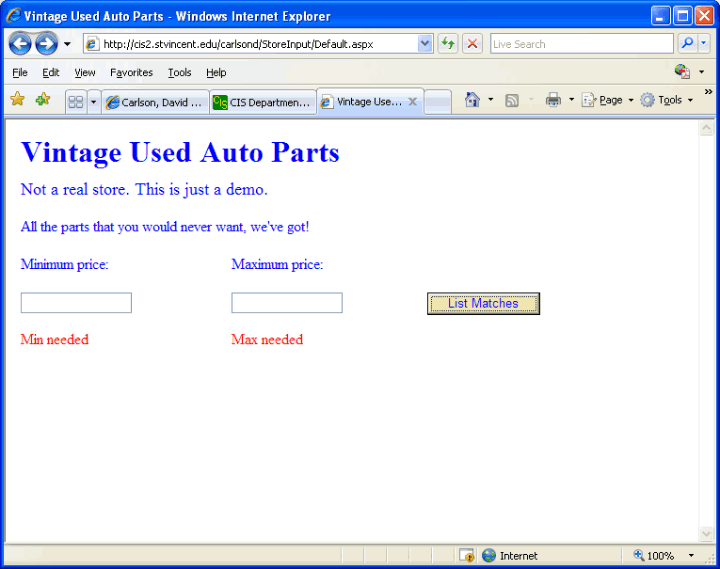
- It would be best to test what your web app does with bad data:
- Try clicking on the button without putting anything into the 2 text boxes.
The required field validators should then show
their error messages.
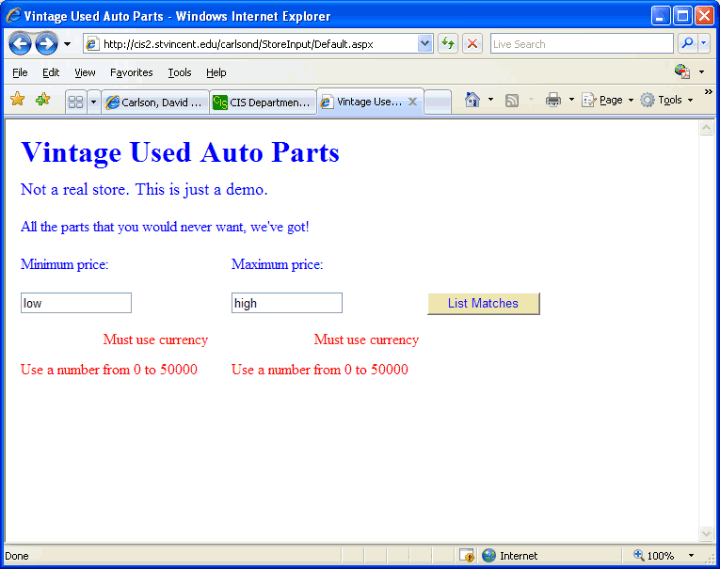
- Try putting bad data such as a string into one of the text boxes.
The other validators should handle this case.
- Also try a number bigger than the largest we allowed, which was 50,000.
The range validators should catch this.
- Now, since our validators have the EnableClientScript property set to True, the above
bad input is caught by JavaScript running in the user's browser. If you want to check
that these errors also get caught, if need be, on the server end
(which is important for security), you would need to
temporarily disable JavaScript in your browser. If you then give bad input like above,
you should see that the error messages only show after you click on the button (so that
the data gets sent to the server) and that the messages show up more slowly due to
the round trip to the server and back.
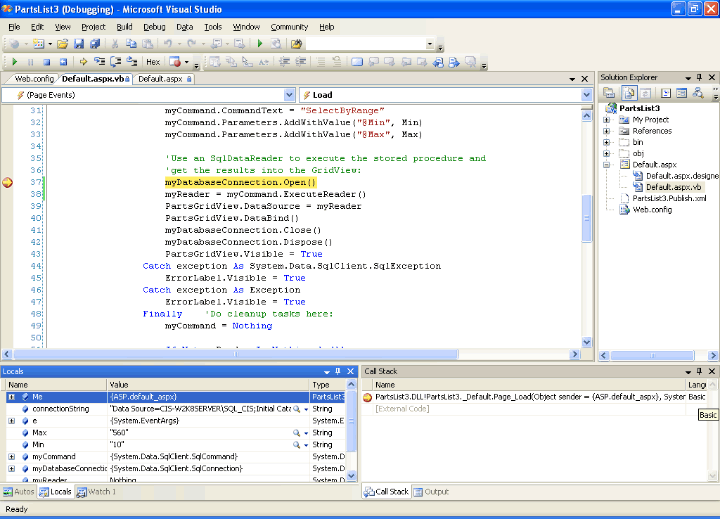
- You might want to use the Debugger. Here are the basics of using it:
- Find a reasonable spot to set a breakpoint. For example, in the above VB code,
you could click on the line that opens the database connection. Then use Debug,
Toggle Breakpoint to set a breakpoint there.
You can set several breakpoints if you wish.
- Use Debug, Start Debugging to start running your web app locally with the debugger.
- Then use Debug, Windows to see what windows of information are available to you.
Some of the most useful ones include Locals, Autos, Call Stack, and Watch.
Perhaps turn all of these on to see what you get. Note that when you create a new
watch window, it lets you enter the names of the variables that you wish to examine.
- In the current web app, you would next have to supply the minimum and maximum price
and click on the List Matches button in
the browser window that Start Debugging started up.
- The application will then run, if possible, to the first breakpoint.
You can then examine the values of the variables in the various
Debug windows and check the call stack to see what called what.
- Use Debug, Step Over to have the debugger move to the next instruction. If you want
to follow a procedure call into the procedure code, use Debug, Step Into. There is also
a Step Out to get out of a procedure and a Continue to run to the next breakpoint (or the
end of the program). There are also buttons on the toolbar for each of these operations.
- You can always abort running the debugger with Debug, Stop Debugging.
- When finished with debugging, undo the customErrors change to Web.config, if you used this,
save everything, and rebuild your app. This will leave your app in a more secure state. If a runtime
error crops up later, you don't want everyone on the Internet to be able to read the
detailed error messages.
- If desired, publish your web app to a live web server and then
try that version in a browser.
Remember that the web server administrator needs to convert your published app into an official
IIS web app for it to work. Then you will get results like this.
|
|

 Search CIS Site
Tutorials
Search CIS Site
Tutorials