A Web App with Text Boxes and Buttons
The Goals for this Example
One goal is to see how to use buttons and text boxes in a web app. Another is to construct a web
app that does some easy calculations.
Creating the Example
Since this example builds upon our previous simple web app for
Pizza Paradise, you can copy the previous project in My Computer, just add on to the previous project, or
create the old project all over again.
Copying a Web Project
- Find your project folder in My Computer. For example, it may be somewhere on your M drive.
- In My Computer, copy the project folder and do a paste. Rename the folder to whatever you wish.
- Open the copied Pizza Paradise project in Visual Studio 2005 by using File, Open Project.
- To be sure that this cloned project is OK, use Build, Build to compile the project
and then run it locally with Debug, Start Without Debugging.
|
Minor Adjustments
- If necessary, use View, Properties Window and View, Solution Explorer so that these 2 items
are available.
- In Solution Explorer make sure that all files are shown. (Click on the "Show All Files" button
until you get this.)
- If the web form isn't on the screen, open it by double clicking Pizza.aspx (or whatever you
named your web form file) in Solution Explorer.
- Be sure that this web form is open in Design View, not Source view. (See the tabs at the bottom
of the window.)
- Change the title if you wish, either with Properties in Design View or with Source view.
- We would like to move the pizza image to the upper right corner of the form.
However, this probably won't work with the default project configuration,
which is likely to be No Positioning.
- Click on Layout, Position, Auto-position Options.
- In the resulting window, expand HTML Designer if necessary and click on CSS Positioning.
- Check the "Change positioning..." checkbox at the top of the window.
- In the pulldown, select Absolutely Positioned. This should allow you to drag controls around
on the form and put them exactly where you want them to show up later in a browser.
It also allows you to use Format, Align to line up items on the form.
- Some authors say to avoid absolute positioning as it can sometimes give overlapping controls
in the browser window. In this author's experience, it is the other positioning options which
do this, while absolute positioning behaves well. Feel free to experiment to see what works
for you. You can also use Help, Search to look up more information about relative positioning,
absolute positioning, etc.
- Resize the image control if need be so that it fits reasonably.
This is done by clicking on the image and then grabbing with the mouse one of the resizing handles
(found at the corners and sides of the image) and then moving it.
- We want the image to be to the right of the first 2 labels on the form.
- Close the Output window if it is open, and then move the Disclaimer label to the bottom
of the form.
- If need be, use View, Toolbox so that you can use the Toolbox. (If your Toolbox is minimized to a
tab docked on the side, you can probably just mouse over the tab to get the Toolbox to display.
Note that you can click on the pushpin in the corner of the Toolbox to toggle it between minimized
view and "always open" view.)
- Drag a label from the Standard section of the Toolbox and place the label below the
first 2 labels on the form.
- Use Properties to adjust the text of this label to "Calculate the total cost of your order:", change
the color to blue, and use a large font.
|
Adding Labels, Text Boxes, and Buttons
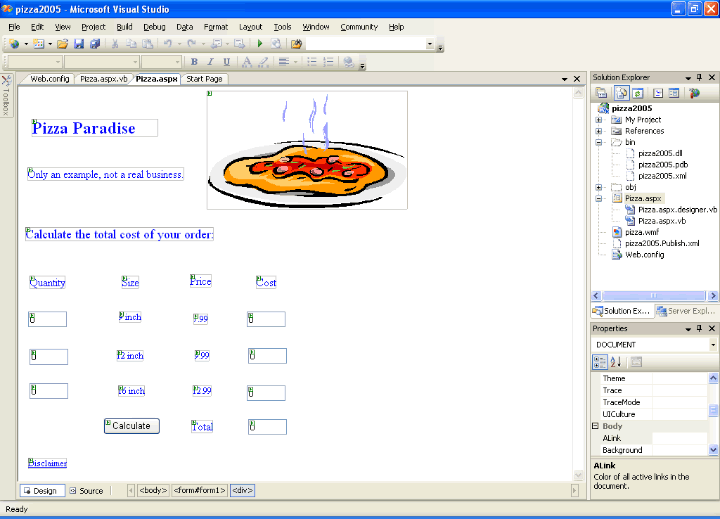
- Start by viewing an image of the running app we intend to create, showing
the labels, text boxes, and a button that we wish to add to the form.
It might also help to look at this this screen shot of the completed
web form in Visual Studio.
- Then add the labels, with the text and blue color as shown. Note that the Total
and those in the first new row have medium font size, while those in-between have small font size.
- Hint: once you have created one label, you can right click on it, select copy, right click on the
form, and select paste in order to make a copy of the label. You can then adjust the properties,
position, etc. for the new label. This is especially useful if a number of properties (such as color)
are to remain the same.
- For each text box needed, drag a text box from the Standard
section of the Toolbox to your web form.
- Resize the text boxes as desired.
- You can align a group of labels, text boxes, etc. by CTRL-clicking them with
the mouse and then using Format, Align. Then choose the type of alignment that you want.
For example, with the 4 large labels in the first new row, you might select all 4 with CTRL-click
and then use Format, Align, Middles.
- Under Properties, change the IDs of the three text boxes below the Quantity label to
Quantity9TextBox, Quantity12TextBox, and Quantity16TextBox. This makes it easier to tell
what text box refers to what data, especially when we write some code later to calculate
the cost of a pizza order based on the quantities that the user places in these boxes.
- Similarly, change the IDs of the text boxes under the Cost label to
Cost9TextBox, Cost12TextBox, Cost16TextBox, and TotalTextBox.
- Since it makes no sense to have the user change a value in any of these last 4 text boxes,
change the ReadOnly property of each to true.
- Make the text field for each text box to be 0 since 0 makes sense as the default value.
- Drag a button from the Standard section of the Toolbox to your form, change its ID to
CalculateButton, and its text to "Calculate".
- Save your work so far by using File, Save All.
|
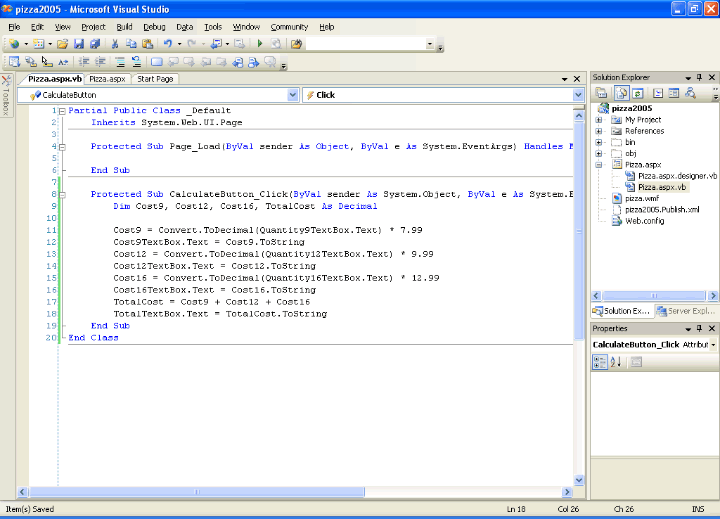
Adding Click Handler Code
- Double click the Calculate button on your form. This will take you to an editor where
you can add the code that should be executed when a user clicks on the Calculate button.
- Note that the name of the sub procedure for your code will be CalculateButton_Click
and that this will be located in a file named Pizza.aspx.vb. (A sub procedure is essentially
a function that returns nothing in the function name.)
- Add your code so that the procedure looks exactly like the following:
|
Private Sub CalculateButton_Click(ByVal sender As System.Object, _
    ByVal e As System.EventArgs) Handles CalculateButton.Click

    Dim Cost9, Cost12, Cost16, TotalCost As Decimal
    Cost9 = Convert.ToDecimal(Quantity9TextBox.Text) * 7.99
    Cost9TextBox.Text = Cost9.ToString
    Cost12 = Convert.ToDecimal(Quantity12TextBox.Text) * 9.99
    Cost12TextBox.Text = Cost12.ToString
    Cost16 = Convert.ToDecimal(Quantity16TextBox.Text) * 12.99
    Cost16TextBox.Text = Cost16.ToString
    TotalCost = Cost9 + Cost12 + Cost16
    TotalTextBox.Text = TotalCost.ToString
End Sub
|
- Look at this picture of the editor to see this code in
the Visual Studio editor.
- Note that the
Dim line declares some variables that are local to this procedure.
Quantity9TextBox.Text is the notation for looking up the value that the user
placed in this particular text box.- The
Convert.ToDecimal function is used to change this string value into a decimal.
- The
* 7.99, of course, multiplies by the unit price of 7.99.
- It would, of course, be better to set up constants for the unit price values, but we do not
go into those details here. (If you are interested, look up how to use const
to declare a constant.)
- The
ToString function is used to convert the decimal cost value into a string.
- The
Cost9TextBox.Text = statement is used to place the resulting string into the
indicated text box.
|
Build Your App
- Click on the Save All button in Visual Studio or use File, Save All.
- Then use Build, Build Pizza (or whatever you named your application).
- If the build succeeded, the Output window will give you a message to that effect.
- If not, take a look to see if you can tell what went wrong.
- You can close the Output window to get it out of your way.
|
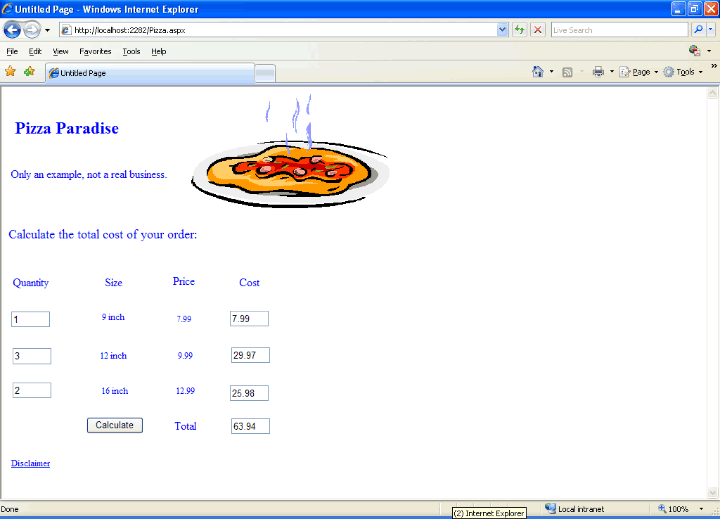
Testing and Debugging The App
- Use Debug, Start Without Debugging to see your web app running on your local machine.
- Put some numbers in the text boxes and click that Calculate button to see if your app
produces the desired costs and total cost for a pizza order.
The results should be something like that shown in
this picture of the running app.
- If the app does not produce the desired results, check your code and the IDs for the text boxes
carefully to see that they match what was given above.
- If need be, you can use the Visual Studio debugger.
- Begin by looking at the code in the Pizza.aspx.vb file. You can do this by double clicking
the file in Solution Explorer.
- Double click the left gray margin, the one nearest your code, to set a breakpoint. This
will show as a red circle. You can set more than one of these if you like. If you get one
in the wrong spot, click on the circle to remove it.
- Use Debug, Start Debugging.
- Your web app will start locally.
- In the resulting browser window, fill in some quantities and click the Calculate button.
- The web app will run to where you set the first breakpoint.
- Note that an Autos window will show automatically the values of the
most relevant data items in this section of the code.
- Use Debug, Step Over to execute the current line of code (the one at the breakpoint) and
then pause.
- You can then examine the values in the Autos window to see if they are correct.
- Continue to use Debug, Step Over until you hit the next breakpoint or reach the end of
the code.
- Once the end of the code is reached, the browser will display the answers in the web app.
- Use Debug, Stop Debugging to turn off the debugging session.
|
Publishing The Web App
- Once the app is working, use Build, Publish.
Choose to publish All Project Files to be sure that the image gets
included. In CS 305 at Saint Vincent College,
you can publish to your W drive, which is your web folder on the cis2.stvincent.edu server.
Click on the Create Folder button to make a new folder to hold your web app.
Use a name such as Calculate for the folder.
- Try looking at your web app by going to the appropriate URL for the above web page.
For the example described above, the correct URL would be
http://cis2.stvincent.edu/studentj/Calculate/Pizza.aspx, where we assume that your
username (and hence your web folder) on cis2.stvincent.edu is studentj
and that your form is named Pizza.aspx.
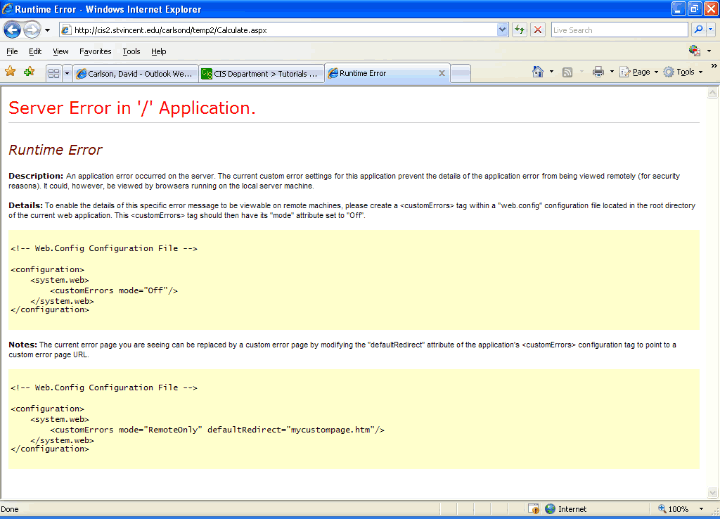
- Viewing your web app on the live web server probably will not work. Do you remember why?
- What you probably get is a runtime error showing up in your browser along with a note on how
to modify your project's web.config file so as to see a more detailed error message.
- Here is a screen shot showing the error in the browser.
- You should set custom errors to Off by using the following within your web.config file:
|
<configuration>
    <system.web>
        <customErrors mode="Off"/>
    </system.web>
</configuration>
|
- Make this change, making sure that the change is not in a commented-off area
of the web.config file.
- Build your project.
- Publish it to the same location on your web server.
- Once again, you will probably get an error. The likely message is:
|
Parser Error Message: It is an error to use a section registered as allowDefinition='MachineToApplication'
beyond application level.  This error can be caused by a virtual directory not being configured as an
application in IIS.
|
- The message tells you what is needed.
We forgot to ask the web server administrator to convert the project to an IIS web app.
- Once you do this, the app should run fine in a browser.
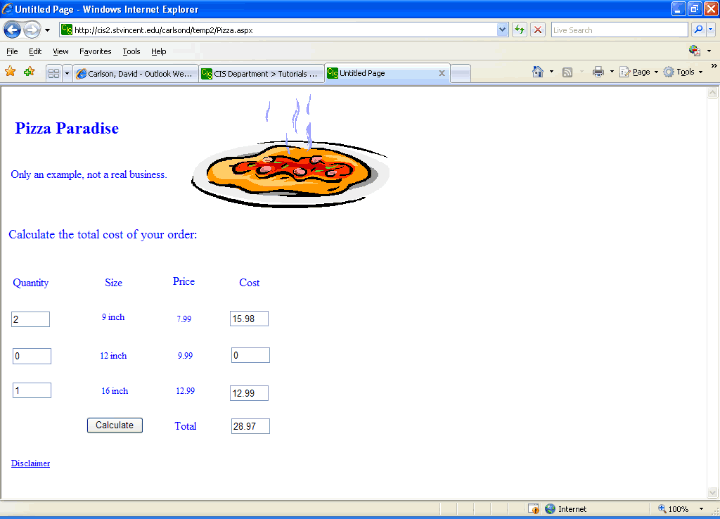
- Here is a screen shot of the completed web app
running on a real web server.
- It would be best to undo your changes to web.config, build your project, and publish it to
the same spot. This is in case some runtime error crops up in your web app later. You probably
don't want everyone on the Internet to be able to read these error messages. So, it is better
in terms of security not to let this information out, at least not for very long.
|
|

 Search CIS Site
Tutorials
Search CIS Site
Tutorials